


About
Silk Screening Tutorial
This online demonstration will show you one method of silk screening onto silk. This method is used to screen print gutta resist onto the silk to prepare it for painting. This way it is faster and easier to reproduce multiple original wall hangings or scarves.
In this demonstration I print on the resist and then let it dry before painting in the color with acid dyes. You may do it this way using resist or you can also print using pigments that are designed for screen printing. You can color or dye the silk beforehand if you like so that you have a colored background on which to print.
I use the Drawing Fluid/Screen Filler method here. With this method you don't need any light tables to expose your screen as in the Photo Emulsion method. It's more direct and needs less studio equipment.
-
 Crip Couture favorited Silk Screening
18 Nov 06:52
Crip Couture favorited Silk Screening
18 Nov 06:52
-
 bettyblazed favorited Silk Screening
13 Oct 10:24
bettyblazed favorited Silk Screening
13 Oct 10:24
-
 Bofoofer favorited Silk Screening
30 Jul 13:15
Bofoofer favorited Silk Screening
30 Jul 13:15
-
 GothicYolita favorited Silk Screening
21 Jun 14:55
GothicYolita favorited Silk Screening
21 Jun 14:55
You Will Need
-
 Step 1
Make a black and white line drawing onto paper. You will trace this picture onto the screen so make sure it's nice and bold!
-
 Step 2
Take a screen that is a few inches bigger all around so that your image fits inside with lots of border around it. You will need this border for the ink to rest on later.
Place it over your drawing with a little space between the screen and the paper. I use little plastic bottle caps on each corner to elevate it so the drawing fluid doesn't stick to the paper. You can use anything as long as they are all the same size and keep the screen horizontal. The screen should be about 110 size mesh. Contact your supplier and he'll know what to get you.
-
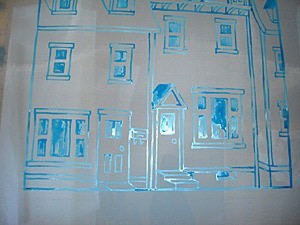
 Step 3
Then trace the image onto the screen with a fine brush with the drawing fluid. I use the Speedball brand here. The drawing fluid and the screen filler are a pair that have to be compatible so get both in the same brand just to be safe.
-
 Step 4
The screen should look like this when you are finished drawing on it. Let the fluid dry completely. It has a shiny smooth texture to it.
-
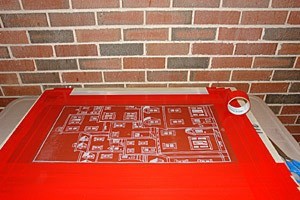
 Step 5
So now you are ready to apply the Screen Filler. In the photo below I show where I have poured out the filler onto the top part of the screen. Make sure that you tape it underneath there to avoid the filler going right through the screen. It is surprisingly runny and I find that keeping it in the fridge helps thicken it a bit so it's easier to apply. Then you take your squeegee and spread the filler evenly as you can over your drawing. Try to do this only ONCE! If you re-apply you risk the chance of the drawing fluid coming off where you don't want it to. You have one chance and if you don't get it then you can work with it and fix it later or just re-do the whole thing.
-
 Step 6
So now you have to let the filler dry completely. This may take a day or a few hours depending on the humidity level in your house. Don't use a hairdryer or anything to speed it up as it might damage the screen. A fan is good or just a warmly heated room will speed up the drying time nicely.
After it is completely dry you need to wash the screen under cold running water. A hose works fine or a shower head does okay too. The more pressure the better but not too much as you might loosen some of the filler. Cold water is definitely better too. The drawing fluid should wash off easily and you can use a brush or rough spongey thing to help you get all the blue stuff off. You should be able to see through the parts where the blue stuff was now. In this photo I have it leaning up against my patio door window so you can see it clearly. Check to see if there are any open screen parts that you didn't mean to leave open. You can fill those with nail polish or paint on some filler with a brush or put some tape there.
-
 Step 7
As you can see there is a big white space all around my drawing. You need to fill that with screen tape. You can use duct tape too or packing tape but the screen tape will last longer and is more water resistant. It's actually called "screen printing tape" and your supplier will know what it is.
Tape on the underside of the screen: the flat side, not the side where you will be putting the ink. If you put the tape on the wrong side then it might catch in the squeegee and cause trouble.
-
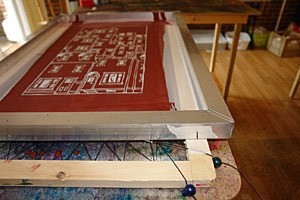
 Step 8
Now you need to prepare your fabric for printing. I use silk and stretch it on a frame like the photo below but you can use whatever you want. It does need to be stabilized somehow though. You can staple gun it to the table or use pins or duct tape or whatever works for you. The table should be a bit cushioned under the fabric so that there will be good contact between the fabric and the screen. Make sure that the fabric is stable enough so it doesn't stick to your screen when you lift it up after printing.
-
 Step 9
Also in this step I make my registration marks so that I can align the image with the fabric. This is very important with wall hangings because you want them to hang straight without folds or wrinkles. Depending on what you are making you will need to line it up somehow and there are many ways to do that.
-
 Step 10
Now it's time for printing! Pour a good amount of ink or pigment or whatever you are using. The consistency should be quite thick so as not to pass too quickly through the screen and run all over the place. Use the same amount as you used for the filler and spread evenly with the squeegee. You might have to make a couple of passes depending on how thick the ink is and how wide your mesh is. Try a couple of test ones to get the hang of it. Stack or hang them to dry and you're done!
-
 Step 11
Here is the silk screened result in black and white.
-
 Step 12
Here is the finished product with color added.


Comments

 1
Home Accessories »
Diy Jewelry Box
1
Home Accessories »
Diy Jewelry Box

