


About
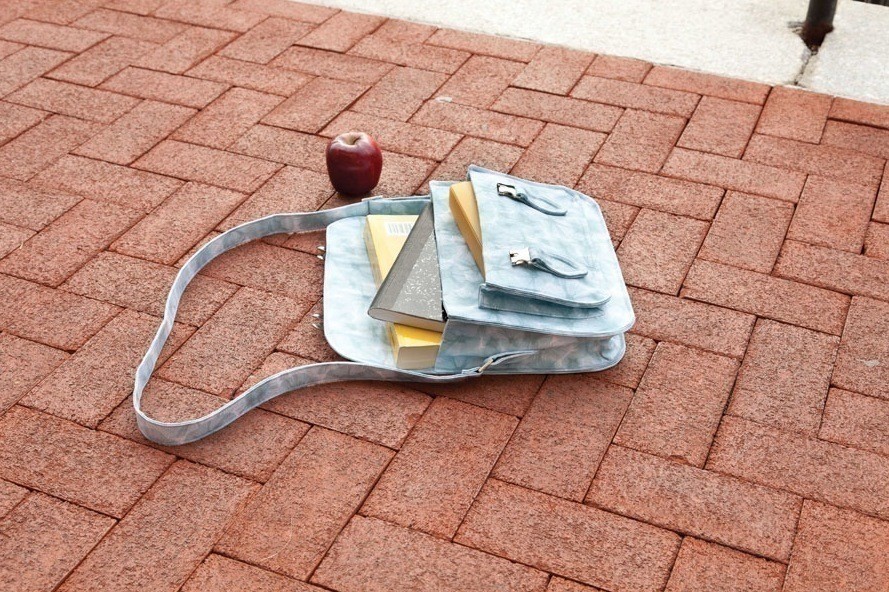
The ‘Too Cool for School’ Satchel
I love this satchel! The design is based on the traditional leather satchels used by English schoolchildren and professors alike. There is something so romantic about old-fashioned school uniform with cute caps and smart blazers – this style of satchel is a key part of that look. Harry Potter and friends, this one’s for you!
Need to know
• The lining and the exterior are cut from the same fabric. This is because both fabrics are visible (in the edges) on the exterior side of the bag. The edges in this satchel are a design feature in their own right.
• I recommend home dec fabrics, denim and canvas for this design.
• The secret to this bag’s professional look is creating neat, crisp edges and well-defined curves and corners. Take your time ensuring all the edges match during construction. Whenever there are fabric corners to turn RSO, clip the corners and then (after turning RSO) thoroughly push out those corners out with a pointy tool.
• All seam allowances are 1cm (3?8in) unless stated otherwise.
• The pattern pieces are given in the pull-out section and include the seam allowance.
Preparation
Cut the fabric pieces as follows (see pull-out section for pattern pieces):
From the ‘Too Cool for School’ Satchel (Front) pattern piece
• 2 x exterior/lining fabric
• 1 x woven fusible interfacing
• 1 x extra-stiff double-sided fusible interfacing
From the ‘Too Cool for School’ Satchel (Back/Flap) pattern piece
• 2 x exterior/lining fabric
• 1 x woven fusible interfacing
• 1 x extra-stiff double-sided fusible interfacing
From the ‘Too Cool for School’ Satchel (Main Body Gusset) pattern piece
• 2 x exterior/lining fabric
• 1 x woven fusible interfacing
From the ‘Too Cool for School’ Satchel (Front Pocket) pattern piece
• 2 x exterior/lining fabric
• 1 x woven fusible interfacing
• 1 x extra-stiff double-sided fusible interfacing
From the ‘Too Cool for School’ Satchel (Front Pocket Gusset) pattern piece
• 2 x exterior/lining fabric
• 1 x woven fusible interfacing
From the ‘Too Cool for School’ Satchel (Handle Loop/Pocket Tab) pattern piece
• 8 x exterior/lining fabric
• 4 x woven fusible interfacing
From the ‘Too Cool for School’ Satchel (Flap Tab) pattern piece
• 4 x exterior/lining fabric
• 2 x woven fusible interfacing
Transfer all pattern notches and markings to the fabric with a disappearing marker
Also cut:
• 1 piece of exterior/lining fabric, 134.5 x 10cm (53 x 4in), for the adjustable strap
?
Finished size: 32 x 24 x 8cm (125?8 x 91?2 x 31?8in)
-
 Kin Dragon added Satchel to Fabric
25 Feb 13:36
Kin Dragon added Satchel to Fabric
25 Feb 13:36
-
Kin Dragon added Satchel to things to make
27 Feb 14:42
-
Kin Dragon favorited Satchel
27 Feb 14:42
-
 Key West Witch favorited Satchel
26 Jun 22:09
Key West Witch favorited Satchel
26 Jun 22:09
-
 Lee I. favorited Satchel
23 May 01:39
Lee I. favorited Satchel
23 May 01:39
-
 December XX favorited Satchel
23 Nov 16:00
December XX favorited Satchel
23 Nov 16:00
-
 aaron o. commented on Satchel
09 Aug 10:40
aaron o. commented on Satchel
09 Aug 10:40
-
aaron o. added Satchel to 4
09 Aug 10:40
-
aaron o. added Satchel to 1
09 Aug 10:40
-
aaron o. favorited Satchel
09 Aug 10:40
You Will Need
-
Step 1
The interfacing and strap
Interface the satchel front, back/flap and front pocket – iron the woven fusible interfacing pattern pieces to one of their respective WS fabric pattern pieces. Note: the interfaced pieces are for the exterior of the bag and the non-interfaced pieces are for the lining. Trim off 2cm (3/4in) all around the edges of the extra-stiff fusible interfacing pattern pieces and set aside. -
Step 2
Interface the main body gusset and front pocket gusset – iron the woven fusible interfacing pattern pieces to one of their respective WS fabric pattern pieces. Note: the interfaced pieces are for the exterior of the bag, and the non- interfaced pieces are for the lining.
-
Step 3
Interface the handle loops, pocket tabs and flap tabs – iron the woven fusible interfacing pattern pieces to one of their respective WS fabric pattern pieces. Note: the interfaced pieces face up from the exterior of the bag, whereas the non- interfaced pieces will face down (they will be the WS of the loops/tabs).
-
Step 4
Make the bag strap – take the adjustable strap fabric piece and make one closed-end strap (see Closed-End Straps in the Techniques section). Set aside.
-
 Step 5
The handle loops and pocket tabs
non-interfaced handle loop fabric pieces RST. Pin and stitch together, leaving a 4cm (11/2in) gap for turning out. Trim all around the fabric edge to 3mm (1?8in) from the seam, except for the area above the gap. See Fig a. Turn the handle loop RSO through the gap. Iron the handle loop and topstitch all around with a 3mm ( ?8in) seam allowance (stitching the gap shut as you sew). Repeat for the other handle loop, pocket tab and flap tab fabric pieces. You should be left with two handle loops, two pocket tabs and two flap tabs. Set all aside.
Fig a Leaving the area untrimmed around the gap will make it easier to stitch the gap shut after turning out.
-
 Step 6
The front pocket
Mark the pocket tabs – use a disappearing marker to draw a ‘squared off’ diamond shape onto the pointed part of one of the pocket tabs (this will be your stitching guide for the next step). Draw the diamond shape 6mm (1/4in) in from the outside edge of the tab, with the straight edge of the diamond shape 4cm (11/2in) up from the tip of the pocket tab. See Fig b. Thread the ring of the female part (the ‘receiving’ part) of the side-release buckle onto the tab and fold the tab in half over the buckle. Repeat with the other pocket tab.
Fig b The drawn diamond should follow the outline shape of the pointed part of the tab.
-
 Step 7
Stitch the pocket tab to the front pocket – transfer both pocket tab pattern markings onto the RS (interfaced) pocket fabric piece (this will be the exterior side of the bag). Place one of the folded pocket tabs (with buckle attached and facing away from you) onto one of the pattern markings. Hold the tab in place with your fingers and stitch to the RS pocket fabric piece (use the drawn diamond as a stitching guide). Be sure to sew back and forth along the straight edge of the diamond shape to reinforce this high-stress area. See Fig c. Repeat with the other pocket tab on the other pocket tab pattern marking.
Fig c Stitch the folded pocket tab onto the RS pocket fabric piece. As you sew, stitch backwards and forwards over the straight edge of the drawn diamond shape.
-
 Step 8
Stitch the front pocket pieces together – on
the WS of one of the front pocket fabric pieces, use a disappearing marker to mark the centre on the top and bottom edges. Repeat with the extra- stiff pocket interfacing piece. (See Fig e.) Set the interfacing aside. Bring both pocket pieces RST, pin and stitch all around leaving a 15cm (6in) gap in the top edge for turning out. Trim the fabric around the curved and straight corners to 3mm (1?8in) from the seam. See Fig d1. Iron the seams open, turn RSO through the gap and iron.Fig d1 For well-defined curved and straight corners, trim the corners as shown. Do not trim the straight edges because these seams help reinforce the straight edges of the bag.
-
 Step 9
Push the raw edges of the gap into the hole, neatly line up the folded edges with top edge of the pocket and iron the folds. See Fig d2.
Fig d2 Push the seams of the gap into the hole, fold them down and ensure the folded edges line up with the rest of the top edge of the pocket before ironing.
-
 Step 10
Interface the pocket with extra-stiff interfacing – roll up the extra-stiff pocket interfacing (from the sides) and insert it through the gap in the top edge of the pocket. Unroll the interfacing inside the pocket layers. Look into the gap and line up the (top and bottom edge) centre markings of the pocket fabric and the extra-stiff interfacing. See Fig e. When you have lined up the markings, hold the interfacing firmly in place with your fingers and iron the interfacing to the pocket layers, ironing on both sides of the pocket. Topstitch the top edge of the pocket (stitching the gap shut as you sew) with a 5mm (3?16in) seam allowance. Begin and end your topstitches 5mm (3?16in) in from the side edges.
Fig e Lining up the centre marks is a little fiddly, but it is important to get the interfacing positioned in the centre of the pocket (because it will make stitching the bag parts together much easier) so take your time.
-
Step 11
Assemble the front pocket – find and mark the centre bottom edge of the pocket, repeat with the long edge of the pocket gusset. Matching the centre marks and edges of both pieces, bring the pocket and the pocket gusset pieces lining sides together. Use sewing clips to clip the two pieces together all around the bottom and side edges of the pocket. Stitch the gusset to the pocket with a 5mm (3?16in) seam allowance. Stitch on the gusset side. Stitch the gap (in the gusset) shut in this step or in Step 13 (either way makes no difference). As you stitch around the curved corners, periodically stop to check that the gusset corner fabric is not bunching up underneath your needle and smooth out if necessary. With the WS of the pocket facing up, fold the pocket gusset in half by matching the long edges of the gusset with the edges of the pocket. Iron the fold. See Fig f.
Fig f Neatly folding the pocket gusset in half will help you to stitch the pocket neatly to the bag front in Step 13.
-
Step 12
Stitching the bag front and attaching the pocket
Stitch the bag front – take the interfaced bag front piece (this will be the exterior side
of the bag) and transfer the front pocket pattern markings onto the RS of the fabric. Stitch, interface and assemble the bag front in the same way as in Steps 8–9. -
 Step 13
Pin and stitch the front pocket to the bag front – position the pocket onto the pocket pattern markings on the RS bag front fabric. As you position and pin the pocket, take your time to ensure the entire pocket gusset remains folded in half. (See Fig f.) When the pocket is stitched
to the bag front, the pocket gusset edges should neatly match the pocket edges. This way, when the finished pocket is lying flat on the finished bag the pocket gusset will be hidden from view. See Fig g. Stitch the pocket gusset to the bag front fabric with a 5mm (3?16in) seam allowance. As you stitch along the pocket gusset, ensure that the pocket is pushed out of the way of the needle.Fig g This is a view of the finished pocket stitched onto the finished bag. Notice how the edges of the pocket and the pocket gusset are all flush with each other? You can’t see
the gusset underneath the pocket and that is why the pocket looks neat and well defined. -
 Step 14
Stitch the main body gusset – take the interfaced main body gusset piece and transfer the handle loop pattern markings onto the gusset RS. Take one of the handle loops, thread a rectangular ring onto the loop, and fold the loop
in half over the ring. Mark and stitch the handle loop to the gusset handle loop pattern marking in the same way as in Steps 6–7. Repeat for the other handle loop. Stitch and topstitch the main body gusset pieces together in the same way as in Step 10. See Fig h.The main body gusset and assembling the bag
14Stitch the main body gusset – take the interfaced main body gusset piece and
transfer the handle loop pattern markings onto the gusset RS. Take one of the handle loops, thread a rectangular ring onto the loop, and fold the loop
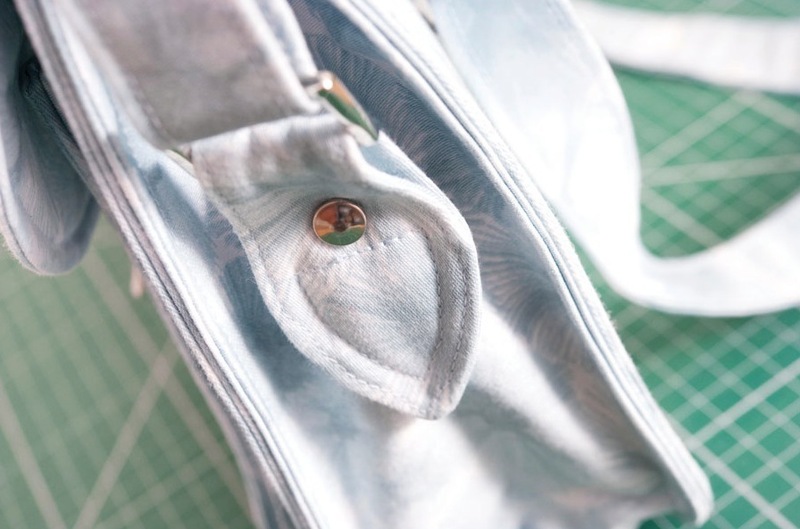
in half over the ring. Mark and stitch the handle loop to the gusset handle loop pattern marking in the same way as in Steps 6–7. Repeat for the other handle loop. Stitch and topstitch the main body gusset pieces together in the same way as in Step 10. See Fig h.Fig h A view of the handle loops on the finished bag. I added these rivets for fun – they are not necessary – I just think they look snazzy! I placed the rivets 4.5cm (13/4in) up from the tip of the handle loop (at the very end of bag construction).
-
Step 15
Stitch the main body gusset to the bag front – find and mark the centre bottom edge of the bag front, repeat with the long edge of the main body gusset. Matching the centre marks and edges of both pieces, bring the bag front and the gusset pieces lining sides together. Use plenty of clips to hold the pieces together. Stitch the gusset to the bag front and iron the gusset in the same way as in Step 11.
-
 Step 16
The bag back/flap
Stitch the flap tabs to the flap area – take one of the flap tabs, on the teardrop shaped
part of the tab, mark a diamond shape in the same way as in Step 6. Repeat for the other flap tab. Transfer the flap tab pattern markings to the RS flap area in the same way as in Step 7. Stitch the flap tabs to the flap area in the same way as in Step 7, except this time there is no buckle to attach (we will add it later). See Fig i.Fig i Stitch the flap tab to the flap area as shown. Be sure to stitch over the straight edge of the diamond because this is a high-stress area on the bag.
-
Step 17
Stitch the back/flap pieces together – mark the centre of one of the back/flap fabric and
the back/flap extra-stiff interfacing pieces in the same way as in Step 8. Then stitch and interface the back/flap as in Steps 8–9 (do not do any topstitching as described in Step 9 – you will do that in the next step). -
 Step 18
Clip the back/flap and the main body gusset together – find and mark the centre bottom
edge of the back/flap and the centre of the main body gusset in the same way as in Step 15. Use plenty of clips to clip the bag back/flap to the main body gusset. Clip all around the main body gusset. Check that the (free) short top edge of the gusset is level with the other (stitched) side. You don’t want the short edge of the main body gusset to be wonky on your finished bag. See Fig j.Fig j A view of the top edge on the finished bag – note how the top edge is level. When clipping the gusset to your bag, aim for a straight top edge.
-
Step 19
Stitch the back/flap to the main body gusset – stitch the back/flap to the main body gusset
with a 5mm (3?16in) seam allowance. Stitch on the gusset side and begin stitching on the bottom edge of the bag (this way your securing stitches won’t be as visible on the finished bag). Just before you reach the flap part of the bag, stitch back and forth over the gusset top edge to reinforce this high- stress area. Then continue stitching all around the flap with a 5mm (3?16in) seam allowance (stitching the gap in the flap shut as you sew). -
Step 20
Attach the adjustable strap and buckle to the bag – attach the bag strap to the bag. Thread the ring of the male part of the side-release buckle (the ‘inserting’ part) through the flap tabs. All done! Well done class! Did you bring an apple for the teacher?
Make it mine ...
Height and width – try making your satchel smaller/larger, say, in 2.5cm (1in) increments. Whatever you add/subtract
to the pattern height, be sure to do the same to the width (I think it’s best to leave the width of the gusset pieces as they are). If you choose to make the satchel a good bit larger, I recommend widening the strap to stay in proportion. You may also want to consider the width at which the closures are positioned.Closures – if you don’t have any side-release buckles handy you can swap the buckles for magnetic snaps – just omit the pocket tabs and shorten the flap tabs to accommodate the snaps. Don’t forget to reinforce the snap fabric area by ironing an interfacing square to the WS of the fabric (see Magnetic Snaps in the Techniques section).


Comments


