


About
Organizing my crafting stuff in a cheap and cute organizer.
There is a video I based it on the video is on youtube but it is in Spanish. I based this tutorial on that video.
You could make this for organizing your makeup if its not too much. But I found it idea for my crafting needs.. :D Enjoy.
Tags
-
 Pimke added Recycled Organizer to Upcycling
11 Feb 21:25
Pimke added Recycled Organizer to Upcycling
11 Feb 21:25
-
 nina.b added Recycled Organizer to Interesting
08 Nov 11:36
nina.b added Recycled Organizer to Interesting
08 Nov 11:36
-
 Sarah W. favorited Recycled Organizer
18 Feb 14:36
Sarah W. favorited Recycled Organizer
18 Feb 14:36
-
 Lenneth entered her project Recycled Organizer to Seal-It Contest
27 Jan 04:36
Lenneth entered her project Recycled Organizer to Seal-It Contest
27 Jan 04:36
-
 Sarah S. added Recycled Organizer to Cheap things to try
19 Jan 02:31
Sarah S. added Recycled Organizer to Cheap things to try
19 Jan 02:31
-
 Jenna C. added Recycled Organizer to Storage
02 Dec 03:08
Jenna C. added Recycled Organizer to Storage
02 Dec 03:08
-
 Khush M. added Recycled Organizer to Crafty Ideas
29 Oct 15:16
Khush M. added Recycled Organizer to Crafty Ideas
29 Oct 15:16
-
 Kinhime Dragon favorited Recycled Organizer
07 Oct 21:13
Kinhime Dragon favorited Recycled Organizer
07 Oct 21:13
-
 Jessica A. favorited Recycled Organizer
09 Sep 22:34
Jessica A. favorited Recycled Organizer
09 Sep 22:34
-
Kinhime Dragon added Recycled Organizer to things to make
19 Aug 00:46
-
 Step 1
You have your shoe box and you have to measure the length of the box, mine 38.6 cm. You don't have to measure the lid, its the other part.
Note: I did this with another box because I forgot to take pictures with the original one. -
 Step 2
Measure half of the length of your box, and from there you have to make a vertical mark and then cut it. Then you have to cut the sides too.
-
 Step 3
You have to reinfore the sides with masking tape or duct tape. I did it with masking tape. It should look like this.
-
 Step 4
I decorated and glued with different types of paper 'cause I didn't have enough paper. In the end I used 3 different types of paper.
-
 Step 5
Now I added a cardboard base on the back because it wasn't sturdy enough and I forgot add wrapping paper to it... which is obvious.
From the bottom part of the box you should leave about 2 cm from both sides (This way you actually close the box easier...REMEMBER LEAVE 2 CM SPACE ON BOTH SIDES)
and then you got cut 2 pieces of foam board of like 3cm of height and 15 cm of width to then glue it with the hot glue gun after the 2 cms and then you a cut another piece of foam board that would be the top of a drawer. For me doing the drawer for the drawer itself was difficult.
After make making the drawer then make 2 holes with the help of an exacto knife in order to glue a ribbon or a cord for the drawer. -
 Step 6
Now we will make 2 compartments that will have have 2 sides only and 2 compartments with 3 sides using the foam board. And glue it with glue gun.
This photo with the 2 sides and a bottom. -
 Step 7
So if you noticed quite well, the front one is the one has 2 sides... and the back has 3 sides.. I made the back one with 3 sides because I want the box to be flexible and be able to open it and close it quite well.
So I didn't glue it the carton base because it wasn't flexible. -
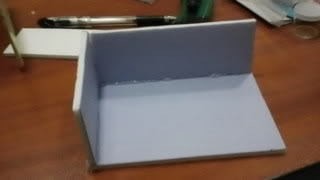
 Step 8
You will get something like this.
-
 Step 9
Now in the front part, I glued another piece of foam board, some stickers and used the marker to write the word Bisuteria (Spanish is my first language)which means Jewelry making.
Made some dividers (my opinion was too much space) and made some dividers with foam board. You can do it here and the bottom drawer. And yes it did rocked... and the end. You can put notes using push pins and the like.NOTE: I made this project last year, it seems I forgot to upload it here.
-
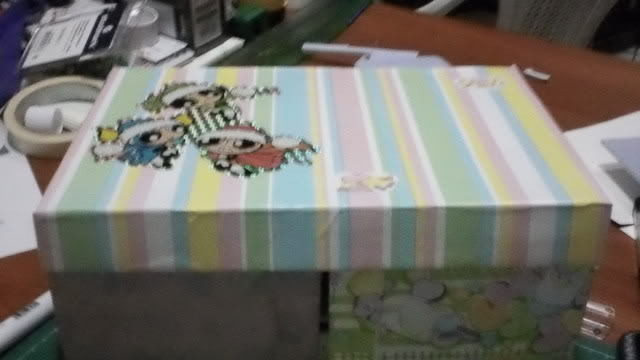
 Step 10
The outside part looks like this.


Comments


 1
Books & Journals »
Locking Box And Journal
1
Books & Journals »
Locking Box And Journal
 2
Babies & Kids »
A Toy Kitchen For A Child
2
Babies & Kids »
A Toy Kitchen For A Child
 3
Origami Flowers »
Origami Orchid
3
Origami Flowers »
Origami Orchid
 4
Office »
Pretty Sketchbooks
4
Office »
Pretty Sketchbooks
 5
Charms & Keyrings »
Shugo Chara Inspired Pop It
5
Charms & Keyrings »
Shugo Chara Inspired Pop It
