About
Knitted Birds
The largest member of the crow family, ravens are often associated with death and disaster but also have a very playful side. They will roll down a snow–covered hill just for the fun of it!
Legend has it that if the ravens ever leave the Tower of London then disaster shall befall England. Maybe they should make a few of these knitted ravens and keep them at the Tower just to be on the safe side.
Tension
6 sts and 7 rows per 2.5cm (1in)
Size
33cm (13in) from wingtip to wingtip, 21cm (8¼in) tall
Notes
The raven has wire support inside the tail, to help the bird stand up, and wire frames inside the wings, to keep them in the air.
-
 Key West Witch favorited Raven
01 Jul 00:31
Key West Witch favorited Raven
01 Jul 00:31
-
 Brenda L. favorited Raven
26 Jun 17:00
Brenda L. favorited Raven
26 Jun 17:00
-
 Ruth H. favorited Raven
02 Aug 21:07
Ruth H. favorited Raven
02 Aug 21:07
-
 Julie R. favorited Raven
17 Mar 02:27
Julie R. favorited Raven
17 Mar 02:27
-
 Jenn H. favorited Raven
16 Jan 07:01
Jenn H. favorited Raven
16 Jan 07:01
-
 EVEnl favorited Raven
17 Sep 13:57
EVEnl favorited Raven
17 Sep 13:57
-
 ALCARIEL favorited Raven
07 Dec 19:41
ALCARIEL favorited Raven
07 Dec 19:41
-
 The Dark Vixen added Raven to Really Cool Stuff
15 Mar 13:16
The Dark Vixen added Raven to Really Cool Stuff
15 Mar 13:16
-
The Dark Vixen favorited Raven
15 Mar 13:16
-
Diane W. favorited Raven
02 Dec 21:59
-
 Step 1
Body and head (make one)
Worked in st st. Using 4mm (UK 8, US 6) needles and black yarn, cast on 28 sts.
Row 1: knit.
Row 2: purl.
Row 3: K5, K2tog, K2tog, K10, K2tog, K2tog, K5 [24 sts].
Row 4: purl.
Row 5: knit.
Row 6: purl.
Row 7: K4, K2tog, K2tog, K8, K2tog, K2tog, K4 [20 sts].
Row 8: purl.
Row 9: knit.
Row 10: purl.
Row 11: K3, K2tog, K2tog, K6, K2tog, K2tog, K3 [16 sts].
Row 12: purl.
Row 13: inc 1, K6, inc 2, K6, inc 1 [20 sts].
Row 14: purl.
Row 15: inc 1, K8, inc 2, K8, inc 1 [24 sts].
Row 16: purl.
Row 17: inc 1, K10, inc 2, K10, inc 1 [28 sts].
Row 18: purl.
Row 19: inc 1, K12, inc 2, K12, inc 1 [32 sts].
Row 20: purl.
Row 21: inc 1, K14, inc 2, K14, inc 1 [36 sts].
Rows 22-32: beginning with a purl row, work st st.
Row 33: *K2tog, K14, K2tog*, rep from * to * to end [32 sts].
Rows 34-40: beginning with a purl row, work st st.
Row 41: *K2tog, K12, K2tog*, rep from * to * to end [28 sts].
Rows 42-54: beginning with a purl row, work st st.
Row 55: K2tog to end [14 sts].
Row 56: purl.
Row 57: K2tog to end [7 sts].
Cut yarn, thread trailing end through remaining sts on needle. -
 Step 2
Wing part 1 (make two)
Worked in st st. Using 4mm (UK 8, US 6) needles and black yarn, cast on 14 sts.
Row 1: knit.
Row 2: purl.
Row 3: K1, inc 1, K10, inc 1, K1 [16 sts].
Row 4: purl.
Row 5: K1, inc 1, K12, inc 1, K1 [18 sts].
Row 6: purl.
Row 7: K1, inc 1, K14, inc 1, K1 [20 sts].
Row 8: purl.
Row 9: K1, inc 1, K16, inc 1, K1 [22 sts].
Row 10: purl.
Row 11: K1, inc 1, K18, inc 1, K1 [24 sts].
Row 12: purl.
Row 13: K1, inc 1, K20, inc 1, K1 [26 sts].
Row 14: purl.
Row 15: K1, K2tog, K18, K2tog, K2tog, K1 [23 sts].
Row 16: P1, P2tog, P2tog, P to end [21 sts].
Row 17: K1, K2tog, K13, K2tog, K2tog, K1 [18 sts].
Row 18: P1, P2tog, P2tog, P to end [16 sts].
Row 19: K1, K2tog, K8, K2tog, K2tog, K1 [13 sts].
Row 20: P1, P2tog, P2tog, P to end [11 sts].
Row 21: K1, K2tog, K3, K2tog, K2tog, K1 [8 sts].
Row 22: purl.
Row 23: K1, K2tog, K to end [7 sts].
Rows 24-26: beginning with a purl row, work st st.
Row 27: K1, K2tog, K to end [6 sts].
Rows 28-30: beginning with a purl row, work st st.
Row 31: K1, K2tog, K to end [5 sts].
Row 32: purl.
Row 33: K1, K2tog, K2 [4 sts].
Row 34: purl.
Row 35: K2tog to end [2 sts].
Cast off remaining sts. -
Step 3
Wing part 2 (make two)
Worked in st st. Using 4mm (UK 8, US 6) needles and black yarn, cast on 14 sts.
Rows 1-14: work as for wing part 1.
Row 15: K1, K2tog, K2tog, K18, K2tog, K1 [23 sts].
Row 16: P18, P2tog, P2tog, P1 [21 sts].
Row 17: K1, K2tog, K2tog, K13, K2tog, K1 [18 sts].
Row 18: P13, P2tog, P2tog, P1 [16 sts].
Row 19: K1, K2tog, K2tog, K8, K2tog, K1 [13 sts].
Row 20: P8, P2tog, P2tog, P1 [11 sts].
Row 21: K1, K2tog, K2tog, K3, K2tog, K1 [8 sts].
Row 22: purl.
Row 23: K5, K2tog, K1 [7 sts].
Rows 24-26: beginning with a purl row, work st st.
Row 27: K4, K2tog, K1 [6 sts].
Rows 28-30: beginning with a purl row, work st st.
Row 31: K3, K2tog, K1 [5 sts].
Row 32: purl.
Row 33: K2, K2tog, K1 [4 sts].
Row 34: purl.
Row 35: K2tog to end [2 sts].
Cast off remaining sts. -
Step 4
Long wing feathers (make four)
Worked in st st. Using 4mm (UK 8, US 6) needles and black yarn, cast on 8 sts.
Rows 1-16: beginning with a knit row, work st st.
Row 17: K1, K2tog, K2, K2tog, K1 [6 sts].
Row 18: purl.
Row 19: K1, K2tog, K2tog, K1 [4 sts].
Row 20: purl.
Row 21: K2tog to end [2 sts].
Cast off remaining sts. -
 Step 5
Short wing feathers (make four)
Worked in st st. Using 4mm (UK 8, US 6) needles and black yarn, cast on 8 sts.
Rows 1-10: beginning with a knit row, work st st.
Row 11: K1, K2tog, K2, K2tog, K1 [6 sts].
Row 12: purl.
Row 13: K1, K2tog, K2tog, K1 [4 sts].
Row 14: purl.
Row 15: K2tog to end [2 sts].
Cast off remaining sts. -
 Step 6
Making up
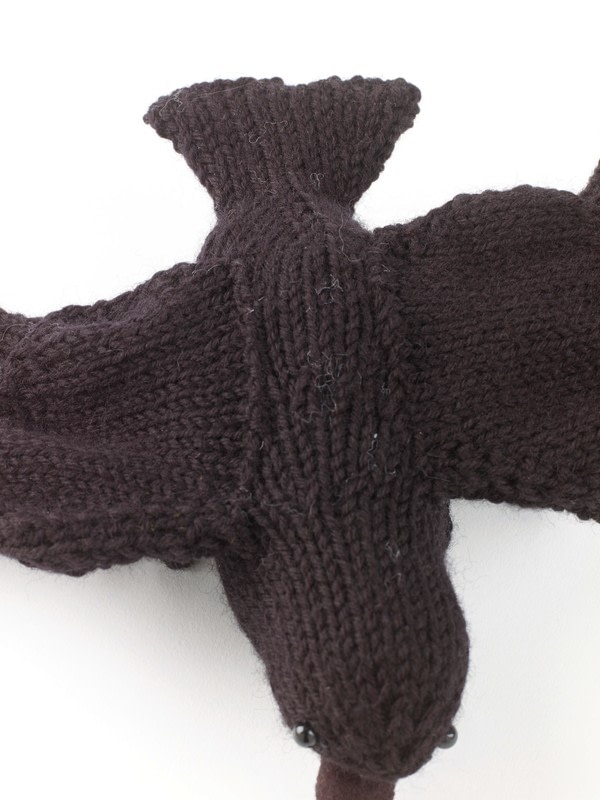
Sew up the seam from the top of the head to the end of the tail, stuffing as you go. Do not sew up the seam at the end of the tail, where you cast on. Do not stuff the tail. Bend two 15cm (6in) chenille stems into the shape of the tail. Insert both into the tail, so you have a double thickness of chenille stem creating a framework inside the tail. Push the sharp chenille stem ends into the stuffing and then sew up the seam at the end of the tail. The chenille stems provide support to help the raven stand up.
Each of the wings uses one part 1 and one part 2, plus two long feathers and two short feathers. The top part of the left wing, and the bottom part of the right wing are both a part 2. Similarly, the top part of the right wing and the bottom part of the left wing are both made up of a part 1. Start by sewing up the side seam of each of the eight wing feathers.
To make the right wing, take one of the part 1 pieces and lay it flat on the table, wrong–side up. Take two black chenille stems and position them at the angle shown in the pictures, one up each side of the wing piece, pushing them through the back of some of the stitches near the edge of the wing piece to keep them in place. Trim the chenille stems so there are approximately 3.75cm (1½in) sticking out of the end of the wing that will join the body.
Take one of the part 2 pieces and position on top of part 1. Sew up the top seam from A to B, and the bottom seam from C to D, sandwiching the chenille stems between the two wing pieces. Leave the rest of the wing seam open.
Insert wing feathers into the unsewn seam, between B and D: the two longer feathers at the top and the shorter ones at the bottom. When you are happy with the positioning, pin the feathers into place and sew up the seam from B to D to secure the feathers in place.
To make the left wing, take the remaining part 2 piece and repeat the construction process for the right wing (see above), inserting chenille sticks and sewing wing part 1 onto the top.
Before sewing the wings into position on the body, push the sharp ends of the chenille stems that are sticking out of the base of the wings into the body, making sure that they are pushed deep within the body stuffing. Sew the wings into position on the body.
Follow the posable legs instruction on page 15 to create legs using a 76cm (30in) piece of stiff craft wire, wrapped in black 8–ply (DK) yarn. Bend the wire so that each toe is approximately 2.5cm (1in) long, and each leg is 2.5cm (1in) tall.
Cut out two beak pieces from black felt, using the templates. Sew the two pieces together, using black cotton, leaving the end that will be attached to the head open. Gently stuff with polyester stuffing and sew to the head using black cotton. To finish, sew two black beads onto the head, for eyes, using black cotton.