About
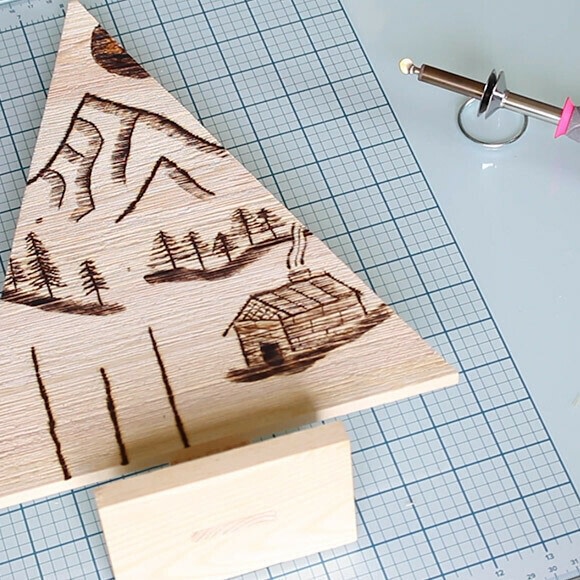
Pyrography mountain landscape on wood
Imagine you’re in the Alps with a mountain landscape in your living room! Use the wood burning tool and accompanying attachments to burn the most beautiful panorama onto a wooden background. The decorated wooden tree is ideal as a decoration on your window sill or as a handmade, personal gift.
-
 mmotse03 favorited Pyrography Mountain Landscape On Wood
23 Mar 05:22
mmotse03 favorited Pyrography Mountain Landscape On Wood
23 Mar 05:22
-
 Rae G. added Pyrography Mountain Landscape On Wood to I wanna make!!
20 Jul 10:23
Rae G. added Pyrography Mountain Landscape On Wood to I wanna make!!
20 Jul 10:23
-
Rae G. favorited Pyrography Mountain Landscape On Wood
20 Jul 10:22
-
 Crafterella featured Pyrography Mountain Landscape On Wood
08 Jul 23:00
Crafterella featured Pyrography Mountain Landscape On Wood
08 Jul 23:00
-
 Vaessen Creative published his project Pyrography Mountain Landscape On Wood
06 Jul 10:44
Vaessen Creative published his project Pyrography Mountain Landscape On Wood
06 Jul 10:44
You Will Need
-
 Step 1
Sketch your design onto paper first.
-
 Step 2
Lightly sand the tree to smooth out the grain.
-
 Step 3
Draw your design onto the wooden tree in pencil.
-
 Step 4
Use the thickest attachment for the thick lines. We’ll be drawing the contours of the mountains, the trees in the foreground and the log cabin with it.
-
 Step 5
Swap the attachment for the long, narrow tip. Refer to the wood burning tool user manual to ensure that you do this safely. We’ll use the narrow attachment to draw details in the mountains and log cabin. We’ll also draw the sun and smoke coming out of the chimney.
-
 Step 6
Now take the angled attachment. This is ideal for drawing shadows in the mountains and hills. We’ll also shade in the sun with it.
-
 Step 7
Next, use the narrow, small attachment to draw the trees and branches.
-
 Step 8
Screw the flat attachment onto the wood burning tool to shade in the hills and sun some more.
-
 Step 9
Draw the remaining branches and other details to your own taste using the appropriate attachment.
-
 Step 10
Finally, we’ll apply some more shadow to the trees and log cabin using the flat attachment. This will make the colours of the neutral and burnt wood flow together better.