

Preparing The Indigo Vat
Extract from Indigo: Dye It, Make It • By Nicola Gouldsmith • Published by CICO Books

About
Indigo: Dye It, Make It
-
 mmotse03 favorited Preparing The Indigo Vat
29 Mar 06:40
mmotse03 favorited Preparing The Indigo Vat
29 Mar 06:40
-
 Ryland Peters & Small published his project Preparing The Indigo Vat
25 Mar 06:00
Ryland Peters & Small published his project Preparing The Indigo Vat
25 Mar 06:00
-
 Step 1
Place the indigo powder in the glass jar with 3 teaspoons (15ml) of spectralite and a little of the warm water. Stir well to make a paste, then mix in ½ pt (200ml) of the warm water.
-
 Step 2
Add the soda ash to the rest of the warm water in a jug and stir well. Add the soda ash solution to the indigo solution a little at a time, using the litmus paper to check the pH level after each addition. Stop adding the soda solution when the desired pH is reached.
-
 Step 3
Cover the jar by placing the lid on loosely, and set it aside in a warm place for the solution to develop (it must be kept warm for this to happen). This will take 30–40 minutes. While this is happening, prepare the large vat by filling a large pan two-thirds full with warm water and adding 1 tsp (5 ml) of spectralite to it. Keep this pan covered and warm.
-
 Step 4
The indigo solution in the jar is ready when you can see both a metallic blue layer on the surface and a yellow liquid beneath. This is due to the dye on the surface of the vat reacting with oxygen in the air; the liquid below remains yellow because it is not in contact with any oxygen.
-
 Step 5
Add the indigo solution to the spectralite solution in the large vat by lowering the jar into the vat; do not pour the indigo solution in, as pouring could cause splashing, which would introduce oxygen into the vat.
-
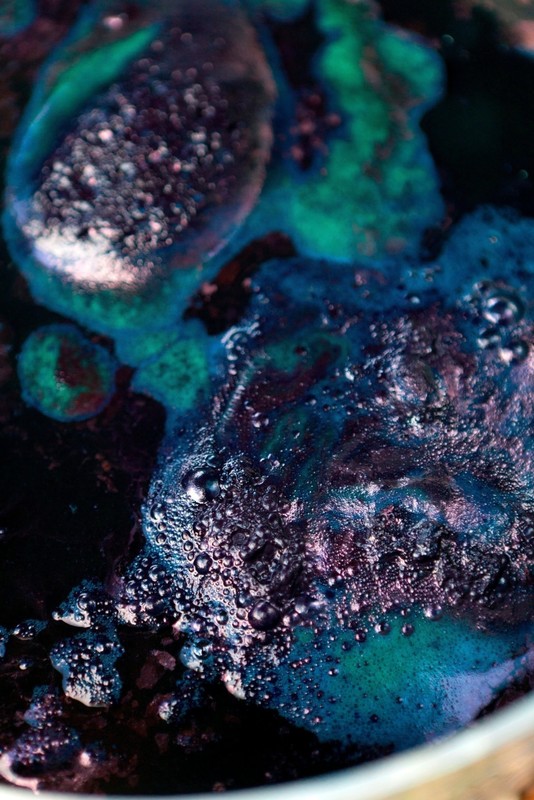
 Step 6
Leave the vat covered and warm for an hour. It is ready to use when the surface of the vat is covered in metallic blue bubbles with an oily appearance.
-
Step 7
Printing your pattern
1 Fill the reservoir section of the applicator system with cold liquid batik wax and then position the roller in the frame, which forms the handle of the roller.
2 Hang your fabric on a firm, flat, vertical surface – a wall or the back of a door is ideal. Draw the roller down the length of the fabric.
3 Repeat, moving across the fabric. Work quickly and carefully, lining up the pattern each time.
4 As it dries, the liquid batik wax will turn from white (when liquid) to a waxy yellow.
5 Once the wax has dried, soak the fabric in cold water for a couple of hours, then remove from the bowl, and gently squeeze out the excess water, takeing care not to damage the wax. Dye and rinse the prepared fabric, but only dip the fabric in the vat once, as the wax will not survive repeated dippings.
6 Scrape off any excess wax, then wash with detergent and allow to dry. Most of the wax will come out when the fabric is washed, but remove any wax still remaining by laying paper towels over the fabric and pressing gently with a cool iron. The wax will melt and be absorbed into the paper.
-
Step 8
Printing your pattern
Fill the reservoir section of the applicator system with cold liquid batik wax and then position the roller in the frame, which forms the handle of the roller.
-
Step 9
Hang your fabric on a firm, flat, vertical surface – a wall or the back of a door is ideal. Draw the roller down the length of the fabric.
-
Step 10
Repeat, moving across the fabric. Work quickly and carefully, lining up the pattern each time.
-
Step 11
As it dries, the liquid batik wax will turn from white (when liquid) to a waxy yellow.
-
Step 12
Once the wax has dried, soak the fabric in cold water for a couple of hours, then remove from the bowl, and gently squeeze out the excess water, taking care not to damage the wax. Dye and rinse the prepared fabric, but only dip the fabric in the vat once, as the wax will not survive repeated dippings.
-
Step 13
Scrape off any excess wax, then wash with detergent and allow to dry. Most of the wax will come out when the fabric is washed, but remove any wax still remaining by laying paper towels over the fabric and pressing gently with a cool iron. The wax will melt and be absorbed into the paper.


 1
Home Accessories »
Diy Jewelry Box
1
Home Accessories »
Diy Jewelry Box

