

About
a sure way to ignite a fire
I just love the crackle, heat, smell and sight of a blaze made with real logs. We live in a 1922 historic craftsman home, and we adore our fireplace, and this DIY helps you get a good blaze going.
Tags
-
 Erica D. favorited Pinecone Fire Starters
03 Feb 16:13
Erica D. favorited Pinecone Fire Starters
03 Feb 16:13
-
 JadeSucksAtLife favorited Pinecone Fire Starters
19 Feb 13:41
JadeSucksAtLife favorited Pinecone Fire Starters
19 Feb 13:41
-
 Jennifer P. favorited her project Pinecone Fire Starters
05 Feb 14:43
Jennifer P. favorited her project Pinecone Fire Starters
05 Feb 14:43
-
Jennifer P. published her project Pinecone Fire Starters
05 Feb 14:31
You Will Need
-
 Step 1
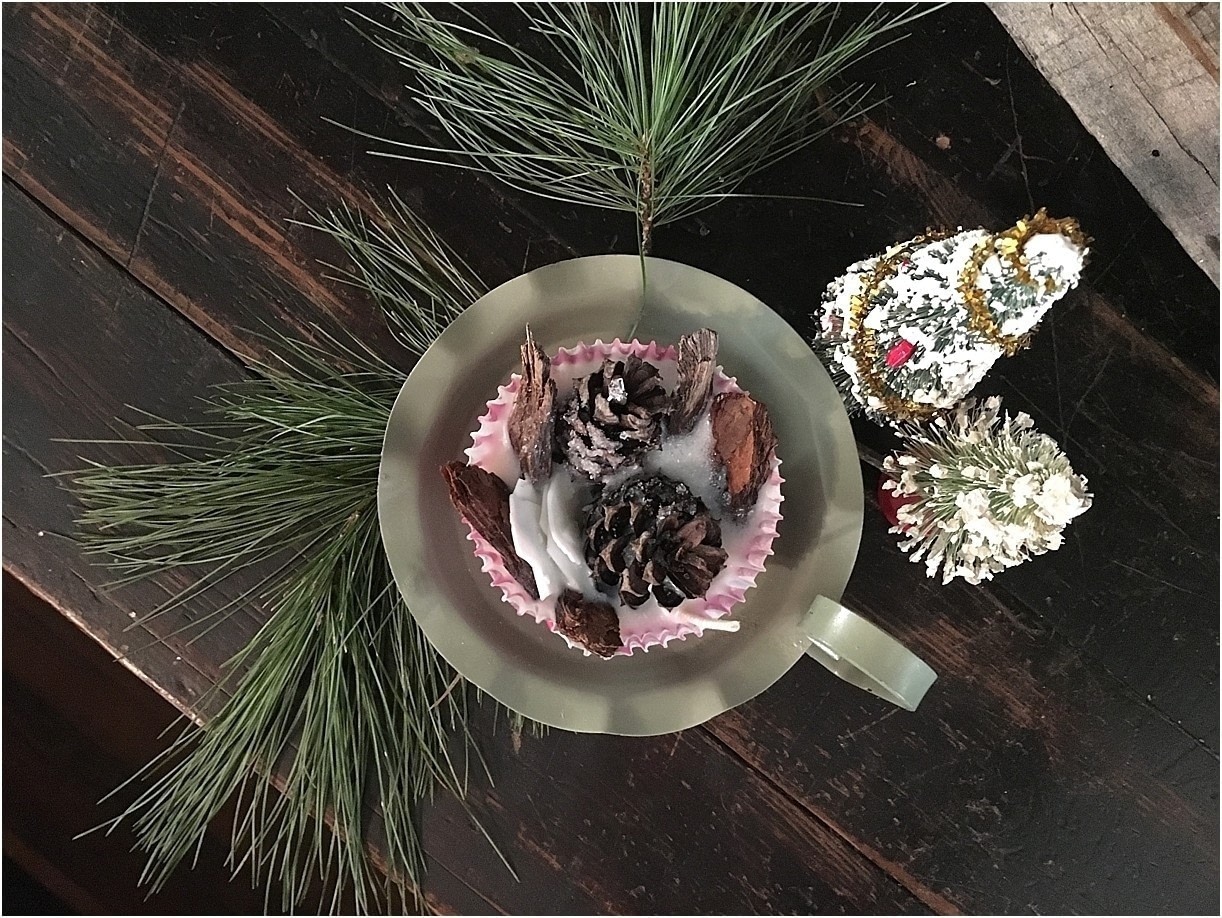
Place your paper muffin cups into the muffin tin or cups.
Melt your wax. I prefer to do this in a glass, microwaveable container that has a pour spout (a Pyrex measuring cup works well!). If you do not have a microwave, then you can melt the wax in a saucepan or use a double boiler setup (I have not personally done either). In the microwave you want to take a cup of wax and melt it for about 1.5 minutes. Microwave for additional time if needed.
After your wax is melted, pour a bit into your muffin cup. I would say to fill it up about 1/3-1/2 of the way full. Adding in your burnable elements will increase the level.
-
 Step 2
Add in your burnable elements. This can be done in whatever arrangement you think is pretty, and children can even help in this step (be sure they don’t knock over the wax!).
During this step I added pinecones, bark pieces and wick segments.
Be SURE to let your wick not sink down as this will actually be where you will light the fire starter.After you have everything arranged as you see fit, you can add in a bit more wax if you aren’t happy with the level, but be sure it doesn’t spill over (if it does, it’s not the end of the world… there will just be wax outside of the paper liner).
If you choose, sprinkle your fire starter with epsom salt (it looks almost like snow!), and you can also add in unmelted soy wax flakes to add dimension and interest for fun.
-
 Step 3
I like to pop my project into the fridge (or freezer) to harden, but if you do this, just be careful in carrying so that you don’t spill any wax. This is NOT necessary as the wax will harden in 30 minutes or so on its own.
Once it is fully hardened and cooled, you have lovely fire starters for gifting, burning or using as favors for your wedding. I think these would make SUCH adorable favors for a Christmas party or winter wedding. So cute!


