

Pillowcase Dream Journal
Extract from At Home with Handmade Books • By Erin Zamrzla • Published by Roost Books

About
At Home with Handmade Books
You may become sleepy as you jot down your dreams in this book. A variation of the Sock Book, the cover of this book is sewn from a vintage pillowcase. It is a bit more challeng- ing to create, but worth the effort.
Finished size
81?2" x 7" x 3?8" tools
-
 Key West Witch favorited Pillowcase Dream Journal
27 Sep 23:26
Key West Witch favorited Pillowcase Dream Journal
27 Sep 23:26
-
 Miss_Fit favorited Pillowcase Dream Journal
09 Jul 00:02
Miss_Fit favorited Pillowcase Dream Journal
09 Jul 00:02
-
 Glenda C. added Pillowcase Dream Journal to Journals
31 Dec 01:36
Glenda C. added Pillowcase Dream Journal to Journals
31 Dec 01:36
-
Maxine M. added Pillowcase Dream Journal to To-make list
13 Apr 04:57
-
 MiaGlitterFlower favorited Pillowcase Dream Journal
17 Dec 06:00
MiaGlitterFlower favorited Pillowcase Dream Journal
17 Dec 06:00
-
 Grimgirl101 favorited Pillowcase Dream Journal
13 Dec 05:16
Grimgirl101 favorited Pillowcase Dream Journal
13 Dec 05:16
-
 Tina L. favorited Pillowcase Dream Journal
09 Dec 03:50
Tina L. favorited Pillowcase Dream Journal
09 Dec 03:50
-
 Jessica B. favorited Pillowcase Dream Journal
02 Dec 05:55
Jessica B. favorited Pillowcase Dream Journal
02 Dec 05:55
-
 Laura favorited Pillowcase Dream Journal
21 Nov 00:23
Laura favorited Pillowcase Dream Journal
21 Nov 00:23
-
 Raven Beauty favorited Pillowcase Dream Journal
20 Nov 17:06
Raven Beauty favorited Pillowcase Dream Journal
20 Nov 17:06
You Will Need
-
 Step 1
Trim your papers to size with a metal ruler and craft knife.
-
 Step 2
Round the fore edge corners of each page. This will help keep the pages from snagging on the fabric cover.
-
 Step 3
Align the pages and clip them with
a bulldog clip along the fore edge. Place a small scrap of paper between the clip and the pages to prevent the clip from damag- ing the pages. -
Step 4
Lay the book block flat on a piece of waxed paper. Slide the spine of the book just off of the edge of your work surface. Brush on a thin layer of glue along the spine. Let the glue dry completely.
-
 Step 5
Cut a piece of scrap paper to the
inside page size to serve as a hole punch template. Mark a line 1?2" from the spine edge. Mark two holes along this line, evenly distributed between the top and bottom edges of the page. -
 Step 6
Use the template to punch holes
through the pages at the spine. Use an awl if you plan to bind the cover with thin thread or a hole punch if you plan to use ribbon. -
 Step 7
Cut the fabric pieces to size.
-
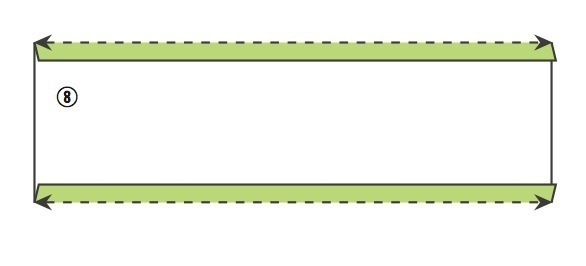
 Step 8
Lay the trim fabric right side down
onto your ironing board. Fold each of the long edges 1?2" to the wrong side and press it with a hot iron. -
 Step 9
Fold the trim fabric in half lengthwise, right side out, and press it with a hot iron.
-
 Step 10
Lay the pillowcase fabric flat onto
your work surface. Sandwich one long edge within the folded trim fabric, overlapping 1?2". Pin it in place. -
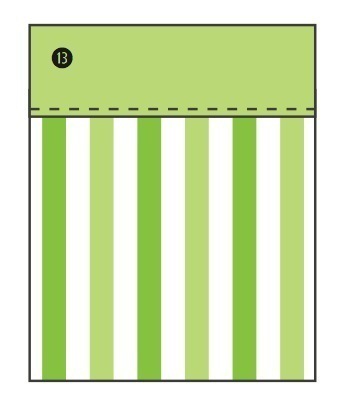
 Step 11
Using a sewing machine, top stitch along the pinned edge, 1?8" in from the folded edge of the trim. Remove the pins as you sew.
-
 Step 12
Fold the pillowcase in half, wrong side facing out. Pin along the two unfinished edges. Using a sewing machine, stitch 1?4" in along the pinned edges, removing the pins as you sew. Zigzag stitch along the raw edges to prevent fraying.
-
 Step 13
Turn the pillowcase right side out and press it with a hot iron.
-
 Step 14
With the sewn edges at the bottom
and left side, slide the inside pages into the cover. Line the spine of the pages up against the seam, centered from top to bottom. Clip along the spine with a bulldog clip. If using thread that can penetrate fabric with a needle, skip to step 19. -
Step 15
If using a ribbon or thicker thread that cannot go through fabric with just a needle, use a pencil to mark two holes in the fabric cover. Align the marks with the holes of the inside pages.
-
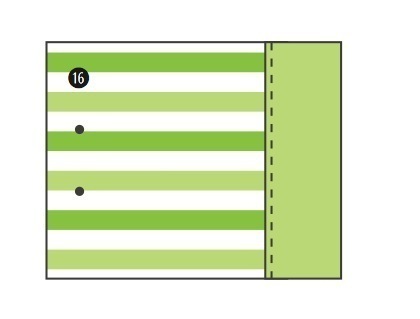
 Step 16
Remove the clip and pages and lay
the pillowcase flat on a cutting mat. Punch holes at the marks with a very sharp hole punch or snip a tiny hole with scissors. -
Step 17
Place a piece of waxed paper inside
of the pillowcase. To prevent fraying, use a cotton swab to apply a tiny bit of glue to all four holes (two in the front of the cover and two in the back of the cover). Let dry completely. Remove waxed paper. -
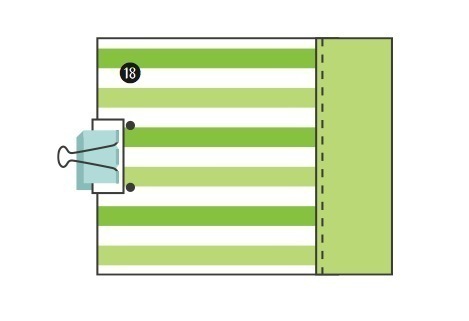
 Step 18
Slide the pages back into the pillowcase and clip. Place a small scrap of paper between the clip and the pillowcase to prevent the clip from damaging the pillowcase.
-
 Step 19
Stitch the spine using Yamato binding. If you cannot see the binding holes from the outside, you may need to poke for the holes until the end of your needle finds them. To stitch the spine with ribbon, wrap a tiny piece of paper around the end to assist it through the holes.
-
 Step 20
Open the front cover by scrunching the pil- lowcase back toward the spine.


 1
Home Accessories »
Diy Jewelry Box
1
Home Accessories »
Diy Jewelry Box
