About
Perler Bead Chest
Make a video game inspired chest using Perler Beads! This project is very patience driven and can be a bit dull if you don't care for placing beads on a peg board.
Never worked with perler beads? It's fairly easy to do. Position all the beads on a peg board, take it to an iron that is set to Synthetic (medium high with NO steam). Place the parchment paper over the beads carefully and iron. It takes about 20 seconds, slowly moving it over the bead surface, for the beads to melt together. Beads should look like they melted with each other but still have a hole in the center. You don't want to over iron them. Once that side cools off (takes about 15 minutes), flip the beads over-so now the peg board is on top-and take the peg board off. Place the parchment paper over the beads and iron on that side. Again, slowly move the iron around for 20 seconds, fusing the beads together. Looking at the beads from the side, they should all look like spools.
Tags
-
 Nicole B. added Perler Bead Chest to Perler
31 Jan 20:21
Nicole B. added Perler Bead Chest to Perler
31 Jan 20:21
-
Nicole B. favorited Perler Bead Chest
31 Jan 20:21
-
 TheGuildHouse published her project Perler Bead Chest
22 Aug 12:01
TheGuildHouse published her project Perler Bead Chest
22 Aug 12:01
You Will Need
-
 Step 1
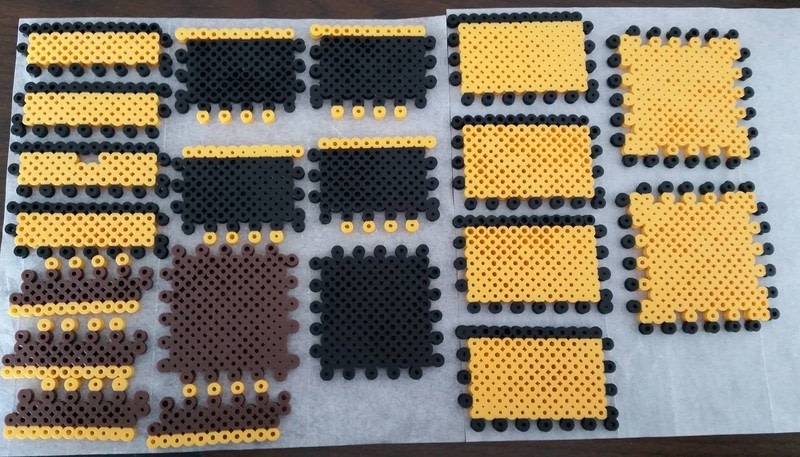
Start working on the inside parts. The accompanying picture is a stage-by-stage example and that the final shape is the bottom right piece. The inside top is going to be a 10x10 square, add the interlocking bits and it should be 12x12. Take it to the ironing board and iron both sides according to the instructions above.
Make one.
-
 Step 2
The inside bottom is the same size, just with black beads.
Make one.
To make the gray latch, position a 2x5 rectangle on the peg board. Once you iron one side of the gray beads, peel it off the parchment paper and fold over 2 edge beads to make a 2x4 rectangle. Very carefully, iron the 2x4 part on the un-ironed side. With the hot glue gun set to low, glue the 1x2 beads to the 2x4 beads. I hope that make sense!
-
 Step 3
Inside bottom pieces. The picture is a stage-by-stage example and that the final shape is the bottom right piece.
Make four.
-
 Step 4
These are inside lid pieces. Be sure they are 5 tall and 12 wide.
Make four.
-
 Step 5
Onto the outer pieces! The bottom sides final shape is the bottom piece
Make four.
-
 Step 6
The top and bottom outside of the chest are the same size. The picture is a stage-by-stage example and that the final shape is the bottom right piece.
Make two.
-
 Step 7
The outside lid pieces are pictured in the top left area. They are a 3x12 cheddar rectangle with black beads around it making it 5x14 size. Be sure to leave one with a 1x2 hole for the latch. Now you can assemble the chest!
The pieces should easily interlock. You can use a hot glue gun-setting on low to glue the pieces together at the edges. This is completely OPTIONAL. The box is pretty sturdy without gluing.
-
 Step 8
Once all the pieces are assembled, grab your hinge and screw it onto the back of the lid and back of the chest. I like to position the screws so they go in between beads rather than in a bead hole.