


About
Pet Stocking
Create the perfect stocking for your pet or show off your team spirit.
Downloads
- 112963_2F2016-01-15-164938-modkid-paw-stocking.pdf 705 KB [ Download ]
-
 K2 favorited Paw Stocking By Modkid
07 Oct 12:00
K2 favorited Paw Stocking By Modkid
07 Oct 12:00
-
 Joanne B. favorited Paw Stocking By Modkid
29 May 19:21
Joanne B. favorited Paw Stocking By Modkid
29 May 19:21
-
 Osiris G. favorited Paw Stocking By Modkid
11 Nov 22:18
Osiris G. favorited Paw Stocking By Modkid
11 Nov 22:18
-
Hayley M. commented on Paw Stocking By Modkid
11 Oct 03:35
-
Caitlin B. favorited Paw Stocking By Modkid
08 Dec 14:36
-
 Sally W. favorited Paw Stocking By Modkid
03 Nov 22:35
Sally W. favorited Paw Stocking By Modkid
03 Nov 22:35
-
 Kimberly R. favorited Paw Stocking By Modkid
16 Dec 22:18
Kimberly R. favorited Paw Stocking By Modkid
16 Dec 22:18
-
Stacy B. favorited Paw Stocking By Modkid
08 Dec 03:22
-
Debbie B. favorited Paw Stocking By Modkid
19 Aug 22:48
-
Amanda V. favorited Paw Stocking By Modkid
30 Jan 03:18
-
Step 1
Prepare Pattern Pieces:
• Print all patttern pieces at 100% (no scaling).
• Cut Pattern Pieces A1 through A4 on the outer solid line (including the shaded areas). Overlap the shaded areas as
indicated on the pattern pieces and tape together to form your lower “paw” pattern piece. This will be referred to as
Pattern Piece A going forward.
• Cut Pattern Piece B along the outer solid lines only (do NOT cut along the diagonal dashed lines). -
Step 2
Cut the Fabric Pieces:
• Pattern Piece A (Paw): Cut two (2) mirrored of fabric #1 and two (2) mirrored of fusible fleece.
• Pattern Piece B (Cuff): Cut four (4) of fabric #2, trace dashed lines onto the wrong side of 2 of these pieces only.
• Hanging Loop (no pattern piece): Cut one (1) 1.5"wide x 8"long piece
• Paw Print: Cut one (1) out of fusible fleece
(recommended) or felt and fusible web, as desired. -
 Step 3
Assemble:
1. Fuse fleece to the wrong side of each Paw (Pattern
Piece A). Quilt your Paw as desired.
Using the dashed lines on Pattern Piece A as a template,
place the fleece or felt Paw Print (Pattern Piece C)
pieces on one side of the Paw, where indicated, and fuse
them in place with a hot iron. With a tight zig-zag stitch
or satin stitch, sew around the perimeter of each Paw
Print piece to secure them in place, fig. 1. -
 Step 4
Place the finished Paws right sides together and pin,
aligning all raw edges. Stitch with a 1/2" seam allowance
(along the outer dashed line) all around the Paw, leaving
the top open, fig. 2. Stitch slowly and carefully around
all the paw curves, lifting the presser foot and pivoting at
each point. Trim the seam allowance down to a 1/4" and
clip into all curves. Turn the Sock right side out and use
a blunt tool to push the rounded "toes" out and smooth
out the curves, fig. 3. Press around all edges. -
 Step 5
Place the two rectangular Cuff (Pattern Piece B) pieces with the
traced lines, right sides together and stitch along the short sides with
a 1/2" seam allowance, fig. 4. Do the same with the remaining Cuff
pieces, fig. 5. Press seams open. Turn the untraced Cuff piece right
side out. Place inside the traced Cuff piece with right sides together,
fig. 6, and pin along the raw edges, aligning the side seams. Baste
1/8" along the bottom raw edge to keep these pieces from shifting.
You will now be sewing along the lines you traced from the pattern
piece. Trim off the excess fabric below the stitched lines, leaving
about a 1/8" seam allowance, fig. 7. Clip into each top peak as
close as you can without snipping through your stitches and clip
each bottom point. Turn Cuff right side out and push out each
point with a blunt tool. Press entire Cuff well. Topstitch 1/8" along
points. -
 Step 6
Fold the Hanging Loop in the same manner as bias tape. To do
this, fold the loop in half lengthwise, wrong sides together. Open
back up and press each raw edge in toward the center using the
first fold as a guide, fig. 8. Fold entire piece in half encasing the raw
edges. Topstitch along the open edge 1/8", fig. 9. Fold Hanging
Loop in half, as shown in fig. 10. -
 Step 7
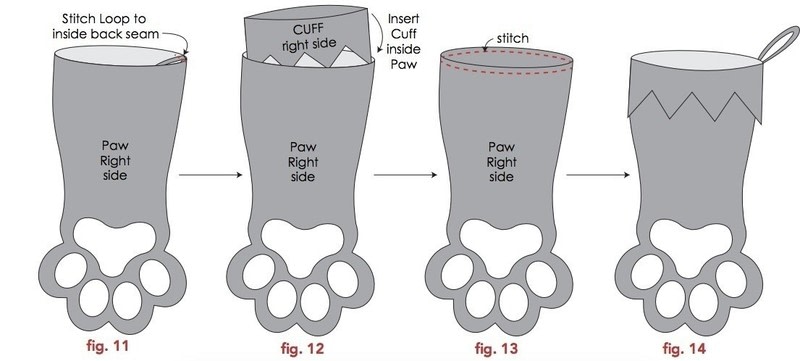
Pin and baste Loop to the inside back seam of the Paw, aligning
raw edges at the back seam, fig. 11.Insert Cuff inside the Paw with the right side of the Cuff facing
the wrong side of the Paw and the Hanging Loop sandwiched in
between, fig. 12. Aligning side seams and raw edges at the top,
pin and stitch with a 1/2" seam allowance all around the opening,
fig. 13. Trim seam allowance down to 1/4". Turn Cuff over to the
right side of the Paw and slightly press around the opening, fig. 14.
If desired, hand sew decorative ornamentation to each point of the
Cuff. We added miniature jingle bells to our stocking


hayleymunoz99@gmail.com