

About
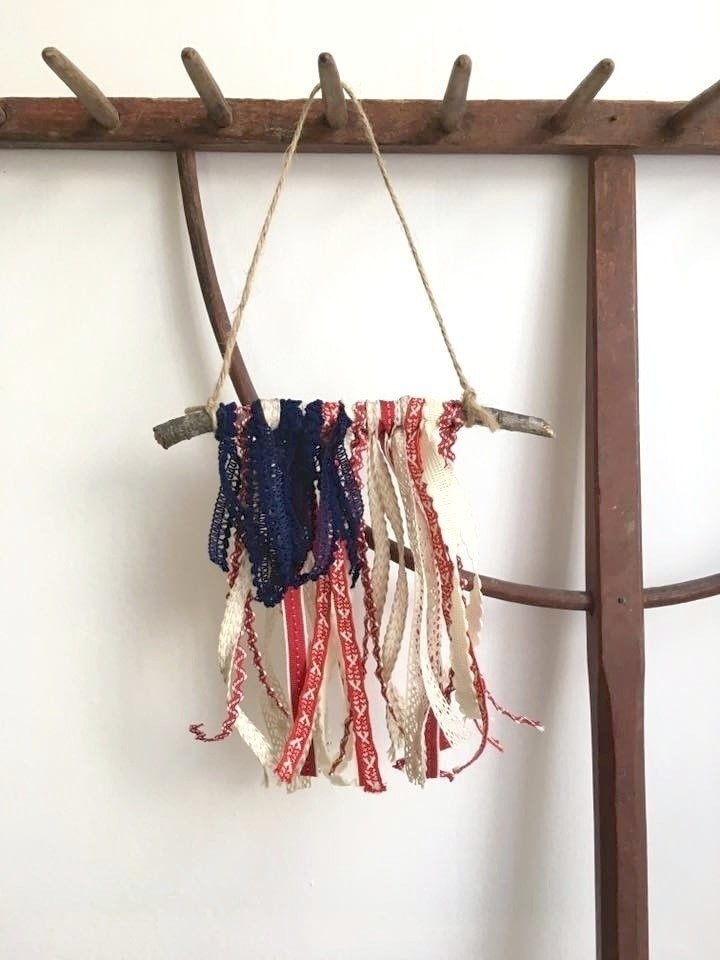
a cute, easy way to celebrate the USA
Whether you are looking for a DIY wedding favor or having a military wedding and need some super cute Americana decor, these ribbon flags are a trifecta – budget friendly, easy to make and adorable! Be sure to consider making one, even if it is just to add to your home’s decor as you show your pride in the USA.
Tags
-
 Deb E. favorited Patriotic Ribbon Flag
17 Apr 00:27
Deb E. favorited Patriotic Ribbon Flag
17 Apr 00:27
-
 Krystal W. added Patriotic Ribbon Flag to Crafts
19 Mar 05:27
Krystal W. added Patriotic Ribbon Flag to Crafts
19 Mar 05:27
-
 JadeSucksAtLife favorited Patriotic Ribbon Flag
19 Feb 18:50
JadeSucksAtLife favorited Patriotic Ribbon Flag
19 Feb 18:50
-
 Jennifer P. favorited her project Patriotic Ribbon Flag
03 Feb 13:17
Jennifer P. favorited her project Patriotic Ribbon Flag
03 Feb 13:17
-
Jennifer P. published her project Patriotic Ribbon Flag
03 Feb 09:00
You Will Need
-
 Step 1
After you gather your supplies, cut 7 strips of red ribbon, 6 strips of white (or cream) ribbon and 5 strips of blue ribbon.
The length of these pieces will be determined by the size flag you would like, the size of ribbon and also the length of your stick. You will be doubling the ribbon, so be sure to cut it TWICE as long as you would like your flag strips to be.
Cut the red and white stripes to approximately the same length.
-
 Step 2
Cut the blue pieces to be half the length of the red and white ones.
For the large flag, my strips were around 30″ long (therefore the blue ones about 15″), and for the small one, my red and white strips were around 18″ long (therefore the blue ones around 9″).
-
 Step 3
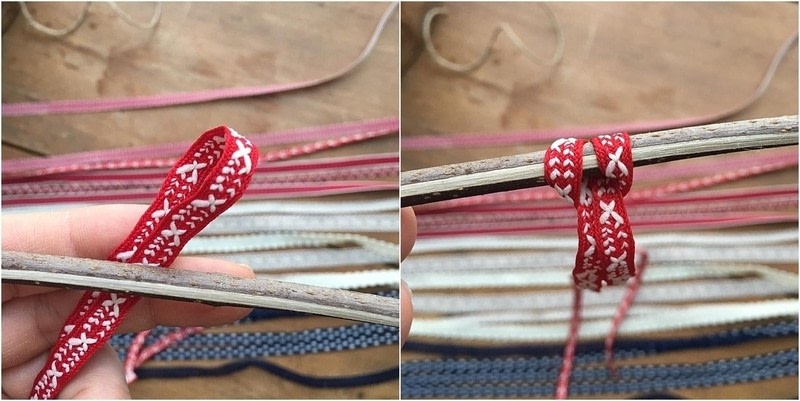
Start with a red ribbon piece, and use – best I can tell it’s called a cow hitch knot – a simple knot to attach it to the stick. It’s more of a loop that you feed the ends through.
-
 Step 4
It is VERY IMPORTANT that all of your knots face the same way (see left photo). Basically you are creating the red, white, red… pattern of the flag by alternating ribbon colors.
Once you have completed knot #8 (doing red, white, red, white, red, white, red, white), then add in your first blue piece of ribbon. Then continue with your red and white pattern while inserting a blue ribbon in the opposite direction every other one. The pattern is – red, blue, white, blue, red, blue, white…etc. – until you reach the very end. Again, be sure that your blue ribbons only are knotted in the opposite direction (see right photo).
-
 Step 5
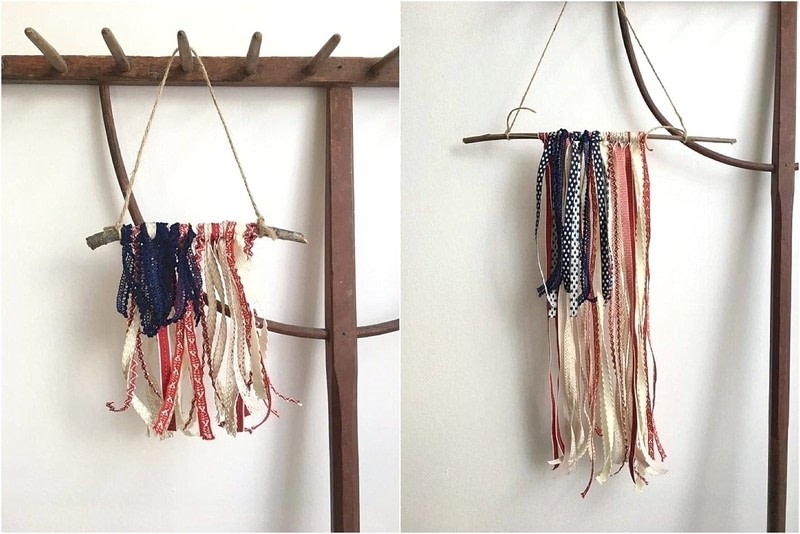
Once you have used all of the ribbon pieces, tie your twine using simple knots on either end so that you can utilize the twine as a hanger for the ribbon flag (see left photo below). Then tighten the loops and scrunch them towards each other to make sure that they are close together.
At this time separate out your blue knots from the red and white ones. Again, the blue loop knots should be facing the opposite direction). This is so when you hang it, the blue ribbons will be on top of the red and white to create the blue patch on the flag (see right photo).
-
 Step 6
The beauty of this project is that if you aren’t happy with the length of the ribbon, you can feel free to trim the ends until you find a size you like. I made two different flags – a smaller one (left) and a little bit of a larger one (right).
I think I like the tiny one better. It’s perfect to impress your guests with your DIY wedding favor skills, right?


 1
Home Accessories »
Diy Jewelry Box
1
Home Accessories »
Diy Jewelry Box
