About
paper roses great for many craft projects!
These little paper quilling roses can be used for cardmaking, embellishing of any project, gift tags, magnets, and even for jewelry!
Tags
-
 Amanda R. favorited Paper Quilling Roses
03 Sep 09:03
Amanda R. favorited Paper Quilling Roses
03 Sep 09:03
-
 Cheryl S. added Paper Quilling Roses to Paper Crafts
20 Dec 04:39
Cheryl S. added Paper Quilling Roses to Paper Crafts
20 Dec 04:39
-
 Kinhime Dragon favorited Paper Quilling Roses
18 Mar 18:50
Kinhime Dragon favorited Paper Quilling Roses
18 Mar 18:50
-
 HoneysQuilling published her project Paper Quilling Roses
27 Jan 09:00
HoneysQuilling published her project Paper Quilling Roses
27 Jan 09:00
You Will Need
-
 Step 1
For this rose I am using paper that is 3/8" width and is 12" long. You can use paper that is wider or more narrow, and different lengths, to get different looks.
Start by inserting your strip of paper into your slotted quilling tool and roll it just a bit. -
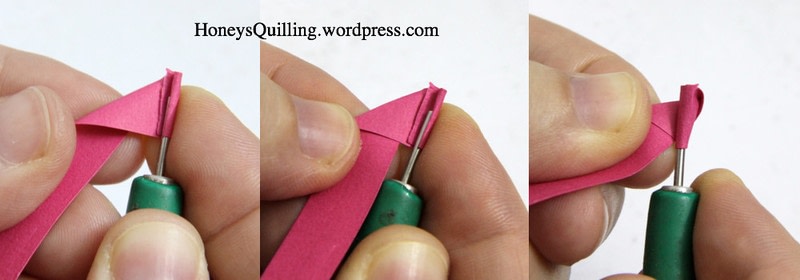
 Step 2
Fold the strip of paper backwards at a 90 degree angle, pressing the fold firmly. Continue rolling the paper, but at an angle so that it flares on the top and the bottom corner of the folded triangle portion stays touching the quilling tool.
-
 Step 3
When you have rolled so that the folded triangle portion cannot be seen anymore it is time to fold your strip backwards again. Continue rolling.
-
 Step 4
Continue folding your paper and rolling, making sure the top flares out while the bottom always stays close to the quilling tool. When you have finished, take it off of the tool. It will unfold a bit as shown in the middle photo above. That is fine. Now it’s time to glue together your rose! Put a drop of glue on the bottom tab of the rose.
-
 Step 5
Put more dabs all the way up the rose. Then gently push the layers back together into a rose shape. The third photo above shows me turning the layers counter-clockwise to get it to look the best. Play around with it, adjusting it so that not all the corners are on top of each other.
-
 Step 6
Once you have the rose looking how you want it, add a bit more glue to the top layers. For this size rose I can just use this fine tip glue bottle. For a tiny rose using more narrow paper I add an extra fine metal tip to my glue bottle to get the glue into the tiny crevices. The finished glued rose is shown in the center photo above. Don’t worry if it seems like a lot of glue, it will soak into the crevices. The last photo shows the same rose when it has dried. It’s ready to be used in a variety of craft/art projects!