About
make a cute little 3d turtle
Use paper quilling to make this adorable little 3D turtle. You can then use it as a pendant, a magnet, in a frame design, in a little 3D scene, as a keychain, and much more!
Tags
-
 HoneysQuilling published her project Paper Quilled 3 D Turtle
26 Jan 09:00
HoneysQuilling published her project Paper Quilled 3 D Turtle
26 Jan 09:00
-
 Step 1
For this project I use all paper that is 1/8" wide. You can try with other widths if you'd like.
To start, make your two 96" strips of paper. I glue together four 24" strips to make a 96" strip. If your paper is shorter, then you'll need to glue more together. -
 Step 2
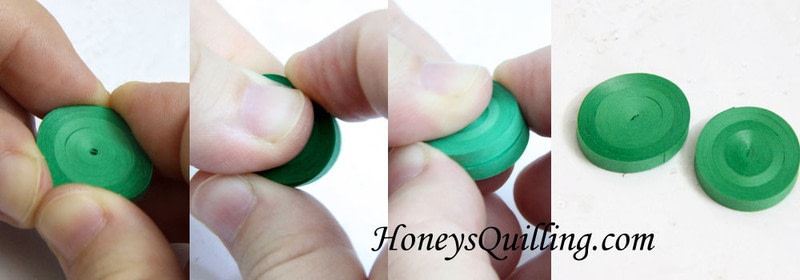
Use your slotted quilling tool or toothpick to roll both 96" strips into tight rolls. So you'll end up with two big tight rolls.
-
 Step 3
I like my turtle to be slightly oval in shape. If you want a circle turtle then you can skip this step. Though the rolls are very tight, you can press them into more of an ovally shape. Just make sure to hold it carefully while pressing it so it doesn't collapse an unroll!
-
 Step 4
With one of the ovals, use your fingers to press it into a shell shape. So now you have one top shell and one flat oval.
-
 Step 5
To make these sturdy, apply a layer of glue on top of the flat oval and inside of the shell. Let dry.
-
 Step 6
While that is drying, roll your other pieces. One of the 12 inch strips gets made into a tight roll for the head. Four of the 6" strips get rolled up, let them loosen a little, glue them shut, and shape them into squares. The 3" strips gets rolled into a tight roll and pinched into a tiny triangle for the tail.
-
 Step 7
You have two 6 inch strips left. Roll them into tight rolls, let them expand a little, and glue closed. Glue them both inside of the shell. This is to support the shell so it won't collapse if you press down too hard on the top of the turtle.
-
 Step 8
Glue the shell onto the bottom oval.
-
 Step 9
Glue the limbs onto the turtle. Let this dry completely.
-
 Step 10
This step is optional, but it really makes the turtle a lot more sturdy. Especially if you are using it as a keychain, pendant, magnet, etc. where it will be handled more. What you do is add dabs of glue to the outside edge, and use the last 12" strip and glue/wrap it around the base. Use your needle tool or toothpick to press the paper into the corners so it lays nice and flat all the way around.
-
 Step 11
And now your turtle is done! If you are turning it into jewelry or a keychain you'll want to add sealant. This is a nice sturdy piece, so it is easy to put on sealant. Just paint it all over the top and sides, let it dry completely, and then turn it over and paint the bottom with sealant and let it dry. You can use something like mod podge or diamond glaze.