


About
an easy custom made skirt
In September a I made a dress for a friend of mine. In exchange she gave me a beautiful fabric from Kokka. I decided to make a paperbag skirt out of it. I photographed all the steps for you to follow. I hope my descriptions are OK, If you find mayor mistakes in my English PLEASE tell me!
Tags
-
 Luna D. favorited Paper Bag Skirt Tutorial
24 Apr 15:36
Luna D. favorited Paper Bag Skirt Tutorial
24 Apr 15:36
-
 Key West Witch favorited Paper Bag Skirt Tutorial
06 Sep 13:59
Key West Witch favorited Paper Bag Skirt Tutorial
06 Sep 13:59
-
Rebecca C. favorited Paper Bag Skirt Tutorial
24 Jul 02:17
-
 Charlene R. favorited Paper Bag Skirt Tutorial
25 Apr 02:39
Charlene R. favorited Paper Bag Skirt Tutorial
25 Apr 02:39
-
 paola m. added Paper Bag Skirt Tutorial to cuci
27 Dec 14:40
paola m. added Paper Bag Skirt Tutorial to cuci
27 Dec 14:40
-
 Regina R. favorited Paper Bag Skirt Tutorial
29 Mar 22:50
Regina R. favorited Paper Bag Skirt Tutorial
29 Mar 22:50
-
 Stephanie F. favorited Paper Bag Skirt Tutorial
20 Jan 06:01
Stephanie F. favorited Paper Bag Skirt Tutorial
20 Jan 06:01
-
 Isabelle M. favorited Paper Bag Skirt Tutorial
03 Oct 07:27
Isabelle M. favorited Paper Bag Skirt Tutorial
03 Oct 07:27
-
Katt C. favorited Paper Bag Skirt Tutorial
23 Aug 22:08
-
Erin C. favorited Paper Bag Skirt Tutorial
09 May 04:58
-
 Step 1
Measure your waist (1) and the length from just above your waist to where you want your skirt to end (3). If your hips are very much wider than your waist you should also measure your hips (2) just to be sure to have enough fabric for around there in the end.
-
 Step 2
Make a sketch of the skirt pieces like the one I made. Decide whether you want wide or small pleats. You will need half the width of your waist plus the width of the pleats plus a seam allowance for each the front and the back piece of the skirt. I wanted to have 5cm wide pleats that means for each pleat I had to add 10 cm. Having 4 pleats I needed to add 40cm to my measurements. If your hips are not very wide you could just add 6cm for each pleat with a gap of just 3 cm. Or if you want really full skirt with big pleats add more for each pleat! I would add lots more than 4cm seamallowence to the length of the skirt. I had 2cm for the top part and 14 for the lower part because I love wide hems.
-
 Step 3
Cut out the fabric according to your mesurements.
-
Step 4
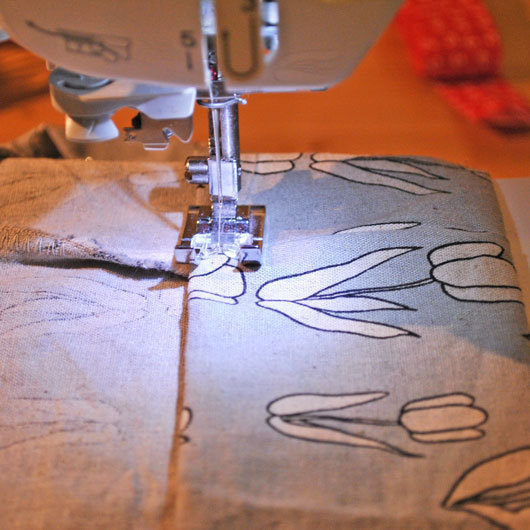
Lay right sides together and sew the skirt pieces together, also putting in the zipper. (Tutorial for example here: http://www.burdastyle.com/techniques/tuesday-technique-the-invisible-zipper) I didn´t do it that way that’s why the photos are a bit different.
-
 Step 5
Hem the upper part of the skirt with a very tiny seam (not more than 1cm)
-
 Step 6
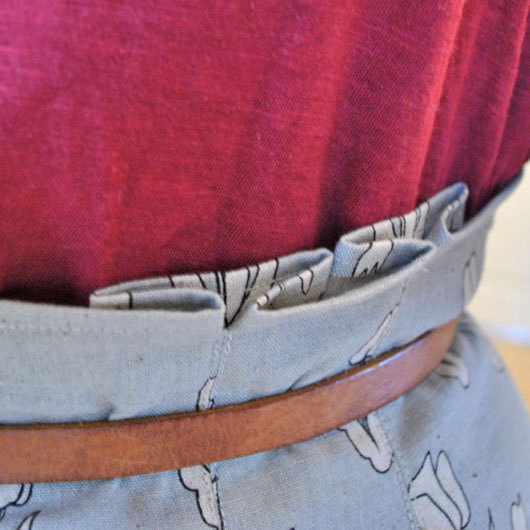
Mark the pleats. Find the middle of each skirt part and mark it with a needle. Fold the edges to the middle and hence mark the middle of each half having divided both skirt pieces in quarters now. I like to have the pleats a little bit more central in the front and therefore moved the two “outer” needles a bit towards the middle (about 4cm- but that’s optional) (Also don´t be confused by the picture I didn´t sew the skirt together until much later wich wasn´t very clever)
-
 Step 7
Now draw in the lines for the pleats. The needle marks the red stripe on my drawing. Pin the Pleats into place by pushing a needle trough the beginning and the end of each plead mark.
-
 Step 8
Also mark how long you want to sew along each pleat. I have a normal waist but very wide hips and therefore cant have the pleats too long. I only sewn along them for 7 cm because otherwise it wouldn´t fit around my waist and the pleats spring open- not very pretty! Begin drawing the lines at least 1 cm under the hem. If you want a larger "paperbag-effect"t start even lower!
-
Step 9
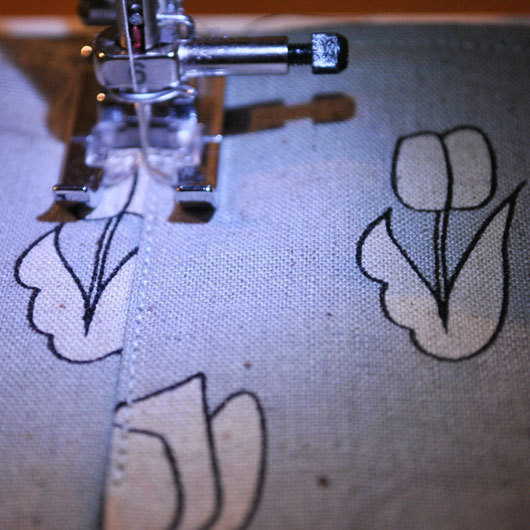
Sew along your marked lines.
-
 Step 10
Fold the Pleats into boxpleats. I didn´t take a picture but I hope you cas see what I mean looking at the picture.
-
 Step 11
Press and then sew along both sides of the seam of each pleat.
-
 Step 12
Hem the skirt and you're done and have made your very own custom made skirt! Yay!


CO + K User