


About
Learn how to make an awesome clay pendant by transferring a pic to it
Have a favorite picture that you'd like to transfer onto clay to make a pendant? This is a relatively easy way to do that. You'll need a xerox copy - NOT an inkjet printed copy - as the toner used in a Xerox copy will transfer, and inkjet will not.
Think of all the possibilities!
Tags
-
 Jill M. favorited Op Art Clay Pendant Features Paper Transfer To Clay
25 Aug 22:09
Jill M. favorited Op Art Clay Pendant Features Paper Transfer To Clay
25 Aug 22:09
-
 Elentine added Op Art Clay Pendant Features Paper Transfer To Clay to Fimo
15 Jun 23:31
Elentine added Op Art Clay Pendant Features Paper Transfer To Clay to Fimo
15 Jun 23:31
-
 nancy.deane.16 favorited Op Art Clay Pendant Features Paper Transfer To Clay
24 Aug 17:20
nancy.deane.16 favorited Op Art Clay Pendant Features Paper Transfer To Clay
24 Aug 17:20
- Abnormal Abby added Op Art Clay Pendant Features Paper Transfer To Clay to Jewellry 11 Jun 01:06
- Abnormal Abby favorited Op Art Clay Pendant Features Paper Transfer To Clay 09 Jun 23:30
-
 Bofoofer favorited Op Art Clay Pendant Features Paper Transfer To Clay
26 Sep 00:47
Bofoofer favorited Op Art Clay Pendant Features Paper Transfer To Clay
26 Sep 00:47
-
 CazSteele favorited Op Art Clay Pendant Features Paper Transfer To Clay
23 Jul 10:41
CazSteele favorited Op Art Clay Pendant Features Paper Transfer To Clay
23 Jul 10:41
You Will Need
-
 Step 1
You'll need to condition a piece of polymer clay. That means squishing it around in your fingers to soften it, then either run it through a pasta machine a few times (end with the 6 or 7 setting), or smoothing and flattening it with a roller of some sort. This pic shows my conditioned/flattened piece of clay. It's about 1/16th of an inch thick.
-
 Step 2
Take your xeroxed copy of your chosen pic. I chose this optical illusion type of pic. Cut it out just a bit outside of the border of the pic.
-
 Step 3
Place the picture FACE DOWN onto the piece of clay and gently smooth it onto the clay with a credit card, or the side edge of a popsicle stick. The purpose of this is to make good contact between the paper and the clay. Don't bear down too hard or you may put dents and dings into the clay. Smooth back and forth one way, then in the opposite direction. You'll be able to see a bit of the color through the paper.
-
 Step 4
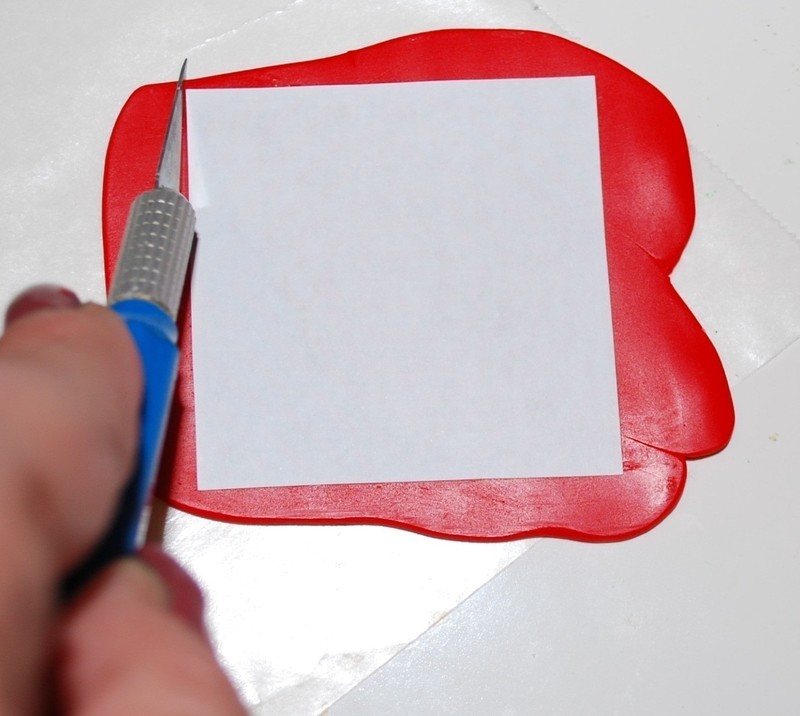
Cut around the paper, through the clay, with your Xacto knife. You'll be trimming the clay again later, after you've transferred the image and rubbed off the paper backing.
-
 Step 5
Fill a small bowl with warm water, dip a small paintbrush into the water, and start "painting" the water onto the paper. Note how you can now see the pattern more clearly. If you see any dry looking spots, repaint with the water.
-
 Step 6
Start gently rubbing the wet paper and it will start to "ball" up and come off of the clay. Use your thumb, or any finger that feels comfortable to you. I usually start at the center and gradually work my out to the sides.
-
 Step 7
Dip the clay piece into your bowl of water periodically, to rinse off the balled up paper, and to keep it wet.
-
 Step 8
VOILA! Your picture has been transferred onto the clay! Don't worry if there are some tiny bits of paper here or there, you can get it off after baking the clay, too.
I've used Sculpey clay in this project. I bake it on a ceramic tile, at 275 degrees for 15 minutes. After removing it from the oven, let it cool for about 10 minutes. It's HOT!
Once it's cooled off, wet a finger and rub off any residual bits of paper.
Next-wet a piece of wet/dry sandpaper and smooth the edges. -
 Step 9
Using super glue, glue a bail to the top center of the clay pendant. Thread through the bail your choice of necklace. I used a six strand, waxed cording that already had a clasp attached to it.
That's it! You're done!
Think about other possibilities using this technique...make xerox copies of the children, grandchildren, friends, etc. - reduce them to the appropriate size for a pendant or charms - and you're off!


 1
Books & Journals »
Locking Box And Journal
1
Books & Journals »
Locking Box And Journal
 2
Babies & Kids »
A Toy Kitchen For A Child
2
Babies & Kids »
A Toy Kitchen For A Child
 3
Origami Flowers »
Origami Orchid
3
Origami Flowers »
Origami Orchid
 4
Office »
Pretty Sketchbooks
4
Office »
Pretty Sketchbooks
 5
Charms & Keyrings »
Shugo Chara Inspired Pop It
5
Charms & Keyrings »
Shugo Chara Inspired Pop It


http://www.cutoutandkeep.net/projects/polymer-clay-photo-pendants