Modern Quilted Blanket
Extract from Make It Your Own • By Anna Alicia • Published by Hardie Grant Books

About
Make It Your Own
I wanted to create a simplified, modern take on the geometric patterns of traditional patchwork quilts. This was partly for a bold, striking aesthetic and partly to design something that can be made in an afternoon rather than over many months!
Your blanket will end up measuring around 87 cm x 115 cm (34 inches x 45 inches), the perfect size for evenings spent curled up reading or in front of the television – I leave one permanently draped over my so far ready to grab.
MATERIALS AND EQUIPMENT
The key to this design is your choice of colours. I’ve used a deep burgundy and navy blue for the main colours, as these are very similar in tone. This gives the vivid bright pink of the stray brightly coloured triangle (and the back of the blanket) all the more impact. See page 71 for how your finished blanket should look.
MAKE IT YOUR OWN
• This would make a wonderful house-warming gift in a friend’s favourite colours, or a newbaby gift in pastel shades.
• For a more traditional patchwork look you could use an assortment of patterned vintage fabrics – a great way to use up small remnants!
• If you’re short on time, a quicker version can be made using a 30 cm x 30 cm (12 inch x12 inch) card template, and by leaving the squares whole (just cut out one less burgundy square and miss out steps 6 to 13).
Tags
© 2024 Anna Alicia / Hardie Grant Books · Reproduced with permission.
-
 Catherine B. favorited Modern Quilted Blanket
16 May 15:15
Catherine B. favorited Modern Quilted Blanket
16 May 15:15
-
 Chudames favorited Modern Quilted Blanket
23 Sep 14:56
Chudames favorited Modern Quilted Blanket
23 Sep 14:56
-
Polina B. favorited Modern Quilted Blanket
23 Jun 08:49
-
 Sue W. favorited Modern Quilted Blanket
09 May 02:42
Sue W. favorited Modern Quilted Blanket
09 May 02:42
-
 ale_corason favorited Modern Quilted Blanket
22 Apr 02:11
ale_corason favorited Modern Quilted Blanket
22 Apr 02:11
-
 Hardie Grant published his project Modern Quilted Blanket
05 Mar 11:02
Hardie Grant published his project Modern Quilted Blanket
05 Mar 11:02
You Will Need
-
Step 1
First make a template to draw out your squares (which will later become your triangles!). Cut out a card square 33.5 cm x 33.5 cm (13. inches x 13. inches).
-
Step 2
Lay out your navy blue fabric on a table or hard surface, with the right side facing down. Draw around your card template with tailor’s chalk to mark out six squares.
-
Step 3
Repeat for the burgundy fabric.
-
Step 4
You also need to mark out one square on your pink fabric (make sure you do this close to a corner so that you leave enough pink fabric for backing the blanket).
-
Step 5
Cut out your fabric squares neatly along your chalk lines.
-
Step 6
Using a long ruler, draw a line with your tailor’s chalk diagonally across each fabric square, from corner to corner, dividing each square into two triangles.
-
Step 7
Cut each square in half to form 12 navy blue triangles, 12 burgundy triangles and 2 pink triangles.
-
Step 8
Remove one burgundy triangle and one pink triangle (these are spare, so save them for a future project or a second blanket!).
-
Step 9
Lay out your first navy blue triangle with its right side facing up, and place your pink triangle face down on top of it, so all the edges match up.
-
 Step 10
Pin along the longest edge, 1 cm (inch) in from the edge of the fabric (see diagram A).
-
Step 11
Now do the same with the remaining triangles, matching up each navy blue triangle with a burgundy triangle.
-
Step 12
Thread your sewing machine with navy cotton and sew each pair of triangles along their longest edge, 1 cm (inch) from the edge of the fabric, removing the pins as you go.
-
 Step 13
Once you’ve sewn together each pair of triangles, fold each one out to form a square. Press with an iron along the seam to flatten it out and trim off the points of the seam that stick out from behind (see diagram B). So now you’ve gone from squares to triangles and back to squares again.
-
 Step 14
Next we need to sew the squares together. To make sure you get the pattern of different coloured triangles in the right order I find it best to start by laying out your squares in the final formation(see diagram C).
-
 Step 15
Now, as though folding along an imaginary seam between the squares, lay a square from row 4 face down on the square above. Pin the two squares together along the bottom edge of the fabric. Repeat this for the other squares in row 4 (see diagram D).
-
Step 16
Repeat step 15 with the squares in row 2, placing them face down on top of the squares in row 1 and pinning along the bottom edge.
-
Step 17
Sew each pair of squares along their pinned edge, 1 cm (inch) from the edge of the fabric, removing the pins as you go.
-
Step 18
Once you’ve sewn together each pair of squares, fold them out again along their seam and press with an iron to flatten them out.
-
 Step 19
Lay your rectangles out again in the final formation. You should now have two rows with three rectangles in each (see diagram E).
-
 Step 20
As you did with the squares, take each rectangle from the bottom row and place it face down on the rectangle above (as though folding along an imaginary seam between the rectangles), lining up all the edges (see diagram F). Pin along the bottom short edge of the fabric.
-
Step 21
Sew each pair of rectangles along their pinned short edge, 1 cm (inch) from the edge of the fabric, removing the pins as you go.
-
 Step 22
You should now have three long strips, ready to sew together! In the same way as before, lay these out in the final formation (see diagram G).
-
 Step 23
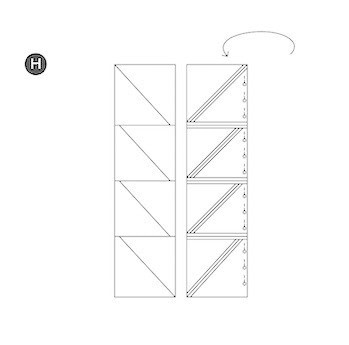
Place the right-hand strip face down on top of the middle strip, lining up all the edges (see diagram H) and pin along the right-hand long edge.
-
Step 24
Sew the two strips together along the pinned edge, 1 cm (inch) from the edge of the fabric, removing the pins as you go.
-
Step 25
Unfold and press with an iron. Lay out your pieces again.
-
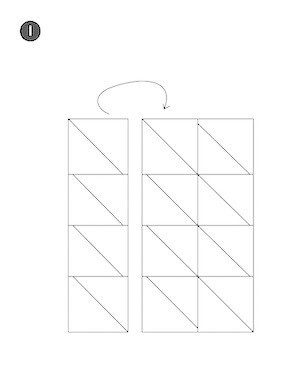
 Step 26
Now place the left-hand strip face down over the central strip (see diagram I),
-
 Step 27
lining up the left-hand long edge and pinning all the way along the long edge of the fabric (see diagram J).
-
Step 28
Sew as before, removing the pins as you go.
-
Step 29
Unfold and press with an iron. The front panel of your blanket is complete!
-
Step 30
Now, you need to make a sandwich of fabrics and batting! Lay out your batting on a flat surface (I usually do this on the floor, as my table isn’t big enough!). Lay your pink backing fabric on top of this with the right side facing up, and lay your finished front panel face down on top of this (I know this might seem like the wrong order, but trust me, it’ll work out right!).
-
 Step 31
Making sure the three layers line up, pin the layers together all the way around your front panel (see diagram K).
-
Step 32
Now that your layers are held together, trim away any excess backing and batting material.
-
Step 33
Starting on one of the longer sides, sew along three of the sides 1 cm (inch) from the edge of the front panel, removing the pins as you go. Make sure you leave the fourth side unsewn.
-
Step 34
To give your blanket neater corners, cut across each one, a little way from the corners of your stitching.
-
Step 35
Now turn your fabric sandwich inside out making sure you end up with the fabrics on the outside and the batting on the inside! Gently poke out the corners from the inside with a pencil (be careful not to poke too hard!). Give your blanket a press with a warm iron.
-
 Step 36
Along the open side, fold in 1 cm (inch) of the backing fabric and batting all the way along the bottom edge. Then fold in 1 cm (inch) of the front panel along the top edge. Pin in place 0.5 cm ( inch) from the edge so that the two edges are neatly lined up (see diagram L).
-
Step 37
Always keeping 0.5 cm (. inch) in from the edge, sew along the pinned edge following the pins and removing them as you go. Continue stitching along the other 3 sides of the blanket. When you reach the folded edge again overlap the stitching by 1 cm ( inch) or so to secure the ends, and you’re done!