


About
Cage beads with a special crochet stitch in wire for a fast, unique bracelet.
The main cost is a short strand of large special beads. I paid $6 USD for mine at a craft store.
This design came to me in a dream just before Mother's Day. I saw a planet-like bead inside a large love knot stitch. As I went about my day I planned out the crochet yarn and beads for the experiment: wire would make the love knots stand out from the beads the most. I could use any beads I liked, even big heavy beads with tiny holes.
The distinctive "love knot" was a very popular crochet stitch in Victorian times, when it was called "knot stitch' and "hail stone stitch". Nowadays it's often called lover's knot and Solomon's knot.
I teach a class on this one stitch because it's tricky for some folks. If you know how to do two basic crochet stitches--the chain and the single crochet (in the UK it's called a double crochet)--then you. can. do. this. I've included helpful aids.
Tags
Downloads
- 115145_2F2016-10-13-195101-39+Crochet+Inspirations+Newsletter-Love+Knot+Research+Apr+2012.pdf 938 KB [ Download ]
-
 DAARSHENI favorited Love Knot Embracelet
14 Jul 02:27
DAARSHENI favorited Love Knot Embracelet
14 Jul 02:27
-
 Kathy C. favorited Love Knot Embracelet
24 Feb 21:29
Kathy C. favorited Love Knot Embracelet
24 Feb 21:29
-
 vashti b. published her project Love Knot Embracelet
22 Dec 09:00
vashti b. published her project Love Knot Embracelet
22 Dec 09:00
You Will Need
-
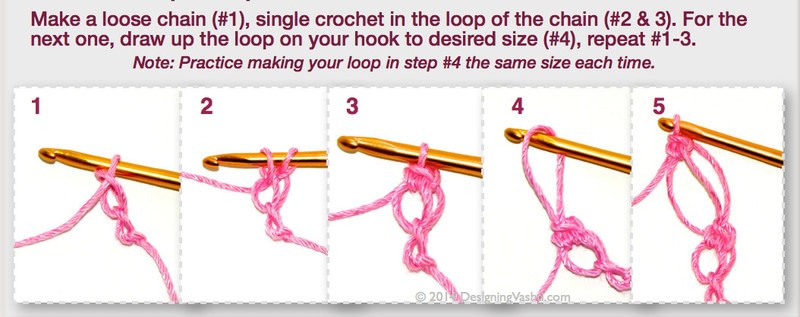
 Step 1
If the love knot stitch is new to you, practice first with "normal" yarn and crochet hook with which you're already familiar. Use the step by steps pictured here, which are from my love knot classes and blog. I've attached a newsletter issue I wrote about this stitch for context and links that you might enjoy.
If you need a how-to video, try searching "crochet lovers knot" and "crochet Solomon's knot".
Then, try crocheting any ol' stitches with thinner wire and the steel hook to get a feel for it. Crocheting with wire builds different finger muscles :)
-
 Step 2
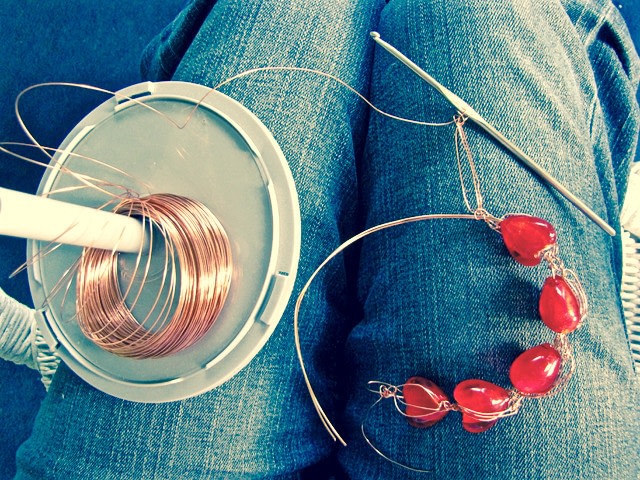
The materials I used. The spool of copper wire is from Radio Shack, the kitchen scissors from a dollar store.
The steel crochet hook I used can be seen in the next photo. Use an old crochet hook when you crochet with wire. The wire can scratch a newer finish, but nicely polishes and smoothes the surface of an old hook. You can find old crochet hooks in thrift stores for as little as 10¢!
-
 Step 3
The thicker, stiffer 22ga wire is the backbone of the whole bracelet, and is not very visible.
For the blue bead version, I didn't have 22g wire in silver to match my thinner silver wire, so I twisted 3 strands of the thinner wire together. (After completing the blue bracelet, I'd say FOUR strands would have been ideal for a stronger backbone.)
-
 Step 4
Loosely fold the 25-inch piece of thicker wire in half so that the fold is a ROUND LOOP, as you can see in this photo.
The beads have been strung on the doubled wire to estimate how many I'll use for a bracelet size to fit.
Remove the beads before beginning the next step.
-
 Step 5
With the thinner wire, make a slip knot and place on your crochet hook. Single crochet (sc) into the loop of the thicker wire piece so that the stitch is wrapped around the thick wire.
This is a close up of the Step 6 photo to show the first sc with thin wire made in the loop of the thick wire. Also see the Step 7 photo.
*Make a love knot that is approx. one-quarter inch [6.4 mm] longer than the bead you're using, slide a bead onto both ends of the thicker wire and slide up so that it's snug against the sc, then sc around both strands of the thick wire on the other side of the bead.
If this is your first time crocheting wire, don't worry about how your stitches look! Try to avoid crumpling up your stitches too much as you go, but a certain amount of crumpling can't be helped when you crochet with wire. You can spiff it up later.
-
 Step 6
Repeat from * to * until approximately 2.5 inches [63.5 mm] of thick wire remain.
The basic design is: you work love knots along one side of a bead strand, single crochet [UK: dc] one end of the clasp, do love knots along the other side of the bead strand, and then crochet the other clasp end.
For the finishing step you'll “fluff” the love knots so that they “embrace” each bead.
-
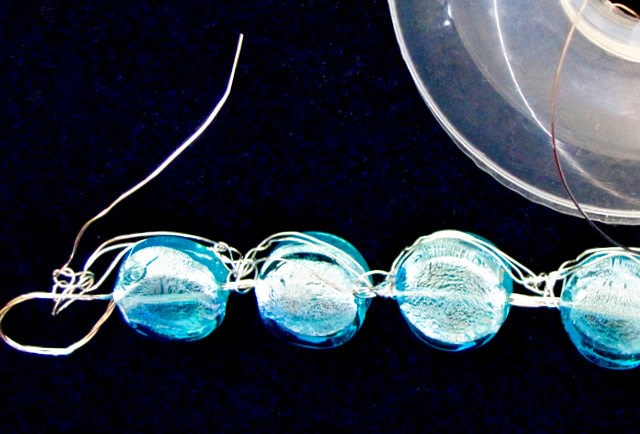
 Step 7
Another view of the Love Knot Embracelet in progress, before the final "fluffing" step.
Notice that as with "ugly ducklings", the love knots look nothing like the "swans" they will become.
-
 Step 8
Sc over the remaining thick wire ends, leaving one-half inch unworked.
Then, flatten the sc's a bit with a rubber-edged pliers/mallet and fold that strip of sc's in half around the shaft of your crochet hook so that it's a nice rounded fold. Flatten and compress the sc's while preserving that rounded fold. This is the hooked part of the hook-and-loop clasp. (See its final hooked shape in the next photo.)
Wind the unworked thick wire ends around the sc strip and use the pliers to hide the ends so that they don't snag or poke when bracelet is worn.
-
 Step 9
Continue working along the other side of the thick wire: *make a love knot of the same size as the others, sc around the thick wire on the other side of the next bead.* You can scrunch the beads apart so that you can fit your sc in there, if necessary.
Pictured: The other side of the thick wire, ready for more love knots to cover the other half of each bead.
Continue from * to * until you reach the thick wire loop end.
-
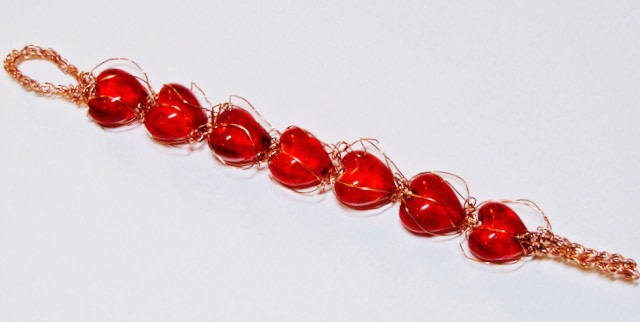
 Step 10
Here's a close up of the completed loop end of the clasp. As you can see, the beads now have a love knot covering both sides of the bead; Step 9 has been completed. (The love knots have also been "fluffed.")
Scrunch together the beads so that about one inch [2.5 cm] of the thick wire loop is free of stitches. Sc around this loop, just one strand of the thick wire, until it is covered. Fasten off and hide the ends. Flatten and compress the sc's.
-
 Step 11
Now you can coax your love knot strands into a pretty look. Each love knot covers a bead with 3 strands, so each bead is enrobed with SIX floaty wire strands.
Gently and evenly curve the piece into a permanent bracelet shape. Avoid completely straightening it ever again (which is unnecessary anyway) so that the thick wire will never become brittle and break.


 1
Home Accessories »
Diy Jewelry Box
1
Home Accessories »
Diy Jewelry Box

