
Love Heart Tote Bag
Extract from Simple Printmaking • By Elizabeth Harbour • Published by Stackpole Books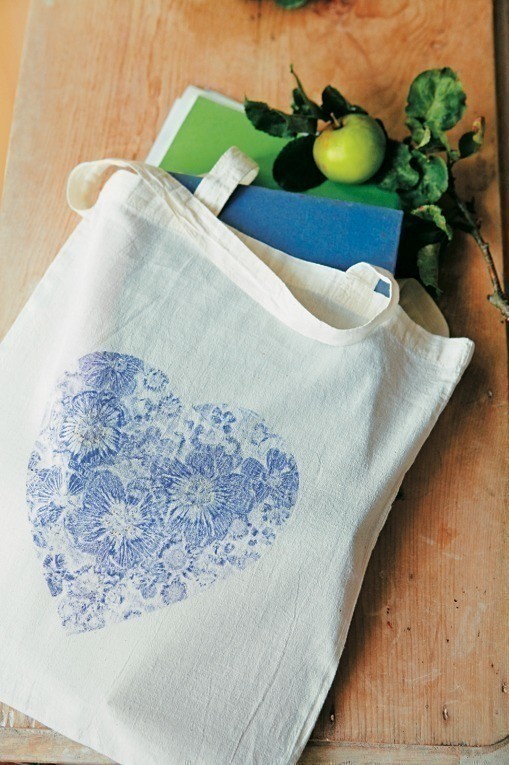

About
Simple Printmaking
This delightful tote bag captures the beauty of summer flowers and is an example of how you can successfully capture delicate mono-printed details on fabric. It makes a unique and lovely birthday gift or Mother’s Day present. The image could also be printed onto a cushion, laundry bag, pillowcase or paper to
make a lovely print for a bedroom. You could even make a smaller heart template to use for a Valentine’s Day card or lavender bags. It is best to use a neutral-coloured fabric with a fine weave, as it will pick up all the small details and help these to stand out. Calico, cotton and medium-weight muslin work particularly
well for this printing technique and are very reasonably priced.
Tags
© 2024 Elizabeth Harbour / Stackpole Books · Reproduced with permission. · Creative Makers: Simple Printmaking by Elizabeth Harbour, published by Mitchell Beazley, £16.99 (www.octopusbooks.co.uk)
-
 Deb E. favorited Love Heart Tote Bag
06 Feb 03:58
Deb E. favorited Love Heart Tote Bag
06 Feb 03:58
-
Rebecca M. favorited Love Heart Tote Bag
19 Jun 23:38
-
sarah g. favorited Love Heart Tote Bag
13 Apr 05:29
-
arina m. favorited Love Heart Tote Bag
08 Jan 22:35
-
 jasmine.thompson.98499 favorited Love Heart Tote Bag
04 Dec 01:36
jasmine.thompson.98499 favorited Love Heart Tote Bag
04 Dec 01:36
-
 Miss Monstro favorited Love Heart Tote Bag
17 Nov 00:25
Miss Monstro favorited Love Heart Tote Bag
17 Nov 00:25
-
Biscuit crumb favorited Love Heart Tote Bag
31 Oct 21:17
-
 Dani T. favorited Love Heart Tote Bag
02 Oct 02:23
Dani T. favorited Love Heart Tote Bag
02 Oct 02:23
-
 Reina M. added Love Heart Tote Bag to Recycled
28 Sep 21:43
Reina M. added Love Heart Tote Bag to Recycled
28 Sep 21:43
-
 Syb' favorited Love Heart Tote Bag
25 Sep 22:29
Syb' favorited Love Heart Tote Bag
25 Sep 22:29
You Will Need
-
Step 1
Prepare the bags
First wash the tote bags to wash out any size in the fabric. Allow to dry and iron with a hot steam iron
-
Step 2
Prepare the heart template
Enlarge the Love heart template on the inside front
cover, making sure that it is just the right size to fit
within your gelatine printing surface, then trace and
transfer the outline centrally onto the cartridge paper. Cut out the heart using a scalpel or craft
knife on a cutting mat. Discard the heart shape and retain
the surrounding paper. -
Step 3
Mix the paint colours
Mix blue and crimson paint with a little white to make a
lavender blue, then add a similar volume of acrylic textile medium to the paint, and a little water if needed. Mix
thoroughly. Don’t work under a direct warm spotlight,
as this will hasten the drying process and hence affect
the workability of the paint. Place a sheet of newsprint
into each bag to prevent any paint seeping through the
fabric when you print. -
 Step 4
Prepare the printing surface
Place the gelatine printing surface in a portrait position
and paint the surface evenly with vertical strokes using
the decorator’s brush or hog-hair paintbrush (this leaves
a little residue on the ghost print, creating a stronger
image). Arrange a selection of flower heads into a rough
heart shape. Hold the heart stencil upside down above the
flowers to make sure that it will be filled with flower heads. The heart is upside down so that the handles of the
bag will hang clear off the table and won’t get in the way
during printing. -
 Step 5
Get ready to print
Lay a piece of newsprint over the flower heads to take
your first silhouette print. Gently smooth over the newsprint
with the palm of your hand. Take the paper off and gently
remove the flower heads using tweezers – you should be
able to see a good flower impression on the gelatine. If it
isn’t clear enough paint the surface again with a little more
paint and repeat the process. It is advisable to take a paper
print to check to see if everything is working in the right
way. When it looks as if you have a good flower impression
on the gelatine, place the heart template upside down
onto the surface so that the negative heart shape is filled
with flower impressions. It is important to cover any
remaining painted surfaces with strips of paper to prevent
any unwanted paint getting onto the bag. -
 Step 6
Print the bag
Hold the first tote bag upside down over the heart
template, positioning it so that the heart image will be
centrally positioned on the bag once it is printed (I allowed
about 7.5cm (3in) from the bottom of the bag). Place the
bag down onto the printing surface and smooth the fabric
with the palm of a clean hand. You should be able to
feel the outline of the template and apply pressure where
the printed image will be. Gently lift the opening of the
bag without moving the fabric and smooth over the inner
paper. Carefully lift one corner of the bag and gently
remove from the gelatine surface. Hang to dry and, once
it is dry, brush off any seeds or stamens and heat-set the
printed fabric with a medium iron.


 1
Home Accessories »
Diy Jewelry Box
1
Home Accessories »
Diy Jewelry Box
