
Louis Xv Cabriolet Dollhouse Chair
Extract from The Big Book of a Miniature House • By Christine-Lea Frisoni • Published by GMC Publications

About
The Big Book of a Miniature House
Downloads
- 104669_2F2014-10-07-104405-MP3_Cabriolet_1.jpg 1.94 MB [ Download ]
- 104669_2F2014-10-07-105750-MP3_Cabriolet_2.jpg 2.22 MB [ Download ]
- 104669_2F2014-10-07-110426-MP3_Cabriolet_3.jpg 1.8 MB [ Download ]
- 104669_2F2014-10-07-110629-MP3_Cabriolet_4.jpg 1.84 MB [ Download ]
- 104669_2F2014-10-07-110811-MP3_Cabriolet_9.jpg 1.79 MB [ Download ]
- 104669_2F2014-10-07-110837-MP3_Cabriolet_11.jpg 1.8 MB [ Download ]
- 104669_2F2014-10-07-111110-MP3_Sofa_L_10.jpg 2.15 MB [ Download ]
-
 Fran M. favorited Louis Xv Cabriolet Dollhouse Chair
10 Sep 22:13
Fran M. favorited Louis Xv Cabriolet Dollhouse Chair
10 Sep 22:13
-
 Kristina A. favorited Louis Xv Cabriolet Dollhouse Chair
27 Apr 15:15
Kristina A. favorited Louis Xv Cabriolet Dollhouse Chair
27 Apr 15:15
-
Elisabeth E. added Louis Xv Cabriolet Dollhouse Chair to chair
21 Dec 13:53
-
Joyce M. favorited Louis Xv Cabriolet Dollhouse Chair
09 Dec 18:28
-
 Robbin B. added Louis Xv Cabriolet Dollhouse Chair to Minitures
11 Feb 09:59
Robbin B. added Louis Xv Cabriolet Dollhouse Chair to Minitures
11 Feb 09:59
-
 MICHELLE M. added Louis Xv Cabriolet Dollhouse Chair to nails
10 Dec 16:52
MICHELLE M. added Louis Xv Cabriolet Dollhouse Chair to nails
10 Dec 16:52
-
MICHELLE M. favorited Louis Xv Cabriolet Dollhouse Chair
10 Dec 16:52
-
 Addee M. favorited Louis Xv Cabriolet Dollhouse Chair
29 May 20:11
Addee M. favorited Louis Xv Cabriolet Dollhouse Chair
29 May 20:11
-
 Therese M. favorited Louis Xv Cabriolet Dollhouse Chair
07 Mar 15:23
Therese M. favorited Louis Xv Cabriolet Dollhouse Chair
07 Mar 15:23
-
 Michaela K. favorited Louis Xv Cabriolet Dollhouse Chair
11 Dec 13:21
Michaela K. favorited Louis Xv Cabriolet Dollhouse Chair
11 Dec 13:21
-
 Step 1
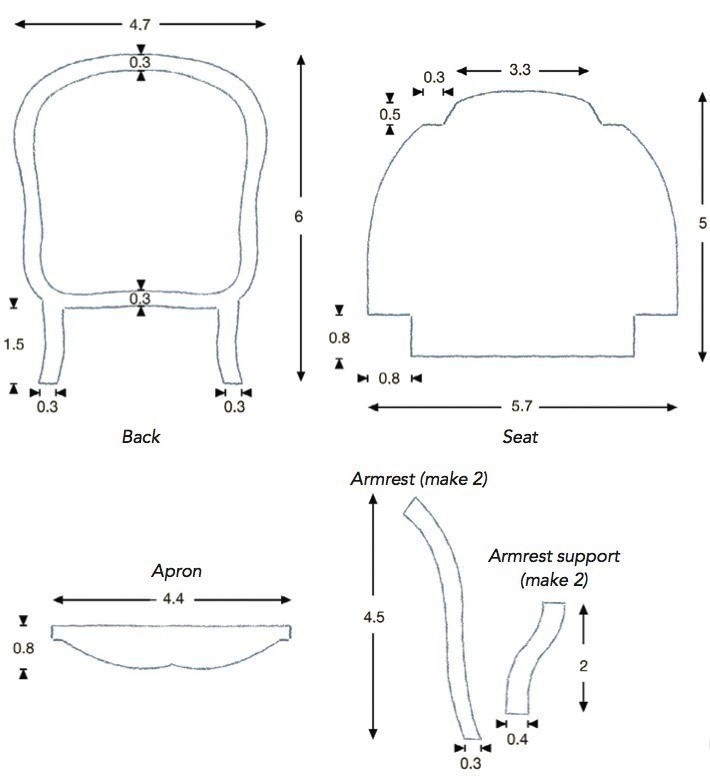
Cut out three of each part from 1mm Bristol board. Cut out the centre of the back with the fretsaw and keep the offcut. Laminate the three copies of each part to make a total thickness of 3mm.
-
Step 2
Glue the back to the seat. Glue the apron to the front edge of the seat. Glue on the relief decorations (two rosettes and two leaves).
-
Step 3
Glue on the wooden legs: the rear ones are placed over the notches that are filled by the back uprights, while the front ones fit into the notches at the front.
-
 Step 4
Assemble the armrests and their supports. Curve the front end of the armrest. Glue on the support and then glue the whole assembly in place. If necessary, adjust the angle where the armrest meets the outside edge of the back.
-
Step 5
When the glue is completely dry, coat with gesso, which will protect the glue joints from the solvent-based modelmaking paint. When this undercoat is quite dry, apply the gold paint, wiping it off in places to reveal patches of white to give an effect of natural wear. The frame is now ready to receive the arm pads, seat and back upholstered in printed cotton or silk.
-
Step 6
Retrieve the offcut from the back and draw round this onto 5mm foamcore. Cut out the foamcore and peel off the paper layer from the front surface. Round over the edges of the outline.
-
Step 7
Transfer the outline of the seat onto 10mm foamcore.
Note
To create hand-embroidered tapestry, you will need a miniature canvas such as silk gauze or similar, embroidery cotton and a suitable motif. Or you can simply print the motif onto fine ecru or white cotton fabric using an office printer. If the fabric is too flimsy to go through your printer, cut it down a little so that the edges can be taped to an A4 sheet of paper. Set the print quality to maximum and select ‘special papers’. -
Step 8
Cut out the seat shape in 10mm foamcore, and cut the back upholstery from 5mm foamcore. Adjust these pieces to fit as necessary. Remove the layer of paper from the top of the seat piece and round over the front and side edges using scissors. Round all four edges of the back in the same way. Cover both pieces with fabric and glue in place.
-
Step 9
Retrieve the paper film that you removed from the foamcore used for the back. Cover this with plain-coloured fabric and glue to the reverse of the sofa back.
-
Step 10
For each armrest, cut a piece of fabric 1.5cm square. Fold back 0.5cm along two opposite sides. The finished armrest pad measures 0.5 x 1.5cm. Round the ends.
-
Step 11
Glue braid trim around the upholstered parts (to make your own braid from embroidery thread, see page 150, step 11). For the characteristically 18th-century bow at the top, cut a strip of thin Bristol board 0.1 x 10cm. Pleat this as closely as possible. Apply wood glue to the middle 2cm of the top edge of the sofa back. Lay the pleated ribbon flat on the glued edge. Form the bow at the top by making three loops one beside the other, leaving about 1cm of ribbon on either side. Paint gold.
-
Step 12
Attach the gilt-paper rosettes to the frame.

Comments

