


About
Challenge yourself!
We’ll use skills learned in my previous tutorial to paint a limited-palette watercolor portrait using your choice of colors. After drawing a pencil outline of our subject’s main features, we will use masking fluid to establish highlights. Then comes the fun part: we will coat the entire sheet of paper with several analogous colors. Once that is dry, we will work on the features using a darker color. This colorful twist on an old-school exercise is popular for a reason: it makes portrait painting a lot less intimidating.
Downloads
- 2019-05-09-160124-supply1.png 982 KB [ Download ]
- 2019-05-09-160128-supply2.png 1.49 MB [ Download ]
- 2019-05-09-160141-supply3.png 1.1 MB [ Download ]
- 2019-05-09-160236-Week-4-Instruction-Sheets-Workshop-1-2018-Realistic-Watercolor.pdf 2 MB [ Download ]
-
 DawnRedwood favorited Limited Palette Portrait
19 May 15:04
DawnRedwood favorited Limited Palette Portrait
19 May 15:04
-
 Kelly E. published their project Limited Palette Portrait
17 Aug 09:00
Kelly E. published their project Limited Palette Portrait
17 Aug 09:00
You Will Need
-
Step 1
Watch the video tutorial.
-
 Step 2
Study the reference photo and draw the basic outlines with pencil. No shading. Your lines should be dark enough for you to see easily. The paint that will cover these lines later can make them hard to see, so go a little darker than you might think, but no need to make them black. Use the template if you need help getting started.
-
 Step 3
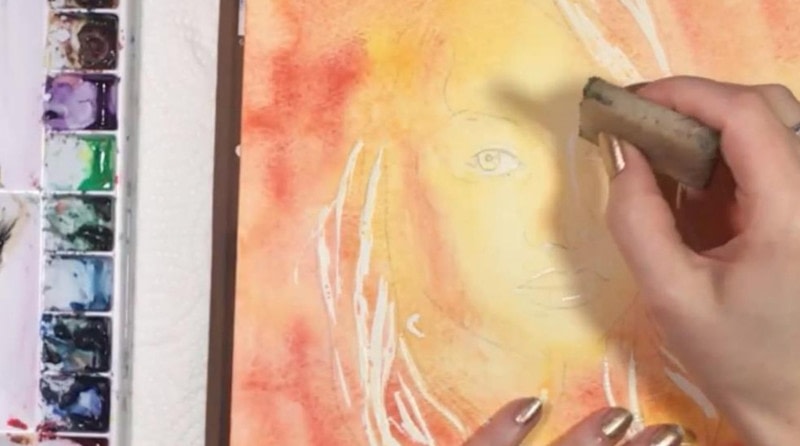
Use a small tool (toothpick, awl, something sharp) to protect the highlights in her face-- everywhere she’s white. Using a larger tool (old brush you can ruin or something similar), paint the whitest parts of her hair in the direction it’s arranged. Use a light touch on the outside edges of your highlights for a more natural look. Let this dry. Tape this to a board using blue painter’s tape, or, if you’re using a block of watercolor paper, you don’t need to do anything.
-
 Step 4
Paint the entire surface of your paper with a mixture of 2-3 colors of your choice. Use a big brush and quite a bit of water for this. Soak up any puddles and tip your paper to get the colors to flow and blend together. This will create a medium-valued piece of paper that’s similar to the one we made in the previous project. Allow this to dry for several hours or overnight.
-
 Step 5
Carefully remove the masking fluid from her face, but leave the masking fluid on her hair alone for now. Select your dark colors(s): one or two colors that are darker than what you have on your paper now.
-
 Step 6
Begin painting the eyes. Use the minimal amount of water it takes to stay in control. Less water equals more control. Her lashes are a solid dark shape with a few individual lashes emerging from it. The iris is light and doesn’t require much darkness--just an outside edge. A dark shadow on the left side works its way into her eye and eyebrow. The eyebrow gets darker as you get closer to that shadow.
-
 Step 7
For the nose, first suggest the nostril with a few small lines and shapes, and then block in the large dark shadow on the left side.
-
 Step 8
If you drop paint onto a damp surface, it will diffuse softly and create a smooth, skin-like texture. If places get too dark or you see a severe edge, absorb it gently with a slightly damp paper towel.
-
 Step 9
Paint the top and bottom lips separately, making sure you leave a highlight in the middle of her bottom lip. Give them some time to dry before you paint the line between the lips--it’s a little darker on the left side. Skip around the face and fine-tune shadows as the paint dries. Be patient as you build up layers.
-
 Step 10
To begin the hair, establish where the darkest parts are. Let the masking fluid help you figure out where you are in the painting (keep it on for now). The hair will be looser than the face. Paint
the hair with strokes that mimic the way the hair has been arranged. The color of the paper will be the medium values in the hair. The masking fluid will become the highlights. So what you’re
concentrating on here are the darkest values. -
 Step 11
Mix a dark background color that will go from the outside edges and right into her hair. Allow the background to be blurry and do what it wants to do. Sometimes a dark background will make everything look too light all of a sudden, so you may want to adjust your shadows.
-
 Step 12
Remove the masking fluid from her hair. Continue to layer on dark hair shadows where you see them, and simplify what you see. Concentrate on big shapes.
-
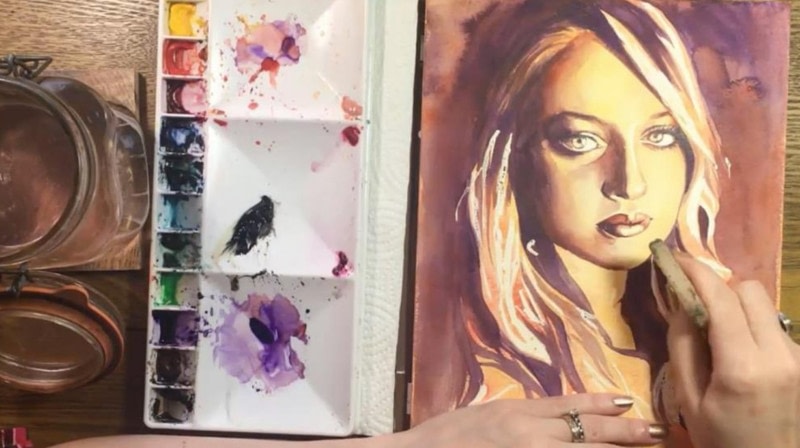
 Step 13
Integrate the highlights with the shadows using an old, fuzzy brush. Do what you can to soften any severe edges.
-
 Step 14
Finishing touches: add details to the earring, and extra lip wrinkles and eyelashes if you think she needs them.
Untape your painting, or, if you’re using a block, slip a ruler or knife into the gap on the side of the block and move it along the outside edge to free the paper.


 1
Books & Journals »
Locking Box And Journal
1
Books & Journals »
Locking Box And Journal
 2
Babies & Kids »
A Toy Kitchen For A Child
2
Babies & Kids »
A Toy Kitchen For A Child
 3
Origami Flowers »
Origami Orchid
3
Origami Flowers »
Origami Orchid
 4
Office »
Pretty Sketchbooks
4
Office »
Pretty Sketchbooks
 5
Charms & Keyrings »
Shugo Chara Inspired Pop It
5
Charms & Keyrings »
Shugo Chara Inspired Pop It

