

Liberty Rose Cushion
Extract from Liberty Book of Home Sewing • By Liberty of London and Lucinda Ganderton • Published by Quadrille


About
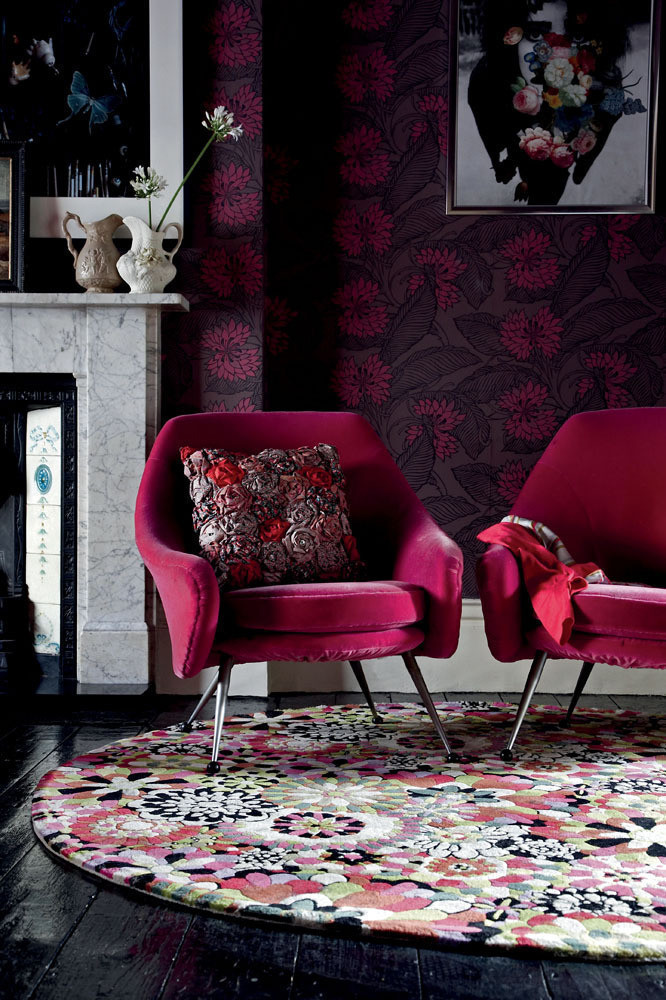
Sew a luxurious rose cushion using Liberty fabric.
The spider-web embroidery used to create these naturalistic roses is usually worked with the narrowest of silk ribbons. I’ve taken the technique up to a much larger scale here and worked with torn strips of Liberty Tana Lawn to create densely packed, three-dimensional blooms in shades of pink, green and red. The cushion cover is backed with a rich velvet and a sprinkling of antique mother-of-pearl buttons adds to the luxurious, textured feel.
Finished size
47cm by 47cm
Cutting out
FROM RED VELVET:
Cut 1 cushion front 50cm square
FROM GREEN VELVET:
Cut 1 pillow back 50cm square
FROM ROSES FABRICS:
Tear 6cm strips as explained in Step 1
NOTE: Seam allowance (1.5cm) is included in the cutting size.
THE LIBERTY BOOK OF HOME SEWING by LIBERTY, published by Quadrille (£20, hardback). Photos ©KRISTIN PERERS; Text ©LUCINDA GANDERTON.
Tags
© 2024 Liberty of London / Quadrille · Reproduced with permission.
-
 Miranda M. added Liberty Rose Cushion to Daisy Buchanan's house
11 Apr 13:10
Miranda M. added Liberty Rose Cushion to Daisy Buchanan's house
11 Apr 13:10
-
 Elizabeth s. favorited Liberty Rose Cushion
04 Apr 17:19
Elizabeth s. favorited Liberty Rose Cushion
04 Apr 17:19
-
 Cute Madness favorited Liberty Rose Cushion
22 Feb 16:53
Cute Madness favorited Liberty Rose Cushion
22 Feb 16:53
-
 MischievousRaven added Liberty Rose Cushion to bedroom ideas
18 Feb 23:44
MischievousRaven added Liberty Rose Cushion to bedroom ideas
18 Feb 23:44
-
 MissDarkMark added Liberty Rose Cushion to Dita von teese room
10 Oct 15:57
MissDarkMark added Liberty Rose Cushion to Dita von teese room
10 Oct 15:57
-
MissDarkMark favorited Liberty Rose Cushion
10 Oct 12:18
-
 Hannah favorited Liberty Rose Cushion
14 Aug 19:59
Hannah favorited Liberty Rose Cushion
14 Aug 19:59
-
 sarah.jones.756412 favorited Liberty Rose Cushion
04 Jul 16:44
sarah.jones.756412 favorited Liberty Rose Cushion
04 Jul 16:44
-
 Teresa S. favorited Liberty Rose Cushion
22 Nov 17:56
Teresa S. favorited Liberty Rose Cushion
22 Nov 17:56
-
 Cadia95 favorited Liberty Rose Cushion
11 Oct 22:43
Cadia95 favorited Liberty Rose Cushion
11 Oct 22:43
You Will Need
-
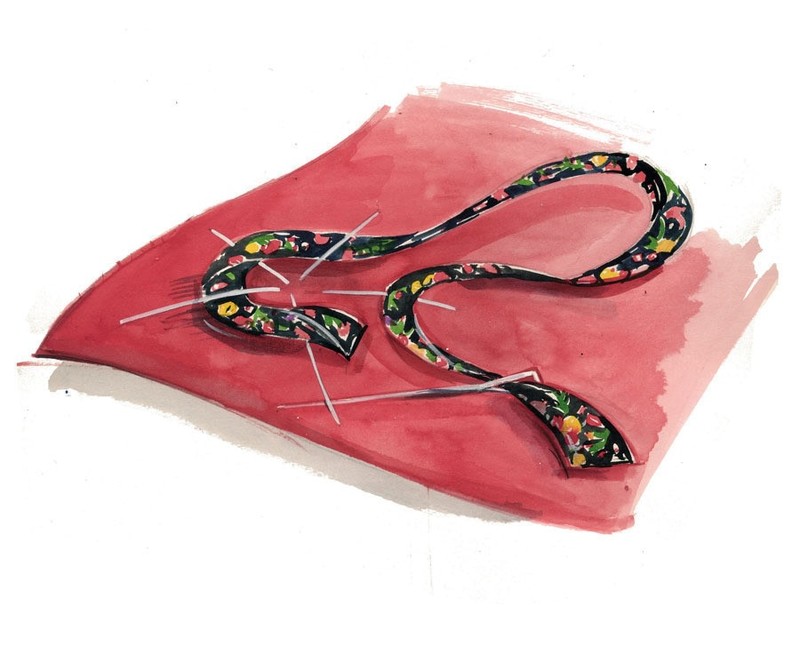
 Step 1
Preparing the fabric strips for the roses
For each rose, tear a 6cm wide strip of fabric selvage-to-selvage from one of the four rose fabrics. Snip off any long loose threads, then press the strip in half lengthways with the wrong side facing inwards. If any of your print fabrics have a paler wrong side, press a few of these strips the other way round with the wrong sides facing outwards to obtain more colour variation in your roses. Prepare a few strips from each of the four rose fabrics to start. (Tear and press more strips only as you need them, so you won’t end up tearing more strips than you need – you can save the surplus for other projects.)
-
 Step 2
Starting a rose
Starting at the bottom left corner of the velvet cushion front, work the foundation for the first rose. Using a double length of strong thread in a colour matching the rose and a large crewel needle, sew five long stitches radiating out from a centre point. Each stitch should be 4–5cm long but the length and arrangement doesn’t have to be too precise – each rose is quite individual. Leave a margin of at least 1.5cm between the stitches and the edge of the fabric to allow space for the seam.
-
 Step 3
Weaving the rose strip around the base spokes
Thread one end of the fabric through the eye of a large blunt-ended tapestry needle or bodkin. Sew the other end to the velvet cushion front, close to centre of the spokes, then weave the strip clockwise between them. Start by going over the first, under the second and then over the third, under the fourth and over the fifth. Pull up the fabric gently – it will turn back on itself to create the curled petal effect – then continue going round and round the spokes until only 5cm of the rose strip remains.
-
 Step 4
Securing the end of the rose strip
Make a tiny slit in the velvet at the end of final round, and take the needle through to the back. Sew the loose strip end in place on the wrong side of the cushion front so the flower cannot unravel.
-
 Step 5
Finishing the rose
Stitch the edge of the outside petals to the cushion front, to keep them in shape, using an ordinary sewing needle and a matching sewing thread.
-
 Step 6
Adding the remaining roses
Stitch five more roses close to each other along the bottom edge of the fabric. Then start the second row with a flower half the width of the full roses in the first row. Centre each of the next five roses in the second row between two roses in the first row – angling the spoke stitches into the space between the roses below – and end the row with another narrow flower. Continue making interlocking rows of roses until the cushion front is completely covered. Six rows of roses should fill the cushion front.
• CHOOSE A CUSHION PAD THAT IS LARGER THAN THE FINISHED COVER TO GIVE THE CUSHION A LUXURIOUSLY PLUMP LOOK.
-
 Step 7
Adding the buttons (or large pearl beads)
Add small highlights of colour by sewing mother-of-pearl buttons (or large pearl beads) to the centre of ten flowers, spreading them evenly across the front.
-
 Step 8
Finishing the cushion
Turn back and tack down a 1.5cm turning along each edge of the cushion front. Do the same with the cushion back and then pin the two together with wrong sides together. Using a matching sewing thread, slipstitch the front and back together around three edges. Insert the cushion pad and pin the front to the back along the opening. Slipstitch the opening closed and remove the tacking.
• FOR EXTRA DEPTH AND VARIETY OF COLOUR TO THE CUSHION, ONE OF THE FABRICS WAS USED BOTH RIGHT SIDE AND WRONG SIDE UP FOR THE ROSES. THIS WORKS ESPECIALLY WELL WITH THE LIBERTY TANA LAWN ‘ROCK AND ROLL RACHEL’ PAISLEY PRINT, WHICH HAS A DUSKY ROSE TONE ON THE REVERSE.


Comments


