


About
Team this colorful Kumihimo bracelet with your weekend casual wear for a fun and trendy look.
Leather jewelry is so on trend at the moment and this easy to make Kumihimo Bracelet will make a fun addition to your wardrobe.
-
 Moe F. favorited Kumihimo Chain Bracelet
22 Jun 23:13
Moe F. favorited Kumihimo Chain Bracelet
22 Jun 23:13
-
Julie C. favorited Kumihimo Chain Bracelet
20 Apr 14:51
-
 Tina C. favorited Kumihimo Chain Bracelet
27 Aug 15:26
Tina C. favorited Kumihimo Chain Bracelet
27 Aug 15:26
-
 Veronica Elizabeth R. favorited Kumihimo Chain Bracelet
27 Jun 08:25
Veronica Elizabeth R. favorited Kumihimo Chain Bracelet
27 Jun 08:25
-
 Werk.eht.bro favorited Kumihimo Chain Bracelet
10 Jun 21:00
Werk.eht.bro favorited Kumihimo Chain Bracelet
10 Jun 21:00
-
Alyssa D. favorited Kumihimo Chain Bracelet
25 May 05:35
-
Katrina P. favorited Kumihimo Chain Bracelet
04 May 14:56
-
Sal M. added Kumihimo Chain Bracelet to Jewellery
03 May 19:20
-
Moira A. favorited Kumihimo Chain Bracelet
02 May 22:11
-
 bigrthanlasagna favorited Kumihimo Chain Bracelet
30 Apr 08:53
bigrthanlasagna favorited Kumihimo Chain Bracelet
30 Apr 08:53
You Will Need
-
 Step 1
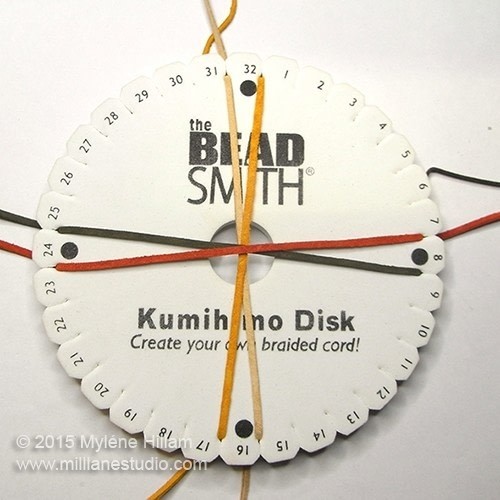
1. Find the middle of each cord and lay it across the center of the disk. Arrange the cords so that two run vertically and two sit horizontally. Insert one of the vertical cords in the slot to the left of the dot at the top of the disk and the corresponding end in the slot to the right of the bottom dot. Insert the other vertical cord to the right of the top dot and left of the bottom dot so that the cords cross over in the middle. Position the two horizontal cords either side of the dot on the left hand side of the disk. Place their corresponding ends on either side of the right hand dot, crossing them over in the middle.
-
 Step 2
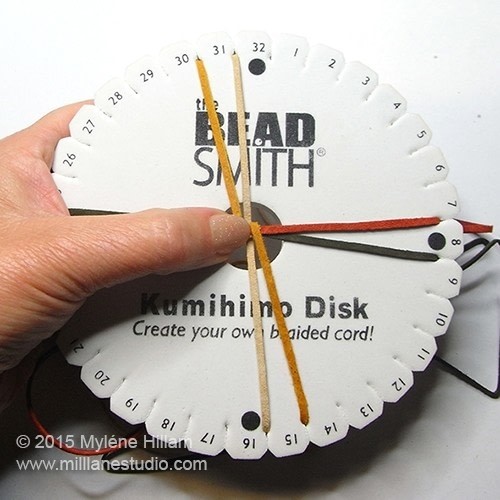
Tip: Work the left hand cords with your left hand and the right hand cords with your right hand. Hold the center of the disk with your free hand to keep the tension in the braid as you work.
There are just three actions to the braid. 1 - Pick up the bottom left cord and place it in the slot to the left of the top two cords.
-
 Step 3
2 - Take the top right cord and place it in the slot to the right of the bottom cord.
-
 Step 4
3 - Rotate the disk counter-clockwise.
-
 Step 5
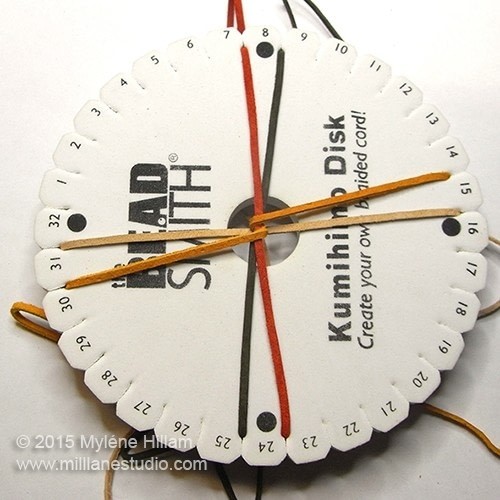
Repeat steps 2 – 4 until the braid measures about 6”.
-
 Step 6
Cut three 12” lengths of sewing thread and wrap one firmly around the braid several times at the 2 1/4” mark before knotting it securely. Wrap the second thread around the braid, leaving a gap of at least 1/4". Measure along 2” and wrap the third thread around the braid. The photo shows the third thread being wrapped around the braid. Trim the thread ends close to the knots leaving only a small tail.
-
 Step 7
Remove the braid from the disk. Cut the braid inbetween the first two thread wraps you made in Step 6. Cut the braid at least 1/8" after the third thread wrap. You now have two braided lengths measuring approximately 2 1/2" long. Trim the ends of the cords to 1/8”.
-
 Step 8
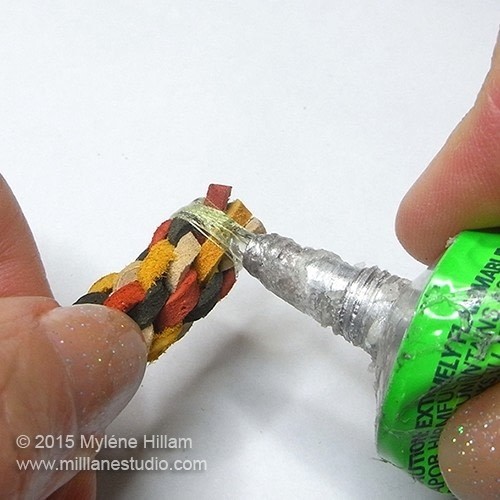
Working on one braid at a time, apply adhesive around the thread and the cut ends of the braid. Slide an end cap over the end. Glue a cord end to the other end of the bracelet. Repeat for the other braid. Allow the adhesive to dry before proceeding.
-
 Step 9
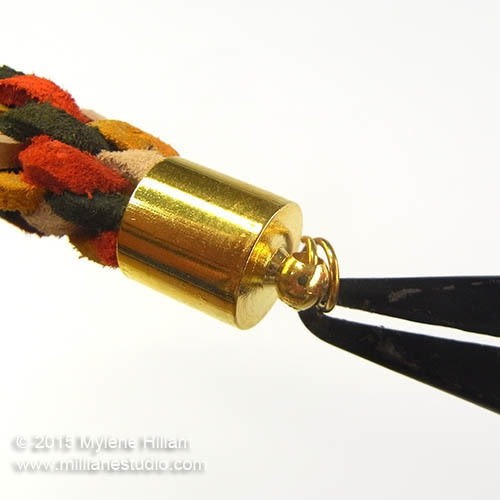
Use the split ring pliers to separate the coils of the split ring.
-
 Step 10
Hook the loop of the end cap onto the split ring and slide it around the ring until it reaches the end of the coil. Repeat on the other length of braid.
-
 Step 11
Hook one end of the chain component onto each of the split rings by separating the coils as you did in Step 10.
Add a split ring to the other end of each braid. Attach one half of the toggle clasp to each ring.


 1
Home Accessories »
Diy Jewelry Box
1
Home Accessories »
Diy Jewelry Box
