


About
A conveNient Bag to KeeP you Knitting StuFF!
So this is a fairly simple bag to make. I used inspiration from the classic knitting rolls and the basic reusable grocery bag.
This is my first "How To" post, so if you have any comments or suggestions, please doN't Hesitate!!
-
 Victorian Dreamer favorited Knitting Bag
31 Mar 02:25
Victorian Dreamer favorited Knitting Bag
31 Mar 02:25
-
 Carlos W. favorited Knitting Bag
23 Mar 09:46
Carlos W. favorited Knitting Bag
23 Mar 09:46
-
 Daniel P. favorited Knitting Bag
22 Mar 08:57
Daniel P. favorited Knitting Bag
22 Mar 08:57
-
 Christine B. favorited Knitting Bag
25 Nov 09:45
Christine B. favorited Knitting Bag
25 Nov 09:45
-
 InterpretThat favorited Knitting Bag
28 Feb 11:48
InterpretThat favorited Knitting Bag
28 Feb 11:48
-
 twins711 favorited Knitting Bag
14 Feb 06:28
twins711 favorited Knitting Bag
14 Feb 06:28
-
 Miss_Fit added Knitting Bag to Purses, Bags, and Wallets
29 Mar 11:35
Miss_Fit added Knitting Bag to Purses, Bags, and Wallets
29 Mar 11:35
-
 Brandie B. favorited Knitting Bag
18 Oct 14:09
Brandie B. favorited Knitting Bag
18 Oct 14:09
You Will Need
-
 Step 1
First off, this is the pieces you will need to make the bag! This tutorial supposes that you have a basic knowledge of sewing!
The names are in french on the pattern, so here they are:
Côtés du sac = Sides of the bag
Fond du sac = Bottom of the bag
Bandouillère = Shoulder strap
Pochette à aiguilles = Knitting needle pocket
Pochette à ciseaux = Scissor pocket
Pochettes à aiguilles à chat = Sewing needle pocketa = Inside fabric without pattern
b = Outside fabric without patternAll the sizes are in centimetres.
All the sizes include a 3/4cm seam allowance... although, you can change the sizes if you want to make you bag bigger or smaller!!
-
 Step 2
The first step is to make the inside pockets. For the needle pocket I used the "a" fabric although you can choose to used the "b" fabric also. For the scissor pocket I used the "b" fabric and apposed the sewing needle pocket to it.
The pocket are only a single layer of fabric, although ou can choose to make them double if you would like them thicker. I also decided to finish the pockets with a dark green seam, but you can simply do a fold over.
-
 Step 3
The second step is to sew the pockets to the side of the bag. I chose to sew them on the center of both of the sides. Make sure your sides are on the right way you want them. ( I had to take off one of mine because I had set up one of the sides the wrong way)
Afterwards, you need to sew separators on the needle pocket. I chose to make six pockets, but it all depends on the size of your needles or how many you have.
-
 Step 4
Here is what part of the needle pocket looks like.
-
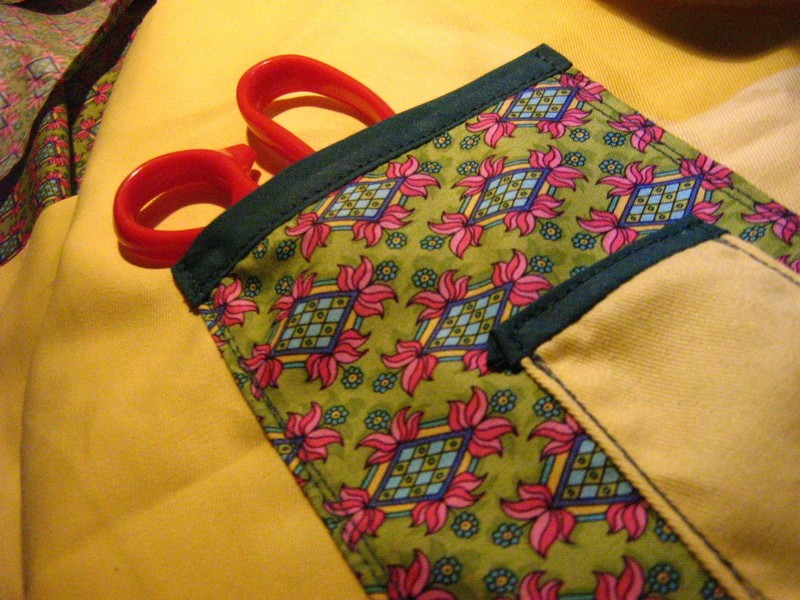
 Step 5
Here is how the scissor pocket should look like once finished!
-
 Step 6
The third step is to make the bottom of your bag. For my bag I decided to use padding in order to make it a bit more rigid. So you take your two pieces of fabric (the inside and outside) and slip the padding in between. You sew all the borders and then sew through it again making the design desired. I simply made losanges.
-
 Step 7
The fourth step is to put the frame of the bag together. First you need to sew together the sides of the bag. Taking the inside and outside layers and sewing them together in reverse, except for the bottom, so that when you flip them around, you cannot see the seems. You should get two pieces.
Then sew those two pieces of fabric together, making sure that the seem will be in the inside of the bag.
Finally you should seww those two pieces to the bottom pieces, making sure that the seems from the side of the bag fall in the middle of the shorter side of the bottom.
-
 Step 8
The fifth step is to finish the seam of your bag. I decided for my part to use a yellow that was a little bit off from the yellow fabric I used for the inside of my bag.
-
 Step 9
The sixth step is to finish the border of your bag. You can, if you want, just leave it with a seam, but for my part I decided it would look better flipped over.
Basically at this step, you flip over the edge of your bag and sew it back on the surface. make it so the line where you sow is on the other side of the seam, that way it looks nicely finished.
-
 Step 10
The seventh step is to give the bag a bit more of a shape. To do that, make a fold starting at a base corner of the bag going all the way up to the top. Use the middle seam of the side of the bag as a guide to keep your line strait. And then sow.
-
 Step 11
By this point, your bag should be looking almost finished. The last step is the shoulder strap.
Take the two pieces you cut out for the should strap. Put them back to back and sow three of the sides together (the two long ones and one of the small ones). Then turn it back over and sew over the sides again to give the strap a nice flat finish. For the small side that wasn't sewn, fold it in so you cannot see the raw edges and sew over it.
Then it's time to sew the last piece to your bag. Place the end of your strap on the middle of the side of your bag and sow a square with an X in the middle to make it sturdy! DO the same to the other side of your bag and Voilà!!
-
 Step 12
Here's the inside of the finished bag!
-
 Step 13
here is the outside!!
Have fun!!And I hope to see your versions!


 1
Home Accessories »
Diy Jewelry Box
1
Home Accessories »
Diy Jewelry Box
