
About
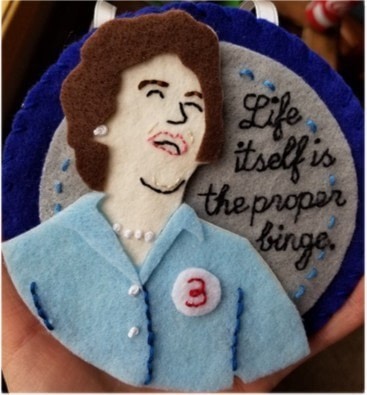
Life itself IS the proper binge.
Use this pattern and make your own Julia Child "Life itself is the proper binge" ornament/wall hanging out of felt. Perfect for your kitchen, your tree, your office, your life, etc.
Hang it proudly and remind yourself of the fabulously fearless Julia Child--and to put more butter into your recipe. Makes a great gift for a friend or project for a craft night.
When you finish your project it will be ~4.23" round.
Note: These instructions are cut out all, then glue all at the end. You may also glue as you go—that’s if you might
be interrupted while you work and are worried about misplacing pieces.
Downloads
- 2018-10-10-192038-Julia+Child+Binge.pdf 5.65 MB [ Download ]
-
 Julie R. favorited Julia Child "Life Itself Is The Proper Binge" Ornament
17 Mar 02:27
Julie R. favorited Julia Child "Life Itself Is The Proper Binge" Ornament
17 Mar 02:27
-
 mmotse03 favorited Julia Child "Life Itself Is The Proper Binge" Ornament
13 Mar 07:07
mmotse03 favorited Julia Child "Life Itself Is The Proper Binge" Ornament
13 Mar 07:07
-
 Mythiko Ino favorited Julia Child "Life Itself Is The Proper Binge" Ornament
05 Mar 00:04
Mythiko Ino favorited Julia Child "Life Itself Is The Proper Binge" Ornament
05 Mar 00:04
-
 Crafterella featured Julia Child "Life Itself Is The Proper Binge" Ornament
04 Mar 23:00
Crafterella featured Julia Child "Life Itself Is The Proper Binge" Ornament
04 Mar 23:00
-
 Kimya J. favorited Julia Child "Life Itself Is The Proper Binge" Ornament
03 Mar 15:23
Kimya J. favorited Julia Child "Life Itself Is The Proper Binge" Ornament
03 Mar 15:23
-
 Missy C. published their project Julia Child "Life Itself Is The Proper Binge" Ornament
02 Mar 09:00
Missy C. published their project Julia Child "Life Itself Is The Proper Binge" Ornament
02 Mar 09:00
You Will Need
-
Step 1
Print out this PDF—instructions and pattern.
-
Step 2
Cut out all paper pattern pieces—only cut outlines except where marked (other lines inside the piece are
guides for stitch detail). -
Step 3
Cut out approximate-sized pieces of felt in noted colors/quantities for each pattern piece (I find it better to
have smaller pieces to work with before taping). -
Step 4
Tape down pattern pieces to felt in the colors indicated on the pattern—being careful not to tape over places
where you’re going to do stitch detail. This step is technically optional—you don’t have to tape—but your life
will be so much better for it. -
Step 5
Cut one piece of ribbon/rick-rack for ornament hanging. (Optional! Approx 6” long, though this is up to you.)
-
Step 6
Cut out one large dark blue background circle.
-
Step 7
Re-tape the circle pattern piece on another piece of dark blue felt and cut that out as well.
-
 Step 8
Using the backstitch (shown below), and black thread (2 strands), stitch lettering onto the smaller light grey
circle piece. Use your paper pattern as a guide. Smaller stitches are better for looks and pattern removal.
(For tips on stitching letters—see here: http://craftsubversive.blogspot.com/2017/03/techniques-stitchlettering.html) -
Step 9
Stitch the inner circle dash detail onto the circle using 6 strands of medium blue thread.
-
Step 10
Cut out the circle you just stitched and carefully remove paper pattern. Set aside for now.
-
Step 11
Using the backstitch, stitch detailing onto the face/body piece. This is fine work, so in most cases you’ll
separate out and use only 2 strands of your 6 strand embroidery floss.
• Nose detail— 2 strands of black thread
• Eye lid detail—2 strands of black thread
• Tongue detail—2 strands of black thread
• Chin—2 strands black thread
• Eyebrow—6 strands of brown thread
• Lips— 2 strands of pink thread
• Face detail (chin, laugh lines)— 2 strands cream thread -
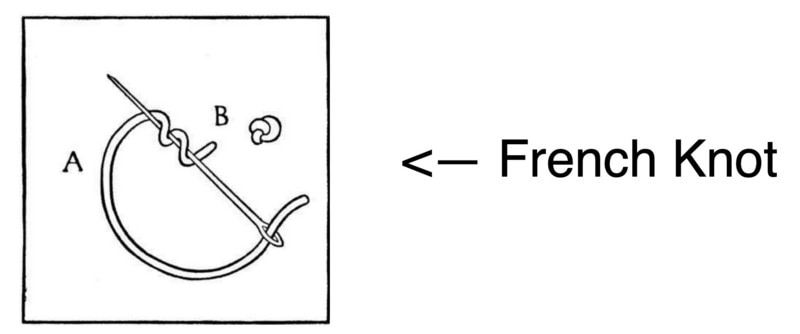
 Step 12
Using a french knot technique (shown below), stitch the white earring and the necklace detail onto the face/
body piece as well. -
Step 13
Cut out body and carefully remove paper pattern. Set aside.
-
Step 14
Cut out hair piece.
-
Step 15
Using the backstitch and medium blue thread, stitch seam details onto the shirt piece.
-
Step 16
Using the french knot technique, stitch button detail onto the shirt piece.
-
Step 17
Cut out the shirt piece, and carefully remove the paper pattern.
-
Step 18
Cut out the shirt collar pieces.
-
Step 19
Using the backstitch and 2 strands of red thread, stitch the “3” onto the chef’s button.
-
Step 20
Cut out the chef’s button and carefully remove the paper pattern.
-
Step 21
Now it’s time to glue the body together.
-
Step 22
Glue the collar pieces onto the shirt piece.
-
Step 23
Glue the button onto the shirt piece.
-
Step 24
Glue the whole shirt piece onto the body piece.
-
Step 25
Glue the hair piece onto the body piece.
-
Step 26
Form a loop with the ribbon and glue the ends in between the dark blue background circle pieces. Be sure
to do this far enough away from the edge so you can still easily stitch without having to go through glue (err
toward the center). -
 Step 27
Using the overcast stitch (shown below) and dark blue thread, stitch your two dark blue background circle
pieces together around the edges.(You may glue down the loose ends as you please—I tuck them inside
the two layers and glue.) -
Step 28
Now—take your stitched light grey circle background and your main body piece and position them, without
gluing, onto the dark blue background circle. You want to move them around so that it’s laid out how you
want it (paying attention to how it will hang, if you’re making the ornament). Make sure that the body piece
isn’t blocking the lettering. The body will overspill the smaller circle onto the larger outer circle. -
Step 29
Glue the body onto the stitched dark grey circle piece.
-
Step 30
Glue the whole body + circle piece to the dark blue main circle (after re-checking and making sure it’s in the
position that you want it).Variations:
Ornament/Wall Hanging:
Complete as instructed. Special supplies needed: Ribbon/rick-rack for hanging.
Button:
Complete without the hanging ribbon. Attach button pin to the back. This may be attached through the fabric
(complete before stitching the two back circles together), or it may be attached to the back (stitch on before
stitching the two back circles together, or place on back and hot glue a bit of felt over it to secure/cover the pin
back).
Special supplies needed: Button back pin or safety pin.
Magnet:
Complete without the hanging ribbon. Hot glue a magnet to the back of the completed ornament. Alternately, if
you want to be fancy and have an invisible magnet, create a felt pocket inside the back layer of the ornament,
then stitch it shut with the magnet inside to secure a magnet.
Special supplies needed: Magnet.