


About
Videogame craft = win #6
I’ve been playing video games since early childhood. I remember going on a family holiday when I was around 8-9 and all I did was play my Game Boy the whole time :P
So I’m going to show you how to make a lightweight (and useful) reminder of that great handheld brick…
Tags
-
 Joe Newton favorited How To: Retro Game Boy Key Chain
23 Oct 06:29
Joe Newton favorited How To: Retro Game Boy Key Chain
23 Oct 06:29
-
 RareJewel favorited How To: Retro Game Boy Key Chain
30 Aug 06:37
RareJewel favorited How To: Retro Game Boy Key Chain
30 Aug 06:37
-
 Hydie Linn T. favorited How To: Retro Game Boy Key Chain
12 Sep 00:12
Hydie Linn T. favorited How To: Retro Game Boy Key Chain
12 Sep 00:12
-
 Penny F. added How To: Retro Game Boy Key Chain to Accessories
30 Aug 01:16
Penny F. added How To: Retro Game Boy Key Chain to Accessories
30 Aug 01:16
-
 Sarin T. added How To: Retro Game Boy Key Chain to Accessories
10 Jul 18:59
Sarin T. added How To: Retro Game Boy Key Chain to Accessories
10 Jul 18:59
-
 Conner W. added How To: Retro Game Boy Key Chain to fashion
28 Jun 18:37
Conner W. added How To: Retro Game Boy Key Chain to fashion
28 Jun 18:37
-
Conner W. favorited How To: Retro Game Boy Key Chain
26 Jun 21:46
-
 Chaos favorited How To: Retro Game Boy Key Chain
14 Jun 15:19
Chaos favorited How To: Retro Game Boy Key Chain
14 Jun 15:19
- JaydeyLikesMac&Cheese favorited How To: Retro Game Boy Key Chain 04 Jun 16:46
-
 stephanie.goodsell.54 added How To: Retro Game Boy Key Chain to Clothing
04 Feb 16:55
stephanie.goodsell.54 added How To: Retro Game Boy Key Chain to Clothing
04 Feb 16:55
-
 Step 1
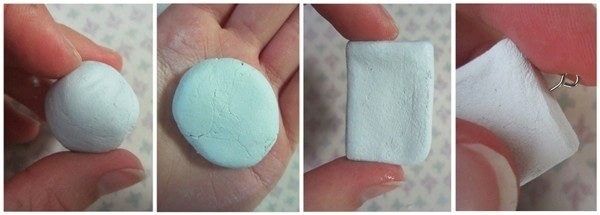
Take a clump of air dry clay (not too big!) and roll it into a ball, squish the ball flat in the palm of your hand and then shape it into a rectangle.
Make sure you curve the bottom right of the rectangle to copy a real Game Boys shape.
Take your eye pin and push it into the top (if it’s a really long eye pin you will have to cut it with jewellery cutters so it doesn’t poke through the bottom) I used a silver eye pin to match my key chain. -
 Step 2
Leave clay somewhere mid temperature to dry overnight. If you put it in front of the heater or hairdryer it will dry too fast and may crack, if you find once it’s dry some cracks have still formed you can put a little wet clay over them and smooth it over.
Once it’s dry you can paint it.
If you need help with the design here is a picture of a Game Boy for reference. -
 Step 3
using a small paint brush start painting the detail onto the clay.
I mixed white, a little black and the tiniest amount of red to create a base coat for the Gameboy. If you don’t add red the colour will be dull and cold looking, the red gives the Game Boy some warmth but make sure you don’t add too much or the grey colour will turn pink and you will have to start over!After the base coat is dry paint a dark grey ‘pre-screen’ at the top. Make sure the bottom right corner is rounded to match the shape of the actual Game Boy. Then paint the ‘speaker’ in the bottom right hand corner, this will help you with proportion and location of the buttons and other features, use it as a guide.
The actual screen is a bit tricky; you need to mix up a dull green, do this by mixing light green with a tiny bit of black. Paint a square in the middle of the ‘pre-screen’, add a little more black to the green and paint thin blurred lines at the top and bottom edge of the screen for shadowing, then use light green to paint a little in the middle of the screen for highlights.
After you have painted the rest of the detail you can paint an image on the screen. I chose to paint ‘Nintendo’ but if you want you can be creative and paint the scene of your favourite game. Because the screen is quite small you may want to use a magnifying glass when painting on the screen.
Let all paint dry. -
 Step 4
Note: You can buy key chain parts from craft shops but it can become expensive, I just went to a cheap shop and bought a fugly snoopy screwdriver key chain for $1.20!
Take your Key chain and open up the loop at the end with small pliers. Take off whatever came with it, loop it through the eye pin at the top of the Game Boy and close the loop.
-
 Step 5
I used a satin varnish over the top of the Game Boy, this will help protect the paint and prevent it from chipping off.
-
 Step 6
You’re done!
Now you have your very own Retro key ring.
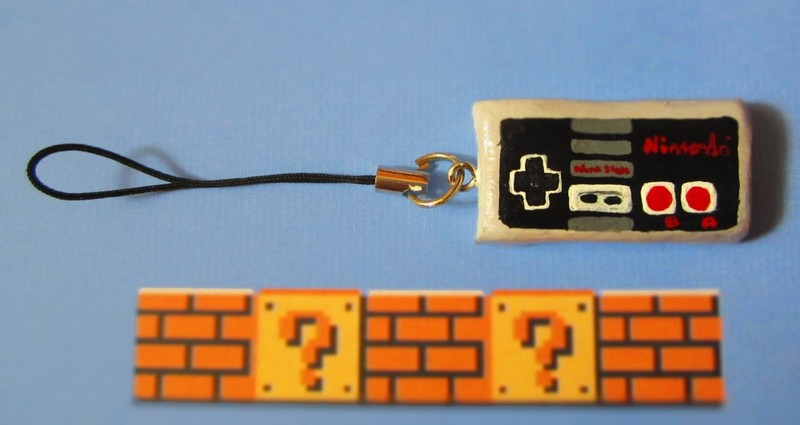
You could also make a Retro NES controller key ring/phone charm.
I bought a phone charm bit from a cheap shop for 99c and put my clay controller on it. -
 Step 7
There are so many other possibilities; you could make the NES gun, SNES controller, N64 controller. Use your imagination!


 1
Books & Journals »
Locking Box And Journal
1
Books & Journals »
Locking Box And Journal
 2
Babies & Kids »
A Toy Kitchen For A Child
2
Babies & Kids »
A Toy Kitchen For A Child
 3
Origami Flowers »
Origami Orchid
3
Origami Flowers »
Origami Orchid
 4
Office »
Pretty Sketchbooks
4
Office »
Pretty Sketchbooks
 5
Charms & Keyrings »
Shugo Chara Inspired Pop It
5
Charms & Keyrings »
Shugo Chara Inspired Pop It
