


About
A collar to brighten up your outfit
A stand alone collar tutorial inspired by the Miu Miu collar 'necklaces.' Create a collar that you can wear with any top : )
Tags
-
 Key West Witch added How To Make A Stand Alone Collar to Sewing
30 Jun 02:06
Key West Witch added How To Make A Stand Alone Collar to Sewing
30 Jun 02:06
-
 Jami H. favorited How To Make A Stand Alone Collar
12 Nov 12:00
Jami H. favorited How To Make A Stand Alone Collar
12 Nov 12:00
-
 Sirena F. added How To Make A Stand Alone Collar to Accessories
29 Feb 00:54
Sirena F. added How To Make A Stand Alone Collar to Accessories
29 Feb 00:54
-
Sirena F. favorited How To Make A Stand Alone Collar
29 Feb 00:54
-
 x_niccadee added How To Make A Stand Alone Collar to make this
21 Mar 02:41
x_niccadee added How To Make A Stand Alone Collar to make this
21 Mar 02:41
-
 C.Rami favorited How To Make A Stand Alone Collar
09 Feb 22:15
C.Rami favorited How To Make A Stand Alone Collar
09 Feb 22:15
-
Kays K. favorited How To Make A Stand Alone Collar
09 Feb 07:19
-
 Rosie M. published her project How To Make A Stand Alone Collar
21 Dec 12:05
Rosie M. published her project How To Make A Stand Alone Collar
21 Dec 12:05
You Will Need
-
 Step 1
You'll need a shirt so you can use it as a guide for making your collar. You'll see that on your shirt, the collar is made of two parts, the main collar itself and the collar stand. The collar stand is the little strip of fabric at the base of the collar that supports the collar and helps it sit in the right position.
Lay the main collar piece of your on top of your fabric and try to make one half of it as flat as possible. Pin it to the fabric and draw around it, with your lines sitting about 1.5cm away from the edge of the collar. Mark the half way point onto your fabric then cut round this half of the shape. Fold it across to the other side and use the cut half as a guide to cut the other half so that you get a perfectly symmetrical collar. Cut a second piece that is identical to the first.
Repeat this process with the collar stand; lay half of it flat and trace around it, then cut half, fold it over to the other side and cut that half too. Cut a second collar stand piece too. You should have four pieces that look roughly like this!
Grey in these illustrations represents the wrong side of the fabric.
-
 Step 2
If you don't want a coloured trim (which is shown on the photos above) you need to join your two main collar pieces together inside out, as shown in the illustrations here.
Pin and sew your two main collar pieces together (make sure the right side of the fabric is hidden in the middle of the sandwich - you should see the wrong side of the fabric on both sides when your collar pieces are pinned together.
Trim the corners off close to the stitching then turn the collar the right way round. Use a knitting needle or pencil to poke out the corners. If you want rounded corners, sew a curved shape instead of a corner!
Iron your collar so that it sits nice and flat.
If you want to trim your collar in a contrasting colour of bias binding, pin your two pieces together with the right sides of the fabric on the outside. Sew them together, then trim away the edge of the fabric very close to your stitching.
Iron your bias binding so that it has a crease all the way down the centre. Position it so that one half sits on top of the collar and the other sits underneath the collar, almost wrapping around the raw edge of your collar (binding it!) and pin it into place like this all the way round the edge of the collar. It should cover your original stitching.
Sew the binding into place with straight stitch. The stitching should catch the front of the bias binding, the collar |(sandwiched in the middle) and the back of the bias binding.
-
 Step 3
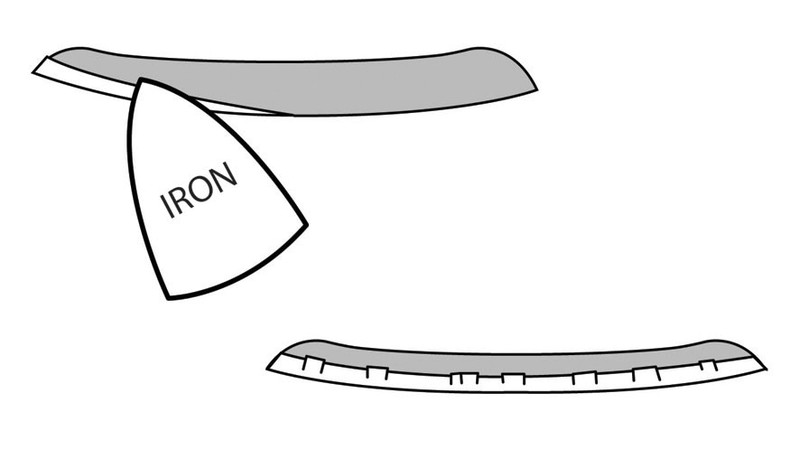
You need to prepare your collar stand pieces with a bit of ironing. Iron up a fold about 1.5cm deep along the longer edge of each collar stand piece. This is the lower edge of your collar stand. The fold of fabric needs to sit on the wrong side of the collar stand.
You’ll need to force the edge of the fabric to go where you want it to by using the iron, and you will create some little wrinkles. Just try and keep the folded edge as smooth as possible.
Do this to both of your collar stand pieces.
-
 Step 4
Now pin one collar stand piece to your main collar. Pin the unfolded edge of the stand so that it sits on top of the raw edge of your main collar. Try and centre the collar, so that the same amount of collar stand sticks out at either side of the collar.
You can sew this stand into place now. You are going to repeat this process with the other stand piece. Position it on the other side of the main collar. The main collar should be sandwiched between the two stand pieces. The stand pieces should be identical, so the folded edges you ironed should sit directly on top of one another. If they are a little mis matched, re iron them so they do match.
Sew all the way around the outer edge of the collar stand, over the folded edges, then pull this little collar-stand-pocket you’ve made downwards, away from the main collar, revealing the base of the collar.
Iron the collar stands so they sit nice and flat then pin the folded edges together and join them with a line of straight stitch, as close to the edge as possible.
Finish your collar with a popper or a button.


 1
Home Accessories »
Diy Jewelry Box
1
Home Accessories »
Diy Jewelry Box
