About
Simple loops are one of the most versatile loops used in jewellery making.
Once you've mastered making simple loops, you'll be able to use them in a multitude of ways: they can be linked together to create rosary chains, used to add dangles to a charm bracelet, or to connect a clasp to the end of a chain.
Photos in this tutorial use an eye pin so you'll be creating a double-ended loop but the basic loop-forming technique is the same when working with head pins.
-
 Sarah Sylvia S. favorited How To Form A Simple Loop
18 Jul 04:02
Sarah Sylvia S. favorited How To Form A Simple Loop
18 Jul 04:02
-
 craftgirl14 favorited How To Form A Simple Loop
07 May 17:20
craftgirl14 favorited How To Form A Simple Loop
07 May 17:20
-
 Alissa B. favorited How To Form A Simple Loop
28 Apr 20:23
Alissa B. favorited How To Form A Simple Loop
28 Apr 20:23
-
 MillLaneStudio published her project How To Form A Simple Loop
26 Apr 09:00
MillLaneStudio published her project How To Form A Simple Loop
26 Apr 09:00
You Will Need
-
 Step 1
String a bead on the eye pin (or head pin). Grip the pin above the bead with the tip of the flat nose pliers leaving a gap the thickness of the pliers between the bead and the pliers (my pliers are approximately 1mm thick at the tip). The gap is necessary so that you don't chip the bead in the next step.
-
 Step 2
Bend the eye pin to the same side that the eye pin loop closes, forming a 90° angle. This will ensure that one loop closes on the left and the other closes on the right hand side of the bead and will give the component added strength.
-
 Step 3
Trim the eye pin to 10mm (3/8") using the flush cutters. When you cut, position the pliers with the flat side facing towards the bead. Use your non-dominant hand to hold the piece you are about to cut off so that it doesn't go flying as you cut it.
-
 Step 4
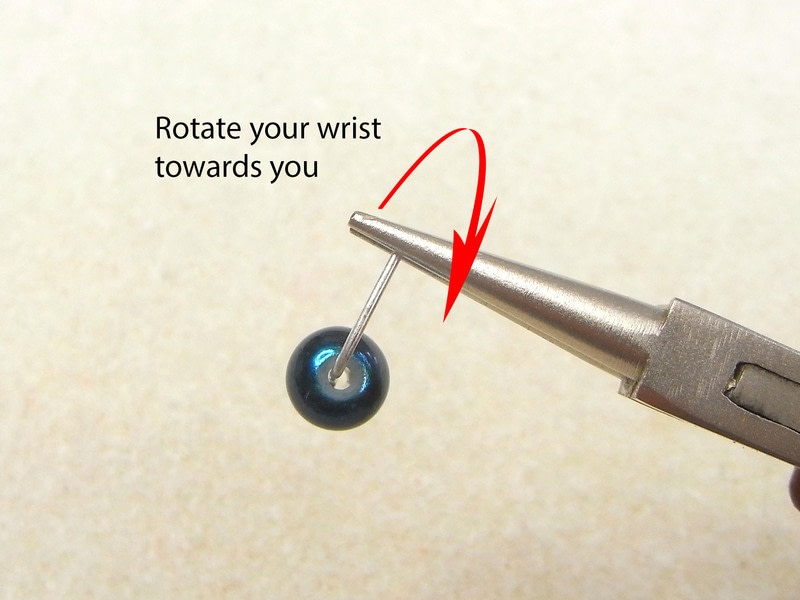
Position the cut end of the eye pin approximately one fifth of the way along the pliers with the cut end sitting flush with the jaws. (You will get better at judging where to position the eye pin with practice.) Rotate your wrist towards you as far as it will comfortably turn. This photo shows the overhead view.
-
 Step 5
Loosen your grip on the pliers slightly so that you can slide the pliers around the partially formed loop to grip the top of the curve.
-
 Step 6
Close the jaws of the pliers again and rotate your wrist towards you. Do this until the loop is fully formed.
-
 Step 7
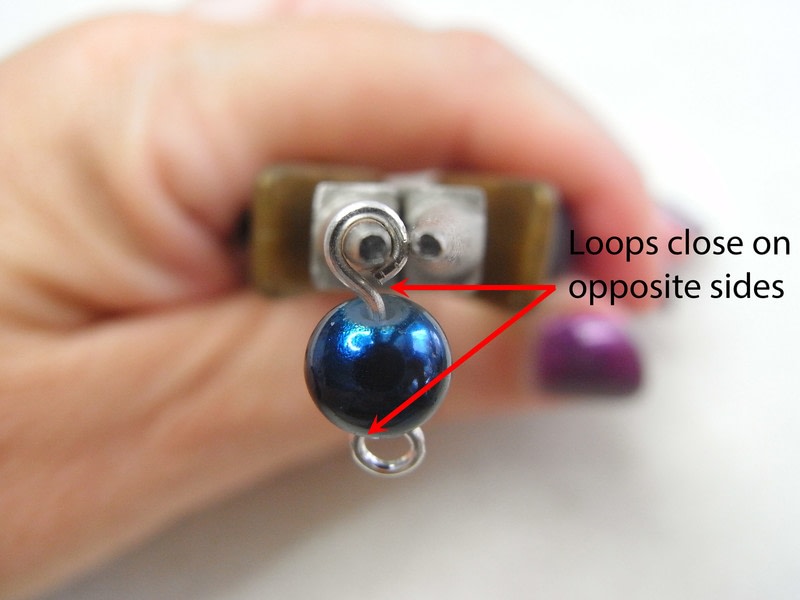
The loops of the completed component should close on opposite sides of the bead and be centred above the bead.