

About
In this tutorial, I’ll cover the necessary steps needed to turn a reference photo into a stunning drawing that you can use as a portfolio piece.
Before we get into the details, we have to first make sure we do some prep work.
-
 Dawn T. added How To Draw And Shade The Human Torso to Drawing
22 Nov 17:30
Dawn T. added How To Draw And Shade The Human Torso to Drawing
22 Nov 17:30
-
Dawn T. favorited How To Draw And Shade The Human Torso
22 Nov 17:30
-
 stanprokopenko published his project How To Draw And Shade The Human Torso
31 May 09:00
stanprokopenko published his project How To Draw And Shade The Human Torso
31 May 09:00
You Will Need
-
 Step 1
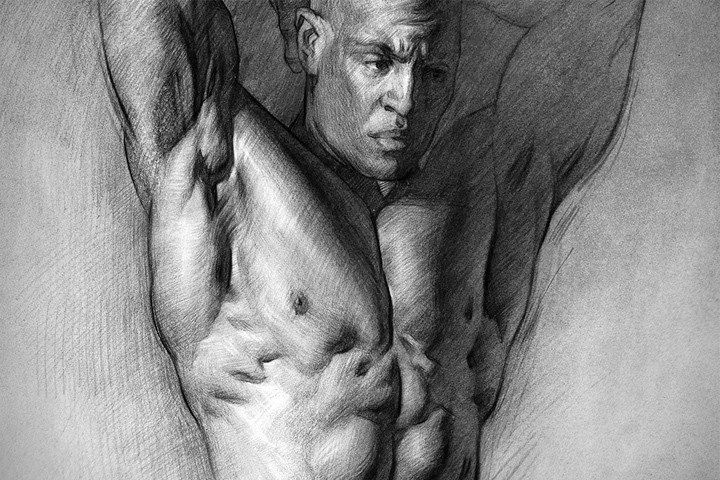
Pick a good reference image that you want to use for your drawing. Make sure it is high resolution and has good lighting.
-
 Step 2
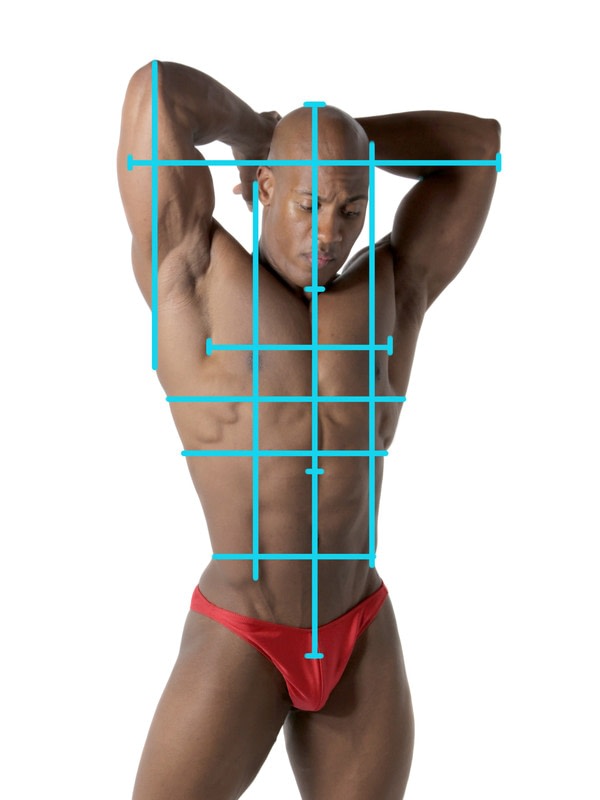
Break down the reference image with proportion studies. Look for measurements that will help you lay in the figure. Things in the photo that align well. Look for head unit alignments, width and height relationships, horizontal and vertical plumb lines, and any other proportional issues you might run into.
-
 Step 3
Figure out and sketch a gesture study. Find the motion within the pose, rhythms between the elements in the pose, and you're much less likely to end up with a stiff drawing. The major action line of this pose is an S curve.
-
 Step 4
Value Studies: Develop a tonal composition. Where's the focal point? How will you design the values to create a clear focal point and an interesting composition? This is a tonal study using 5 values.
-
 Step 5
Finish off your prep by doing an anatomy study for the figure drawing. Here I did an anatomy tracing of the muscles over the photo.
-
 Step 6
Start drawing the layin. Since you're drawing from reference, not from imagination, the first step should be heavy on measuring. Checking to make sure the proportions are correct.
-
 Step 7
Identify the largest shapes and rhythms, then add the anatomical details on top. Use what you learned from your proportion and gesture studies.
-
 Step 8
Now that we have the layin finished, it's time for the shading. I like to start by separating the lights from the shadows. A quick way of doing this is with some charcoal powder.
-
 Step 9
Dip a soft sable brush into a little jar of charcoal powder. Lightly tap the brush on the jar to knock off some of the charcoal. Slowly start spreading it onto the shadow areas.
-
 Step 10
When you're done spreading the charcoal powder begin using your pencil to shade in more details. Make sure your pencil is already nicely sharpened when shading an important light area.
-
 Step 11
You're done! Keep practicing to develop your eye and hand. Learning to represent the human form 3 dimensionally on a flat paper, takes many years of practice.


 1
Home Accessories »
Diy Jewelry Box
1
Home Accessories »
Diy Jewelry Box

