


About
Add a neat professional detail to your handmade wardrobe
I love adding details and quirks to my dressmaking projects and one of my favourite techniques is adding pin tucks.
In this tutorial I'll show you how to customise a pattern that you already have for a simple top and show you how to adapt it to include pin tucks.
-
 mumiavadasz favorited How To Add Pin Tucks To Your Garments
18 Jan 21:48
mumiavadasz favorited How To Add Pin Tucks To Your Garments
18 Jan 21:48
-
 ellie j. added How To Add Pin Tucks To Your Garments to cool stuff i can do
18 Jan 09:23
ellie j. added How To Add Pin Tucks To Your Garments to cool stuff i can do
18 Jan 09:23
-
 Sheila M. favorited How To Add Pin Tucks To Your Garments
17 Jan 01:33
Sheila M. favorited How To Add Pin Tucks To Your Garments
17 Jan 01:33
-
 Crafterella featured How To Add Pin Tucks To Your Garments
09 Jan 23:00
Crafterella featured How To Add Pin Tucks To Your Garments
09 Jan 23:00
- Kate A. favorited How To Add Pin Tucks To Your Garments 09 Jan 04:24
-
Suzi T. favorited How To Add Pin Tucks To Your Garments
03 Jan 12:03
-
Alissa B. favorited How To Add Pin Tucks To Your Garments
29 Dec 19:02
-
 Lauren G. published her project How To Add Pin Tucks To Your Garments
28 Dec 09:00
Lauren G. published her project How To Add Pin Tucks To Your Garments
28 Dec 09:00
You Will Need
-
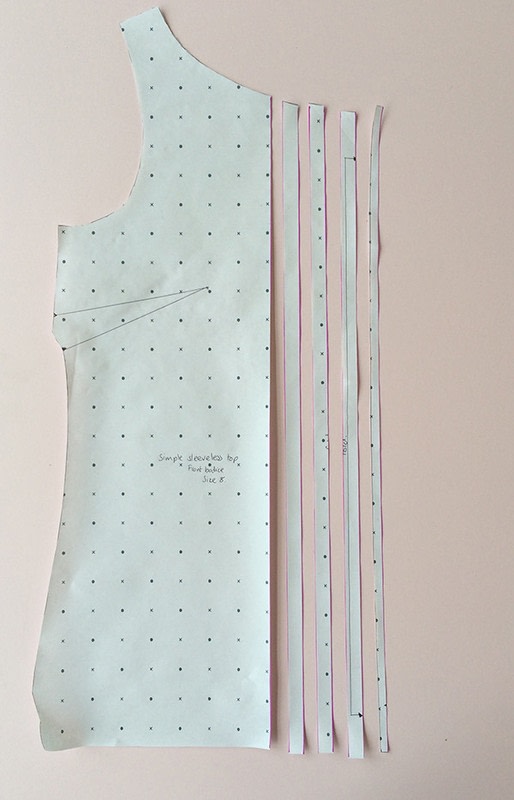
 Step 1
Whether you are going to stitch part way down the tucks or the whole way, the following steps will be the same.
First of all decide how many tucks you want – I’m going to have 8 all together in mine. As the pattern is cut on the fold, I’ll have to add 4 to my pattern piece.
I want my tucks to be 1/2 inch apart so for my first tuck I’m going to draw a parallel line 1/4 inch from the centre fold line.
I’m using inches to measure it out as that’s what my ruler is in and it makes it easier to get the lines parallel. You can choose to have them further apart if you want but closer together might get too tricky. Just practise on some scrap fabric if you are not sure how it will look.
-
 Step 2
Continue to draw a further 3 lines each 1/2 inch apart.
-
 Step 3
Now cut along each of these lines so that your front bodice is in 5 sections.
-
 Step 4
With some pattern paper underneath, tape the big bodice section of the pattern onto the paper. I wanted each tuck to be really narrow so I taped all of my strips down 3/8 inch apart. You can make the distance whatever you like - just bear in mind the tucks will appear half the size.
-
 Step 5
Next just round out the neckline back into a smooth curve again. I've shaded in the tuck sections with purple pen just so they are easier to see.
-
 Step 6
When you cut the fabric out, cut little snips in the edge of the fabric to indicate where the tuck lines are. Each tuck will have two snips at the neckline edge and two and the hemline edge (even if you are only stitching part of the way down).
-
 Step 7
Once the fabric is cut out, stay stitch the neckline as normal. Don't sew the dart yet - get the tucks in place first.
Press the centre crease in the garment - this will help to get the first tuck even.
Starting at the tuck closest to the centre (you can do left or right first - it doesn't matter), fold the bodice, wrong sides together and match up the little snips for the first tuck that you made at the neckline and hemline. Press the a crease in the fabric.
Pin in place and sew just a few mm from the fold. If you are only stitching part of the way down then just stop once you reach wherever you want to stop and do a few reverse stitches to secure the threads.
I stopped 9 inches from the neckline edge but you could alter this if you wanted. If you still want it to be fitted over the bust, just make sure you stitch lower than the level of the dart.
-
 Step 8
Press the tuck out to the side.
-
 Step 9
Continue the process for the rest of the tucks. Match up the notches at the top and bottom and before you stitch press a crease in the fabric making sure it is an even distance from the last tuck.
-
 Step 10
Press them towards the side seams –so you’ll have 4 going to the left and 4 going to the right.
-
Step 11
Continue the rest of the construction of the top in the same way as per the instructions in the book, making sure the tucks stay pressed in the right direction when you sew on the bias binding at the neckline.