


About
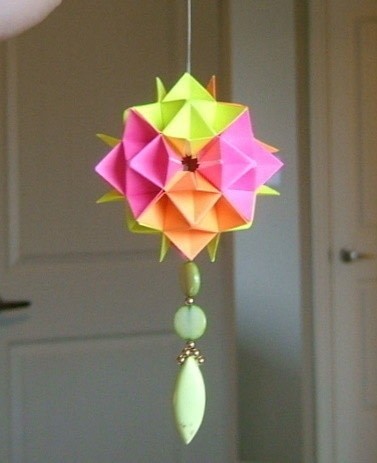
Elegant Holiday Ornament.
Create your own stunning ornaments...
Tags
-
 Key West Witch favorited Holiday Ornament Tutorial
08 Aug 00:47
Key West Witch favorited Holiday Ornament Tutorial
08 Aug 00:47
-
 Dana H. favorited Holiday Ornament Tutorial
06 Jun 19:02
Dana H. favorited Holiday Ornament Tutorial
06 Jun 19:02
-
 matthew t. favorited Holiday Ornament Tutorial
23 Jan 05:41
matthew t. favorited Holiday Ornament Tutorial
23 Jan 05:41
-
Marie R. added Holiday Ornament Tutorial to ART
12 Feb 15:34
-
Marie R. favorited Holiday Ornament Tutorial
12 Feb 15:34
-
Nina L. added Holiday Ornament Tutorial to Orgami
04 Jan 12:48
-
Nina L. favorited Holiday Ornament Tutorial
04 Jan 12:48
-
 ShortHairedGirl favorited Holiday Ornament Tutorial
01 Jan 03:27
ShortHairedGirl favorited Holiday Ornament Tutorial
01 Jan 03:27
-
 harleygirl6815 added Holiday Ornament Tutorial to Paper Crafts
29 Nov 04:47
harleygirl6815 added Holiday Ornament Tutorial to Paper Crafts
29 Nov 04:47
-
harleygirl6815 favorited Holiday Ornament Tutorial
29 Nov 04:47
You Will Need
-
 Step 1
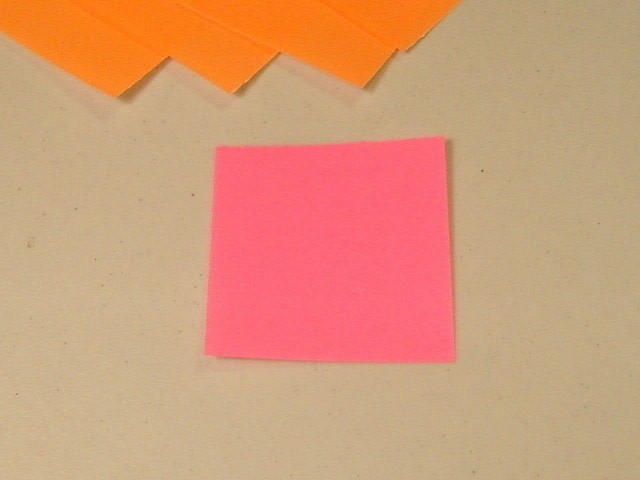
Start with 12 pieces of square paper measuring 3 inches by 3 inches. I chose three different colours for this "how to" because it will be easier for you guys. ;)
-
 Step 2
Start with your first piece...in this case, pink.
-
 Step 3
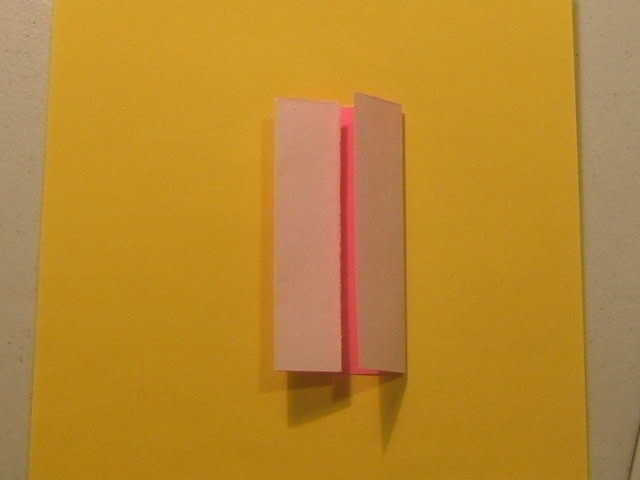
Fold paper in half so that the "white" side is showing.
-
 Step 4
Unfold paper. Fold one side towards the centre line that you just created. Then do the same for the left side.
-
 Step 5
This is what you should have so far. :)
-
 Step 6
Now unfold again. This time we are going to fold the other way, still keeping the white side facing out.
-
 Step 7
Same as before, fold one side to that centre line fold you just made, and then fold the left side.
-
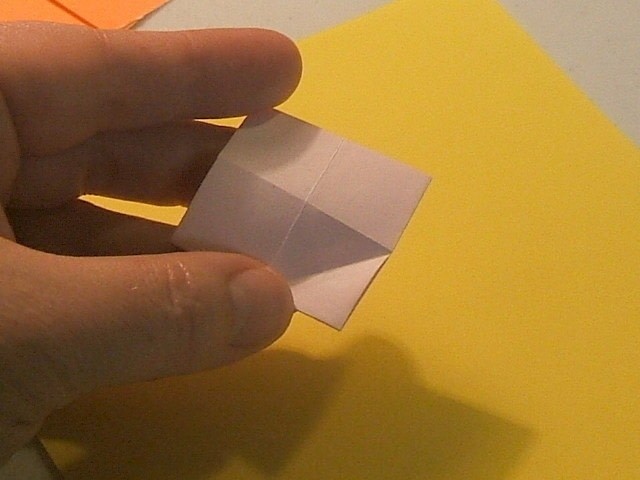
 Step 8
This is what it should look like now. :)
-
 Step 9
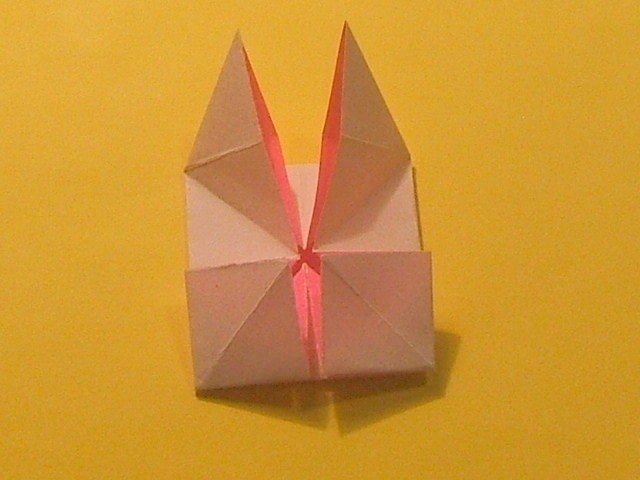
We are going to open the right flap slightly and crease paper as shown. Then we are going to do the exact same crease fold to the left side.
-
 Step 10
This is what the module should look like.
-
 Step 11
Place your finger as shown in the diagram. See how it flattens out?
-
 Step 12
I want you to crease the paper now to create the "roof-top" shape.
-
 Step 13
Place your finger under the left flap as shown and crease upward.
-
 Step 14
This is what the module should look like now. Repeat step "13" on the right side.
-
 Step 15
This is what the module should look like now...lets go to the next step now. :)
-
 Step 16
Place fingertip on the tip of the left flap shown here.
-
 Step 17
Now just fold in down gently as shown. We are going to do the exact same thing to the right side. Look to step 16 to repeat.
-
 Step 18
Here's what our module looks like so far. Now we are going to do the exact same thing to the other end.
-
 Step 19
Remember, Fold back one flap as shown, and then the other.
-
 Step 20
Then place your finger as shown in step 11. Crease to create the "roof-top" type fold.
-
 Step 21
Look at step 13 again...place your finger under the left flap and crease upward. Do the same for the right side. This is what it should look like now. :)
-
 Step 22
Look at step 16 again. Place your finger as shown on the left flap and lay down. Do the same for the right side. This is what you should have.
-
 Step 23
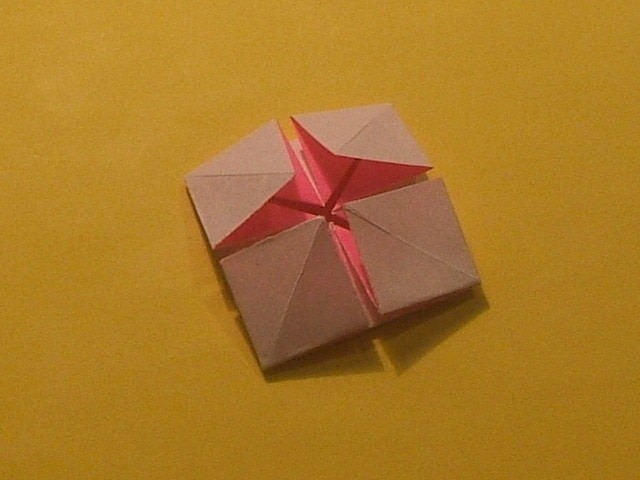
Turn the module over...Note the "x" pattern in it. We are going to fold these four corners up to meet the centre of the "x". See next step.
-
 Step 24
Start folding up one corner to meet the centre.
-
 Step 25
Three corners are done...one more corner to fold.
-
 Step 26
This is what our module looks like now. Turn the module over.
-
 Step 27
Okay...now we are going to fold it in half diagonally back on itself...see the following diagram.
-
 Step 28
We are just going to crease it. Then unfold it so it lays flat like step 27, and fold it in half diagonally again using the other two corners.
-
 Step 29
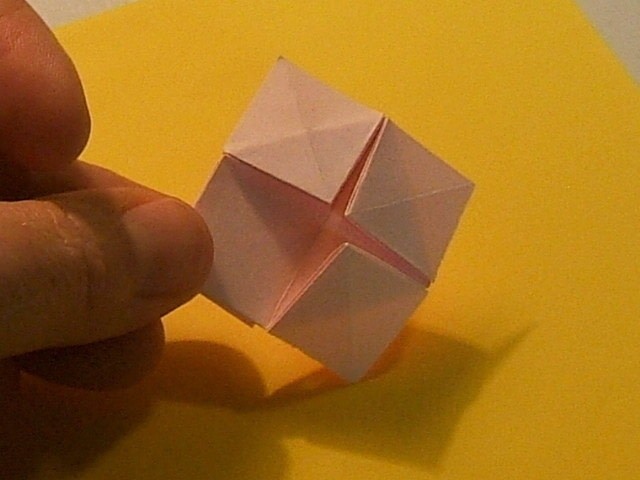
This is what your module should look like. Now take two end tabs at a time..(my fingers are already on one tab) and we are going to push down. Repeat on the other two tabs. By pushing these tabs down you are "opening" the module.
-
 Step 30
You have completed your first module! Good job...now make a total of 12 modules please. :)
-
 Step 31
Here are our 12 completed modules...now we put it all together.
-
 Step 32
Very simply join together by placing the orange tab over the yellow tab and push together.
-
 Step 33
Now for the third piece (pink), two of its "tabs" fit on the the newly formed module. One tab slips onto the orange, and the other pink tab slips onto the yellow.
-
 Step 34
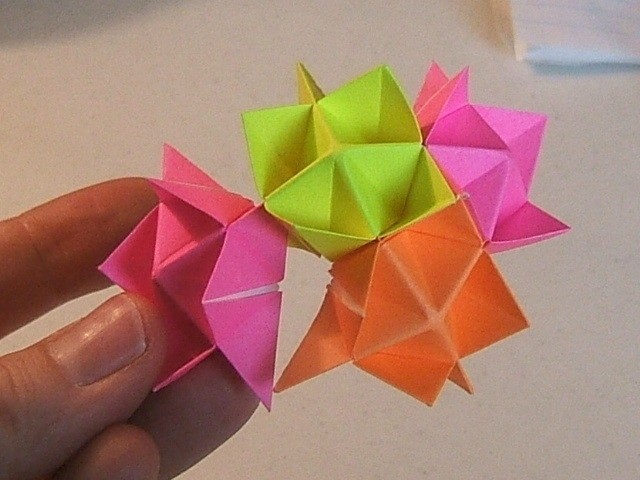
So this is what we have so far. If you look directly into the middle of our model, you will see a large triangle. One corner is pink, the second corner is orange and the third corner of it is yellow. Now for our project, on each side of our triangle(total of three sides), we are going to create a "square" using our modules.
-
 Step 35
So lets take a pink one and slide it onto the yellow module.
-
 Step 36
Now lets add a yellow module onto the orange one. Then join the new pink and yellow modules together. This forms our square. Do you see it? The top left hand corner of the square is pink. The top right hand corner of the square is yellow. The bottom left hand corner is yellow. The bottom right hand corner is orange. So we have now completed a "square" using one of the sides of our central "Triangle". Repeat these steps for the second and third sides of our central "Triangle".
-
 Step 37
Once we have added our "squares" to each side of our central "triangle", you will see that some tabs needed to be tucked together...so don't add any new modules yet, just tuck the existing tabs together. Once you do, you will notice that they form "triangles" again. :)
-
 Step 38
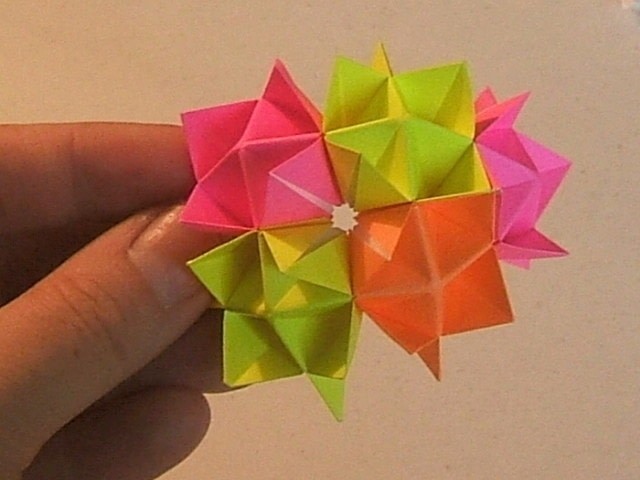
Here we are, all nicely tucked in. Rmember in between the "triangles", there are "squares". Complete the module in this manner...you're almost done!
-
 Step 39
Now, with the last module or two, you will be using all 4 tabs to close it all up. Just be patient. You're doing great!
-
 Step 40
Yay here's the finished model! Now it's time to add the fun stuff. Go get some stringing wire and beads. If you look at your model there are several openings. These are perfect for adding our beads.
-
 Step 41
Here's my choice of stones, and now I am going to bring the wire up through the module so I can finish it.
-
 Step 42
And....you're done! I hope you enjoyed this "how-to" project!
:)
Lanie


 1
Books & Journals »
Locking Box And Journal
1
Books & Journals »
Locking Box And Journal
 2
Babies & Kids »
A Toy Kitchen For A Child
2
Babies & Kids »
A Toy Kitchen For A Child
 3
Origami Flowers »
Origami Orchid
3
Origami Flowers »
Origami Orchid
 4
Office »
Pretty Sketchbooks
4
Office »
Pretty Sketchbooks
 5
Charms & Keyrings »
Shugo Chara Inspired Pop It
5
Charms & Keyrings »
Shugo Chara Inspired Pop It

i love this project.
CO + K User
i loooove the colors *-*