


About
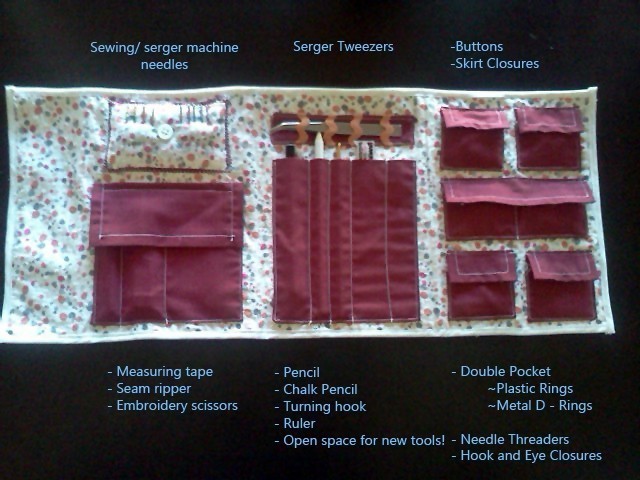
Simply sewn sewing kit made with scrap fabric! Organize all your sewing gear!
Project perfect for those with a basic understanding of sewing/ sewing machines. This is something I designed for my own personal use
but feel free to change things around to make it better suit your needs! The finished dimensions are: 8½” H x 20” W and yours will come out looking a little different then mine because I used some not so fancy finishes on the outside pocket edges. Lastly, this is my very first tutorial so constructive criticism will be appreciated
Tags
Downloads
- tutorial_pic.jpg 298 KB [ Download ]
- tutorial_pic.jpg 298 KB [ Download ]
- tutorial_pic.jpg 298 KB [ Download ]
- tutorial_pic.jpg 298 KB [ Download ]
- tutorial_pic.jpg 298 KB [ Download ]
- tutorial_pic.pdf 661 KB [ Download ]
-
 alp.zoey added Hand Made Sewing Kit! to Bug
18 Aug 04:37
alp.zoey added Hand Made Sewing Kit! to Bug
18 Aug 04:37
-
alp.zoey favorited Hand Made Sewing Kit!
18 Aug 04:37
-
 Julie R. favorited Hand Made Sewing Kit!
09 May 16:03
Julie R. favorited Hand Made Sewing Kit!
09 May 16:03
-
Julie R. added Hand Made Sewing Kit! to Sewing
09 May 16:02
-
Rebecca C. favorited Hand Made Sewing Kit!
29 Jul 06:50
-
Deb E. favorited Hand Made Sewing Kit!
06 Feb 05:00
-
 Miss_Fit favorited Hand Made Sewing Kit!
17 Nov 01:26
Miss_Fit favorited Hand Made Sewing Kit!
17 Nov 01:26
-
Charlott W. favorited Hand Made Sewing Kit!
09 Jun 06:32
-
 forbunnie favorited Hand Made Sewing Kit!
06 Mar 01:34
forbunnie favorited Hand Made Sewing Kit!
06 Mar 01:34
-
 Rachel B. favorited Hand Made Sewing Kit!
15 Aug 19:05
Rachel B. favorited Hand Made Sewing Kit!
15 Aug 19:05
You Will Need
-
Step 1
Gather supplies and necessary equipment
Supplies:
- Two types of fabric: one solid and one print
~I used scrap left over fabric I had lying around and to be honest I don’t remember how much I used….
~But if my math is correct (and I’m so sorry if it’s not!) you’ll need 2 ½ yards of the solid and just a ½ yard of the print
~Note: This number seems like a lot for such small squares so I may be wrong but I don’t want anyone to start a project and not have enough…. So…. better safe then sorry
- 1 ½ yards Fusible interfacing
- Thread
- Stuffing
- ½” single fold bias tape
- Ribbon/ trim (scraps work perfect)
- And a button (if you want)Tools/ Machinery:
- Sewing machine
- Iron and ironing board
- Tape measure/ Ruler
- Scissors
- Chalk pencil (or other non-permanent marking device) -
Step 2
Getting Started....
- Choose two contrasting fabrics, one solid and one print, and cut a 8½” H x 20” W piece for each.
(This will be finished with bias tape and has no seam allowance built in so try to be as exact as possible)- Cut two pieces of fusible interfacing the same size and iron on the WRONG side of each fabric piece according to manufacturer’s instructions.
- Set solid piece aside, pockets (also in solid fabric) will be attached to printed piece.
-
Step 3
Pocket / Pouch / Flap Dimensions
If you like the pocket design I chose the non-finished dimensions for the fabric squares are as follows:
( Please note: The pockets are done in the solid fabric unless otherwise noted. Also a 5/8” seam is INCLUDED in these dimensions on ALL SIDES so if the dimensions given are 4 ¼” X 6” the FINISHED dimensions will be 3” x 4 ¾” )
Panel 1:
- Bottom pocket: 4 ¼ ” h x 6” w
- Bottom pocket flap: 4 ¼” h x 6” w with a finished ¾” fold- Pin cushion:
~ Top (print piece): 3 ½” h x 5” w
~ Bottom (solid piece): 4” h x 5 ½” wPanel 2:
- Pencil pocket 6 ¾” h x 6” w
- Tweezer holder: 2 ¼” h x 6” w (two of them)Panel 3:
- Single Pockets: 2 ¾“ h x 3 ½” w (four of them)
- Single Pocket Flaps: 2 ¾“ h x 3 ½” w with a finished ½” fold (four of them)
- Double Pocket:2 ¾” h x 6 ” w
- Double Pocket Flap:2 ¾” h x 6” w with a finished ½” fold -
 Step 4
Pockets and Flaps
Pockets:
- Note: I made my pockets and pouches custom for the tools I uses, feel free to play with the pockets sizes and the amount based off your own need
- Use solid fabric to make pockets
- Place fabric pieces face down on ironing board, fold in 5/8" all around and press (miter corners if desired)
- Sew top hem
- Sew pocket in place on left, bottom, and right side of pocket close to the edge and leaving the top side open.
- When sewing in place sew slightly over top of pocket edge and back stitch to strengthen pocket
Pocket Flaps:
- Place fabric pieces face down on ironing board, fold in 5/8" all around and press (miter corners if desired)
- Sew close to edge all the way around
- Fold flap in the specified amount and press
- Sew flap in place by stitching across the flap on the inside fold line as well as at the bottom of fold
- Sew slightly over edges and back stick to strengthen flap
-
 Step 5
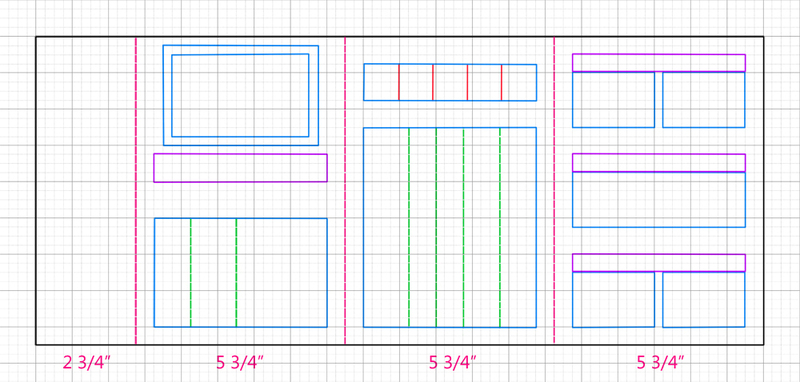
Pocket/ Pouch / Flap Placement
In picture: Step marked in blue for pocket and purple for flap attachments at fold
- After making pockets it’s time to sew them in place on your printed 8 ½” x 20” piece of fabric
- On inner fabric piece mark (but do not sew yet!) vertical panel lines with chalk pencil. (as seen in pink in image)
~ Front flap panel: 2 ¾” in length
~ Additional three panels: 5 ¾” in length- Most pouches are placed ½” inward on each panel. For example the pouch on panel 1 is 4 ¾” in width, placed a ½” inward on left, right and bottom sides of panel.
- For exact placement of pouches see scale picture
download also available in jpg and pdf
-
 Step 6
Pin cushion
- Take 3 ½” x 5”of printed fabric and fold/iron press all sides by 5/8”
- Repeat for 4” x 5 ½” solid fabric
- Sew printed fabric on three quarters of the way on top of solid fabric (with about a ¼” border around) leaving small gap at one side- Stuff with stuffing but remember not to over stuff because the fuller it is the less flat it will lay in the kit
- When done sew closed the rest of the way
- Place cushion in place on panel 1 and use zigzag stitch around border to secure in place
- For a finishing touch sew a cute button in the middle
-
 Step 7
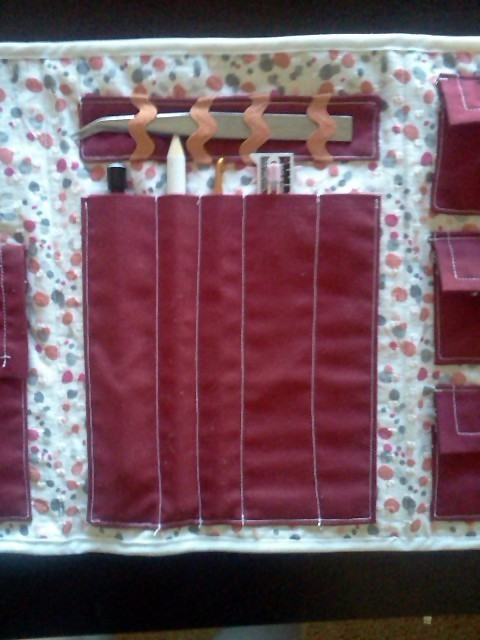
Sewing pocket dividers
Image: Step displayed in green
- Once pouch is sewn in place (such as the large pouch on panel 2)turn the entire piece upside down so you can sew from the bottom - up.
- Use a small straight stitch starting from the bottom of the pouch
(When beginning, make a small back-stitch to secure in place)- Work your way straight to the top, stitching slightly over the pouches edge and back stitch to secure
- Repeat to create desired amount of dividers
-
 Step 8
Tweezer holder
- This was originally meant to hold pencils but my serger tweezers fit so well I just decided to keep them there
- Layer fabric and trim
~ 2 ¼” x 6” piece face up
~ Desired trim spaced equally apart, face up
~ Second 2 ¼” x 6” piece face DOWN
~ Pin in place if needed- Sew 5/8” from edge, three quarters of the way around leaving one of the smaller edges open
- Trim corners with scissors and turn sewn piece inside out (like a pillow case!) and tuck in open edges
- Sew piece in place sewing open edge closed in the process
-
 Step 9
Joining pieces / Creating panels
Image: Step displayed in pink
- Now that all your pockets are in place take out 8 ½” x 20” piece of solid fabric and place it face down
- Take printed 8 ½” x 20” piece with pockets in place on top of solid piece
- Pin in place and with a small straight stitch sew panels together at 2 ¾” , 5 ¾”, and 5 ¾” markings
-
Step 10
Bias Tape
- I really hope I'm explaining this alright, I apologize if I'm not
- Take ½” bias tape, unfold and place face down on the edge of the printed piece, making sure to line up edges
- Do this all the way around pinning in place as you go
- Sew bias tape in place right on the inner tape fold
- Fold tape over edge of piece, making sure the pre-done fold is folded in to give a clean edge. Press and pin in place
- Finish edge by sewing bias tape in place on solid side of piece, tucking the corners as you go
-
 Step 11
Last Step!
- Take extra piece of bias tape, about 2' - 2½' long, fold in half and sew edges together to create a tie
- Fold up your finished piece starting with the right panel and moving to the left, and tie a pretty bow around it with the bias tape tie
- Enjoy having all your sewing gear organized and at the ready whenever you need it in your hand made case!


Comments


 1
Home Accessories »
Diy Jewelry Box
1
Home Accessories »
Diy Jewelry Box
