


About
make a rockin' guitar bag
A step-by-step guide into making your own guitar bag.
Tags
-
 Key West Witch favorited Guitar Shaped Bag
26 Jun 22:00
Key West Witch favorited Guitar Shaped Bag
26 Jun 22:00
-
 mar *ૢ✧ ཻུ۪۪⸙͎ ೫ favorited Guitar Shaped Bag
25 Oct 14:18
mar *ૢ✧ ཻུ۪۪⸙͎ ೫ favorited Guitar Shaped Bag
25 Oct 14:18
-
 Marieke favorited Guitar Shaped Bag
17 Dec 19:39
Marieke favorited Guitar Shaped Bag
17 Dec 19:39
-
 vbehymer favorited Guitar Shaped Bag
08 Dec 04:19
vbehymer favorited Guitar Shaped Bag
08 Dec 04:19
-
 Ronald T. commented on Guitar Shaped Bag
11 Jul 05:24
Ronald T. commented on Guitar Shaped Bag
11 Jul 05:24
-
Ronald T. favorited Guitar Shaped Bag
11 Jul 05:23
-
 Kevin Huggins favorited Guitar Shaped Bag
28 Jan 09:42
Kevin Huggins favorited Guitar Shaped Bag
28 Jan 09:42
-
 Blondell K. favorited Guitar Shaped Bag
11 Mar 19:32
Blondell K. favorited Guitar Shaped Bag
11 Mar 19:32
-
Lori B. favorited Guitar Shaped Bag
12 Aug 17:38
-
 Surf jewels favorited Guitar Shaped Bag
10 Apr 10:05
Surf jewels favorited Guitar Shaped Bag
10 Apr 10:05
You Will Need
-
 Step 1
Print a guitar image onto an A4 paper. Trace your image; 2 for the body, 2 for lining, 2 for your scratchplate.
-
 Step 2
Out of silver-y fabric, cut and sew rectangle and tear-shaped pieces. The rectangle would be your whammy bar while the tear-shaped piece would serve as your input jack.
-
 Step 3
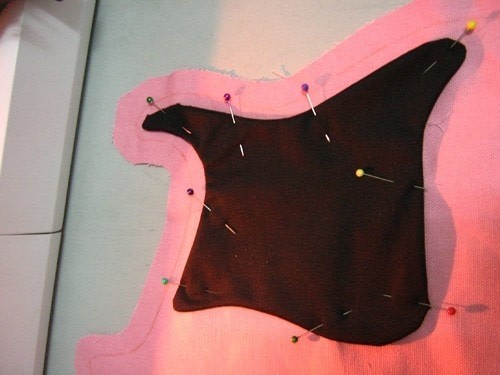
Take your scratchplate pieces, right sides together, and sew all the way around. Leave a 2-inch gap for turning inside out.
-
 Step 4
After this, clip all the way around so that the curves would be better-defined. Turn inside out and sew on top of the front body of your bag. Use the image you printed for the position of the scratchplate.
-
 Step 5
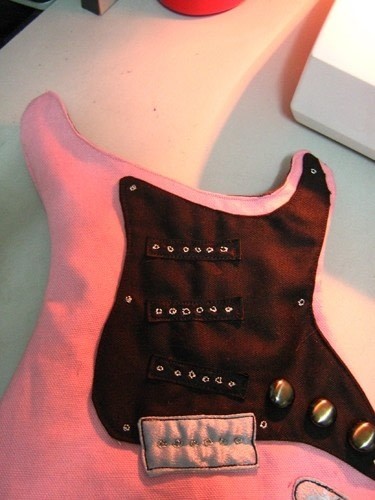
Now sew the whammy bar and the input jack. Take three strips of bias tape (or any fabric that matches the color of your scratchplate). Their length should be the same as your whammy bar. These strips would be your single-coil pickups. Position them according to the image and sew. Mark the parts of the scratchplate where the screws are. Embroider these with silver thread. Handsew circles on the strips you just added. Remember,these circles should be aligned.
-
 Step 6
Mark the volume and tone controls. Sew on buttons for these.
-
 Step 7
Now position your front and back pieces, right sides together. Sew from the highest points of the curved tops on both sides. Do the same to the lining, leaving a gap at the bottom. (If you want, you can add a pocket or two before doing this.)
-
 Step 8
Turn the outer body inside out and place it inside the lining. Sew the opening of your bag.
-
 Step 9
Pull out your outer body through the gap at the bottom of the lining.
-
 Step 10
Your bag is starting to take shape. Topstitch the top part.
-
 Step 11
Attach one end of the strap with the rectangular ring for the adjuster. Sew the other end. Do not forget to sew the gap in your lining shut.
-
 Step 12
And you’re done!


http://www.google.com/imgres?imgurl=http://i22.photobucket.com/albums/b337/Raymund_Gradt/tele_template.jpg&imgrefurl=http://www.tdpri.com/forum/telecaster-discussion-forum/77158-telecaster-shape-template-pdf.html&h=799&w=618&sz=28&tbnid=KitntglwNUJwrM:&tbnh=90&tbnw=70&zoom=1&usg=__DZ7OhrisCICwpE9YG2szEvrcaT4=&docid=izYtz-y8Q5cI0M&sa=X&ei=FO82UImtG8bpiwL2r4DwDg&ved=0CCIQ9QEwAA&dur=7276