


About
PLUS tutorial- how to colour on gimp!
ever scince I first found out about it (which was quite hard, seeing as it does not have so much of a presence here in england as opposed to in the states where I suppose most of you come from) I have been drawing manga. my drawig, sense of proportion and style has developed and improved much over the years, as have my colouring skills, which I would like to show to you!
This image is coloured using gimp ver. 2.1, a free program, which I, for one (me being someone who has tried photoshop and painter XD) find this one best to use. It's easy, and you can cheat with some things!
these SDs (super-deformed) are dressed in the two mst common and widley known lolita styles. the one on the left is a rather old-school gothic lolita. the one one the right is less old school sweet lolita. SDs aren't my usual style, but they're easy because they don't have so much detail.
Tags
-
 miss rose entered her project Gothic And Sweet Lolita to ChattyFeet
23 Mar 13:32
miss rose entered her project Gothic And Sweet Lolita to ChattyFeet
23 Mar 13:32
-
miss rose entered her project Gothic And Sweet Lolita to Secret Santa
28 Dec 20:35
-
miss rose entered her project Gothic And Sweet Lolita to Secret Santa
28 Dec 20:35
-
miss rose added her project Gothic And Sweet Lolita to art tutorials!
12 Jul 19:13
-
 Conner W. favorited Gothic And Sweet Lolita
27 Jun 18:25
Conner W. favorited Gothic And Sweet Lolita
27 Jun 18:25
-
miss rose entered her project Gothic And Sweet Lolita to Kigurumi Shop
14 Apr 21:06
-
miss rose entered her project Gothic And Sweet Lolita to Draw Manga
27 Aug 12:43
-
 Step 1
first you have to scan in your lineart. I used Xsane which allows me to scan it in the lineart format, and also to flip it over and such when I'm done. save your image and open up gimp.
-
 Step 2
to open your image in gimp, right click and find 'open in' and then choose gimp (With windows, it usually has an option called open in gimp' when you first right click- but only if gimp is open) or simply drag onto the toolbox. go to image> mode>indexed and change it to black and white (1 bit) pallete. using the wand tool, select your line art. only use the colour select tool if your image has NO unwanted smudges on it. (and this is unlikley)
-
 Step 3
create a new layer below your lineart and call it 'flat'. put all the flat colours you want on this. to fill in parts, use the paint bucket tool set to 'fill similar colours' with the 'sample merged' button checked and the tolerance at 0% . if it fills areas you don't want it to, look it over for gaps, and fill them using the pencil tool. the paint will now stay in the area. don't do the pupils of the eyes yet.
if you can't find your lavers window, go to window> dockable dialogs> layers. the button for a new layer is the shiny peice of paper. -
 Step 4
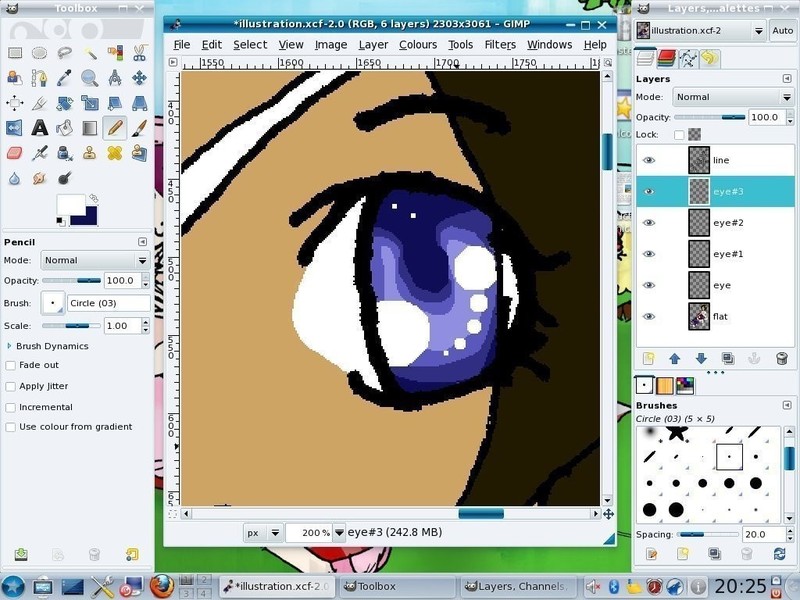
create a new layer and call it 'eye' pencil on a shadow and a big version of the pupil, with a darker colour than the iris.
-
 Step 5
create a new layer called 'eye' (it should rename it eye #1 or som,ething similar) and do a smaller layer of this shape using a darker colour than the one before it.
-
 Step 6
repeat step 5. then make a new layer (same name, call them different things if you want to be more original. If you like you could call them 'tom' 'dick' and 'harry'!)paint on some eyeshine. this usually meand for me 2 big blobs and then smaller dots using the different size pencils.
-
 Step 7
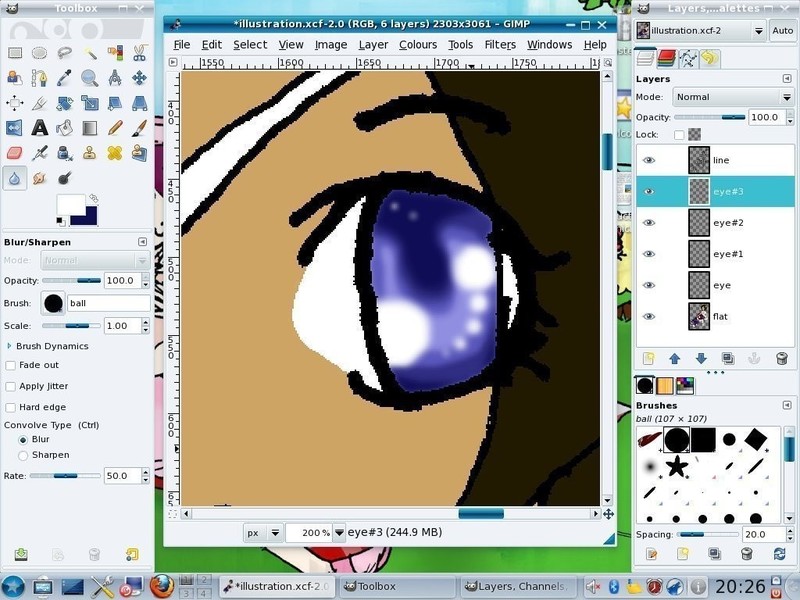
use the 'blur' tool to blur all the edges on your eye layers. ust to smooth them down. you may want to save it at this point. the native format for gimp is an xcf. it can handle layers. if you want, you could also save it as a psd.
-
 Step 8
make a new layer and call it 'hi' (short for 'highlights') choose the direction the light is coming from, and then use a pencil and a paint bucket set to 60% opticity with the forgound colour being white to fill in the highlighted areas.
-
 Step 9
now, to make it look natural without the need to do extra layers of colouring (like on photoshop etc) ue the smudge tool wih the brush 'galaxy big' to smudge all the white areas. it gives a nice, dappled effect. when you've done that, use the colour select tool on the 'flat' layer to select all the transparent areas, then switch back to the 'hi' layer and press delete to get rid of all the stuff that went over the edges when you smudged it. use the rubber tool to get rid of all the rest of the exess.
-
 Step 10
hide that layer by clicking the button with the eye. create a new layer named 'lo' (short for 'lowlights') and use the same metods as explained in steps 8 & 9 but with colours that are darker than the ones you are coluring over instead of white.
-
 Step 11
you can make changes at any point, that is the beauty of layers. for example, if you want to insert a patter from an image, as here, open up your image, select all> copy, go back to your art, make a new layer called 'pattern' then select the areas you want it in. go back to your new layer (with the areas still selected) go to edit> paste into then use the anchor button to set it.
-
 Step 12
to create a sipmple and traditional manga background, hide all your layers. then create a new layer under them called 'BG' (short for Back Ground) use the gradient tool to select the gradient you want, set it to linear and drag it down the length of the page. you can go to colours> hue/saturation and drag the hue slider to change the colours or go to colours> brightness/contrast and drag the brightness slider to change how pale or dark it is. I've used the 'purples' gradient with the brightness turned up to make it less distracing.
-
 Step 13
then use the 'FG to transparent' gradient, set your FG colour to white and the gradient shape to 'radial' drag the gradient over the radius of your circles. do this several times to make more dots.
-
 Step 14
tourn on the rest of your layers and check over. I noticed I forgot to put on my signiture so I inserted it in the same way as the pattern.
-
 Step 15
to make sure you can post it on things, go to file> save as then put .jpeg at the end of your file name. choose to flatten the image and don't make the quality any less than 75%. now you are done! but keep you xcf for any changes at a later date.


 1
Home Accessories »
Diy Jewelry Box
1
Home Accessories »
Diy Jewelry Box

