


About
Fool proof instructions!
The most feared and equally adored embroidery stitch. The trick is in really understanding how it works instead of just hoping it will turn out right. You can do it. Mais oui, you can! So why is it so difficult to learn? It's not. It's difficult to teach. Usually, I encourage you to read stitching instructions with needle and floss in hand. Instead, this time I suggest you read through all the steps first and then try it while going through the insructions again. I've broken down each tricky bit that finally clicked with me after lots of practice.
Don't be scared off by all the steps, once you get the hang of it, they will all blend together with a petite flick of your wrist! Let's start chéri...
-
 Key West Witch favorited French Knot
05 May 07:09
Key West Witch favorited French Knot
05 May 07:09
-
 Ellen R. favorited French Knot
07 Aug 18:11
Ellen R. favorited French Knot
07 Aug 18:11
-
 su l. favorited French Knot
05 Mar 13:06
su l. favorited French Knot
05 Mar 13:06
-
 mmotse03 favorited French Knot
08 Jun 20:27
mmotse03 favorited French Knot
08 Jun 20:27
-
 Marshall M. favorited French Knot
30 May 02:04
Marshall M. favorited French Knot
30 May 02:04
-
 Tiffanezep K. favorited French Knot
29 Mar 21:59
Tiffanezep K. favorited French Knot
29 Mar 21:59
-
 Ella Light added French Knot to Embroidery
10 Aug 23:43
Ella Light added French Knot to Embroidery
10 Aug 23:43
-
 Chudames favorited French Knot
03 May 05:32
Chudames favorited French Knot
03 May 05:32
-
Maxine M. added French Knot to To-make list
19 Apr 04:46
-
Gabriela M. favorited French Knot
22 Feb 00:46
You Will Need
-
 Step 1
You will need both hands (at least I do), so set your hoop in your lap or work surface. With your non-needle hand pinch the floss a few inches from where it exits the fabric (where arrow is pointing). Hold it taut with your hand not holding the needle (that's important).
-
 Step 2
Place your needle in front of this stretch of floss. Notice the needle is in front of the floss, not coming from behind it. This will make the next step easier, and will prevent the knot from going all wonky later on.
-
 Step 3
Wind the floss around the needle once or twice (shown winding twice), depending on if you want a bigger or smaller knot. Continue the tension of the floss with your left hand (non-needle hand) to prevent it from uncoiling.
IMPORTANT: Keep your hand holding the needle still while winding it with the floss in this step. Meaning, don't try to use your needle hand to do the wrapping by getting all twirly with your wrist. This is the first way your knot can go wrong!
-
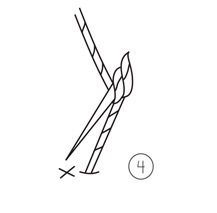
 Step 4
Okay, you've wound around the needle, the coil is pulled nice and taut. Next: (this is an important one) re-insert the tip of your needle just next to, but not into the same exit point on your fabric. If you enter the same hole, your knot may pop all the way through when you finish (and you say "wha happen?"). So, simply return at a point a little bit away from the exit point. And hold it right there! Keep your needle in this position. Don't push it all the way through juuust yet. The next step is an even more important one...
-
 Step 5
Remember your non-needle hand pinching the length of floss? Remember? Wake it up! This is when it goes to work. Give the floss a little downward tug with that hand, so that the coil will tighten up, and slide down your needle to make a little bundle against the surface of your fabric.
-
 Step 6
With your coil snugly held in position against the surface, now push your needle all the way through!
-
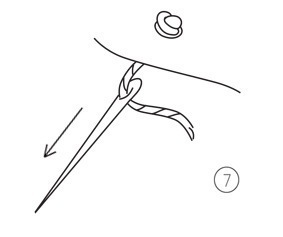
 Step 7
See? You've just pulled your needle, and the floss trailing behind it, down through the center of the coil that was wrapped around the needle. (Didn't work? Go back to step one and we'll go over it again.)
-
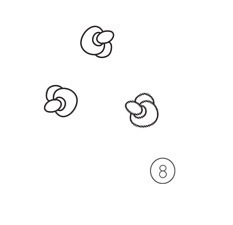
 Step 8
Voilà! I knew you could do it! Let's celebrate:
-
 Step 9
Keep practicing and you won't even have to think about the steps. Once you get the hang of it, I bet it will become one of your favorite stitches to use. You'll start thinking of all sorts of neat ways to use it. If it didn't turn out just right the first time, don't worry- try it again and you'll eventually get the feel for it. I know you can do it.


Comments

 1
Home Accessories »
Diy Jewelry Box
1
Home Accessories »
Diy Jewelry Box
