

About
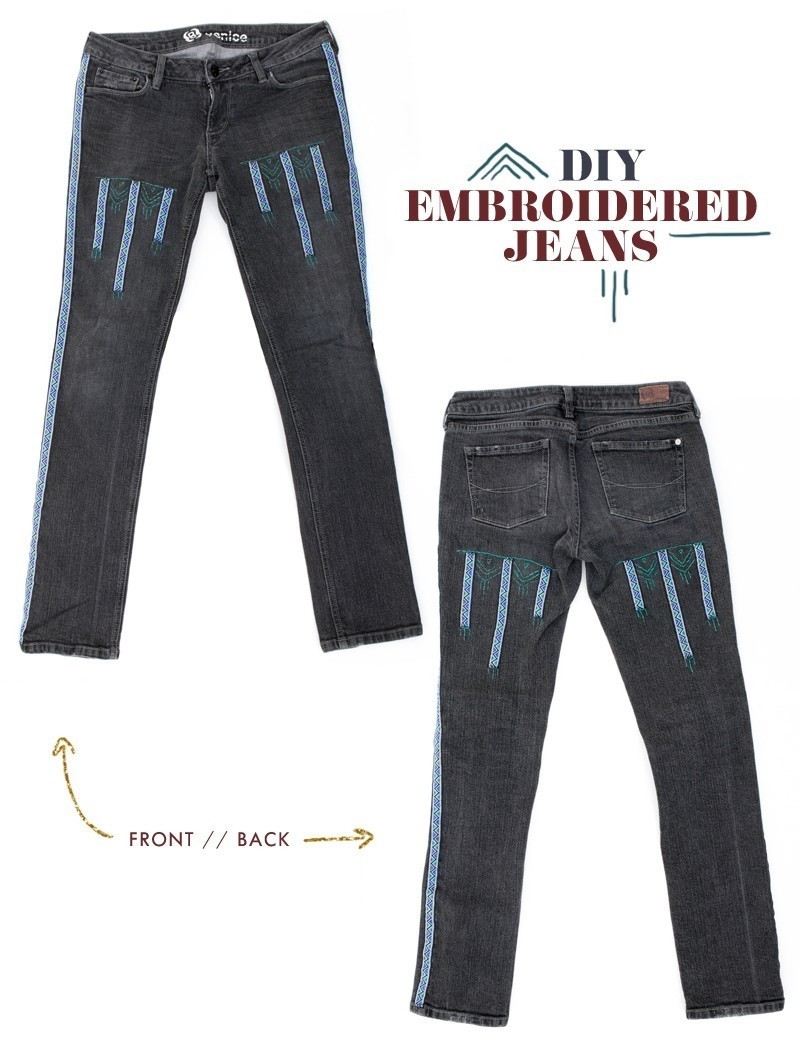
Geometric trim and embroidery floss design
This DIY was inspired by the arrowhead jeans I saw online at Free People. They have this geometric embroidery going down the side of each leg and then vertically on the front and back of the pants. It’s such a simple design with maximum impact. Instead of embroidering the entire thing, I hand stitched on a geometric trim and then embroidered the triangular patterns after. Because there were so many hard-to-reach places, using a sewing machine was not an option, so this project took a bit of time. If you’re handy with a needle and thread and love these jeans but don’t want to spend $208, then this DIY is right up your alley!
-
 K H. favorited Free People Inspired: Diy Embroidered Jeans
23 Oct 18:00
K H. favorited Free People Inspired: Diy Embroidered Jeans
23 Oct 18:00
-
 Rachel B. added Free People Inspired: Diy Embroidered Jeans to DIY and Crochet Clothes
02 May 23:55
Rachel B. added Free People Inspired: Diy Embroidered Jeans to DIY and Crochet Clothes
02 May 23:55
-
 jaisa.riley favorited Free People Inspired: Diy Embroidered Jeans
18 May 17:30
jaisa.riley favorited Free People Inspired: Diy Embroidered Jeans
18 May 17:30
-
 Agy added Free People Inspired: Diy Embroidered Jeans to Livia Firth
05 Apr 12:21
Agy added Free People Inspired: Diy Embroidered Jeans to Livia Firth
05 Apr 12:21
-
 cristinakilljoyway favorited Free People Inspired: Diy Embroidered Jeans
03 Jan 13:44
cristinakilljoyway favorited Free People Inspired: Diy Embroidered Jeans
03 Jan 13:44
-
 Melia P. added Free People Inspired: Diy Embroidered Jeans to Looking Classy
18 Dec 00:30
Melia P. added Free People Inspired: Diy Embroidered Jeans to Looking Classy
18 Dec 00:30
-
 Minerva H. added Free People Inspired: Diy Embroidered Jeans to Clothes Call
13 Dec 21:47
Minerva H. added Free People Inspired: Diy Embroidered Jeans to Clothes Call
13 Dec 21:47
-
 PsychoticWeirdo favorited Free People Inspired: Diy Embroidered Jeans
26 Nov 15:10
PsychoticWeirdo favorited Free People Inspired: Diy Embroidered Jeans
26 Nov 15:10
-
 Anita B. favorited Free People Inspired: Diy Embroidered Jeans
25 Nov 13:05
Anita B. favorited Free People Inspired: Diy Embroidered Jeans
25 Nov 13:05
-
Melia P. favorited Free People Inspired: Diy Embroidered Jeans
19 Nov 06:31
-
 Step 1
Start by pinning the trim on sides of the pants. Decide where you want your design to start on the front and back of the pants and pin your pieces accordingly. I did mine at different levels on the front and then the same level on the back.
-
Step 2
Hand sew the trim onto the pants on all areas.
-
Step 3
Hand embroider a geometric 'arrowhead' design on the front and back of the pants near the trim. Look at mine for design inspiration.


