

Framing Art On Canvas
Extract from The Picture Framing Handbook: Matting, Mounting, and Framing Techniques for Professional Results • By Andy Parks • Published by Watson-Guptill

About
Advanced framing techniques.
Art on canvas usually refers to an oil or acrylic painting; however, photographic images can also be printed onto canvas. In recent years it has become fashionable to display art on canvas without a frame. The image is printed with extended borders that "wraparound" the edges of a stretcher, producing an effect that means the image will not necessarily require a frame. However, a frame can easily be added in the future if you think it would improve the image, or if fashions change.
-
 Ashley Jean favorited Framing Art On Canvas
22 Mar 05:13
Ashley Jean favorited Framing Art On Canvas
22 Mar 05:13
-
 Sarah Sylvia S. favorited Framing Art On Canvas
25 Jul 02:43
Sarah Sylvia S. favorited Framing Art On Canvas
25 Jul 02:43
-
 lilcalcb@gmail.com added Framing Art On Canvas to art
25 Aug 22:41
lilcalcb@gmail.com added Framing Art On Canvas to art
25 Aug 22:41
-
 elaina.nattrass added Framing Art On Canvas to Misc
22 Jan 02:52
elaina.nattrass added Framing Art On Canvas to Misc
22 Jan 02:52
-
 Jessica A. favorited Framing Art On Canvas
27 Aug 22:05
Jessica A. favorited Framing Art On Canvas
27 Aug 22:05
-
Eloisa *. favorited Framing Art On Canvas
01 Aug 02:55
-
 Step 1
<b>Stretcher bars</b>
Canvas stretcher bars are purpose-made to standard sizes. They are readily available from most art supply stores and come in sizes from 4-30 inches (100 - 750mm) in 2 inch (50mm) increments. They are also available in larger sizes in larger increments up to 48 inches (1200mm). They are designed to interlock at the corners to form a "stretcher frame", and they are supplied with eight wooden wedges that fit into the inside corners to add a final stretch to the canvas.If you have a nonstandard size canvas you may be able to choose a smaller size stretcher bar if you can position the canvas so that you do not cover any important parts of the image. Alternatively, you can make your own stretcher bars from 2 x 1-inch (50 x 25 mm) batten. This can be mitered and joined in the same way as a normal frame to create any size stretcher that you require. However, you will not have the use of the wedges at the end of the process to ass that final stretch to the canvas.
<b>Tip</b>
Sometimes canvas stretcher bars have a sanded-down inner edge, but this may only be on one side. This is to stop a solid line forming on the canvas where the stretcher bar touches the back of the canvas. If your stretcher bars have this feature, make sure to keep all the smooth edges on one side of the stretcher when assembling. Also, remember to position the smooth edge next to the canvas when stretching it. -
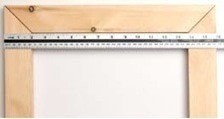
 Step 2
Measure the canvas picture to be stretched. For this example, the image measures 18 x 14 inches (450 x 350mm) and the stretcher bars are usually 1/4 inch (20mm) thick, so 16 x 12-inch (400 x 300mm) bars are used to allow the image to wrap around the edges of the stretcher.
-
 Step 3
Using four purpose-made stretcher bars-two measuring 16 inches (400mm) and two measuring 12 inches (300mm)- assemble the stretcher bars to form a rectangle. Use a wooden mallet to hammer the pieces together if necessary.
-
 Step 4
Measure across the stretcher bars to check for the correct size. This needs to be repeated at each edge of the rectangle to ensure the whole stretcher is evenly proportioned.
-
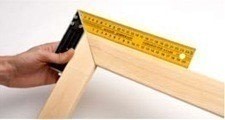
 Step 5
Check to see if the corners of the stretcher bars are at right angles and adjust as necessary. It is essential to get the stretcher frame square because it will show when hung if it is not. (Also, if you are going to frame the canvas it may not fit into the frame if it is crooked.)
-
 Step 6
To make absolutely sure the stretcher frame is completely square, measure the diagonals of the stretcher frame. If they are the same measurements, the stretcher frame is square.
-
 Step 7
Any sharp corners of the stretcher may cut through the canvas over time, so be sure to sand them down with an emery board.
-
 Step 8
Position the canvas onto the stretcher frame. Be sure to position the picture so that no white unfinished canvas will show after stretching. Also, take care to leave the artist's signature (if present) showing.
-
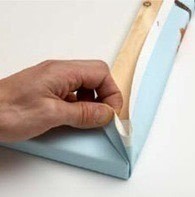
 Step 9
Once you are happy with the positioning of the canvas, turn it over so that you can work from the back. Keeping everything in the desired position, pull one of the excesses of canvas down onto the back of the stretcher frame.
-
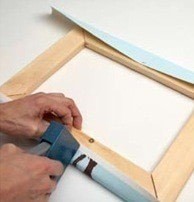
 Step 10
Using a wall stapler, secure the canvas in the center of one of the long sides with one staple. It is a good idea to use the staple gun at a diagonal angle so that the staples are not positioned entirely along one weave of the canvas because multiple holes can fray and eventually tear the canvas. Make sure you staple on the back of the canvas and not on the side, where it will be visible.
-
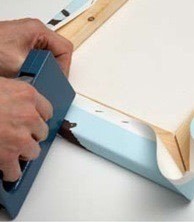
 Step 11
Turn the canvas around so that you can pull against the first staple. Pull firmly to apply stretch to the canvas and then secure in place with another staple.
-
 Step 12
If there is an excessive amount of canvas it will get in the way and also make a neat fold at the corners difficult to achieve, so remove some of the excess canvas with scissors but be sure to leave enough to easily grab hold of. Repeat steps 9 and 10 for the remaining two sides of the canvas.
-
 Step 13
<b>Canvas pliers</b>
You can also use canvas-stretching pliers. These make a more even stretch on bigger canvases a lot easier to achieve. They are not an essential tool, but they can be useful if canvas stretching becomes a regular picture-framing project for you.
-
 Step 14
Continue stretching the canvas, adding one staple at a time. Add stretch to the canvas, staple it in place, and then pull on the opposite side. You should always be pulling against the last staple you added.
-
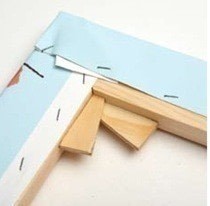
 Step 15
The corners will need to look neat from the sides, and folds should only be visible from the top and bottom. The technique is exactly the same as making a bed with a flat undersheet. First, choose a corner and pull the canvas from one of the side edges toward its opposite. A staple here will help to keep it in position.
-
 Step 16
Fold the top corner of the canvas underneath itself so it is hidden from view.
-
 Step 17
Fold the now double-thick remaining loose canvas over and secure it with a staple on top.
-
 Step 18
Repeat this process for the diagonally opposite corner. Remember to add stretch to the canvas by pulling it as you fold. Secure this corner with a staple as before.
-
 Step 19
Repeat for the remaining two corners. All of the corners should look neatly folded and the canvas should be fairly flat along the edges of the corners.
-
 Step 20
You may need to add additional staples toward the corners of the canvas to achieve an even stretch to the picture.
-
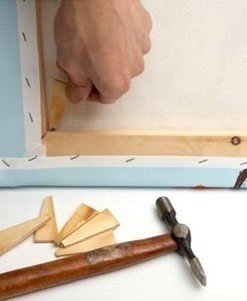
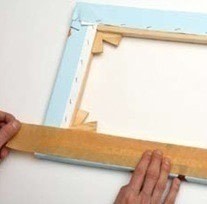
 Step 21
To add a final stretch, carefully insert the wooden stretcher wedges into the gaps in the corners of the stretcher bars.
-
 Step 22
Lightly hammer the wedges home with a tack hammer. Be very careful not to hammer them too far because too much stretch could rip the canvas. The tension should allow some movement in the canvas when pushed in the middle of the picture. It should not be as tight as a drum.
-
 Step 23
To tidy up the back of the canvas, gummed paper tape may be added to cover the staples. However, this is not essential.
-
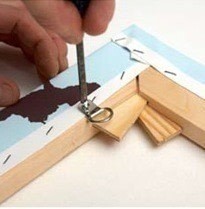
 Step 24
Add a suitable hanger. A D ring screwed into the stretcher frame is a good idea as it helps to keep the canvas as flat as possible on the wall.
-
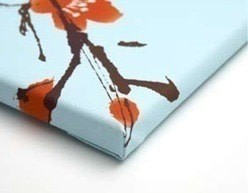
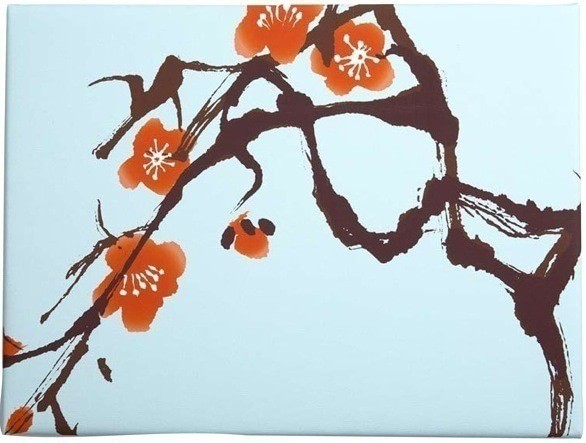
 Step 25
The unframed canvas is now ready to hang on the wall.


 1
Home Accessories »
Diy Jewelry Box
1
Home Accessories »
Diy Jewelry Box
