

Foil Transfers
Extract from Photo Craft • By Susan Tuttle and Christy Hydeck • Published by David & Charles

About
No longer is creativity with foil limited to tin hats
When I set out to duplicate old tin-type images, I was foiled (go ahead, groan) time and again. I eventually did replicate the look, but along the way my experimentation brought on this unexpected use for an everyday item. I love when that happens! Using gel-based transfers, an aluminium foil surface and alcohol inks, this technique introduces urban chic to the old masters.
-
 Amanda T. favorited Foil Transfers
01 Jan 19:34
Amanda T. favorited Foil Transfers
01 Jan 19:34
-
 Susana F. added Foil Transfers to to do
20 Aug 23:07
Susana F. added Foil Transfers to to do
20 Aug 23:07
-
 Katrina P. favorited Foil Transfers
05 Jul 03:14
Katrina P. favorited Foil Transfers
05 Jul 03:14
-
Heather H. favorited Foil Transfers
20 May 01:03
-
 lilcalcb@gmail.com added Foil Transfers to art
25 Aug 19:05
lilcalcb@gmail.com added Foil Transfers to art
25 Aug 19:05
-
Iris E. favorited Foil Transfers
15 Aug 06:40
-
 Angela I. favorited Foil Transfers
14 Aug 22:09
Angela I. favorited Foil Transfers
14 Aug 22:09
-
 KelliDroze added Foil Transfers to Decorations
06 Aug 18:01
KelliDroze added Foil Transfers to Decorations
06 Aug 18:01
-
 Kc F. favorited Foil Transfers
06 Aug 14:00
Kc F. favorited Foil Transfers
06 Aug 14:00
-
 Anna S. favorited Foil Transfers
05 Aug 08:03
Anna S. favorited Foil Transfers
05 Aug 08:03
-
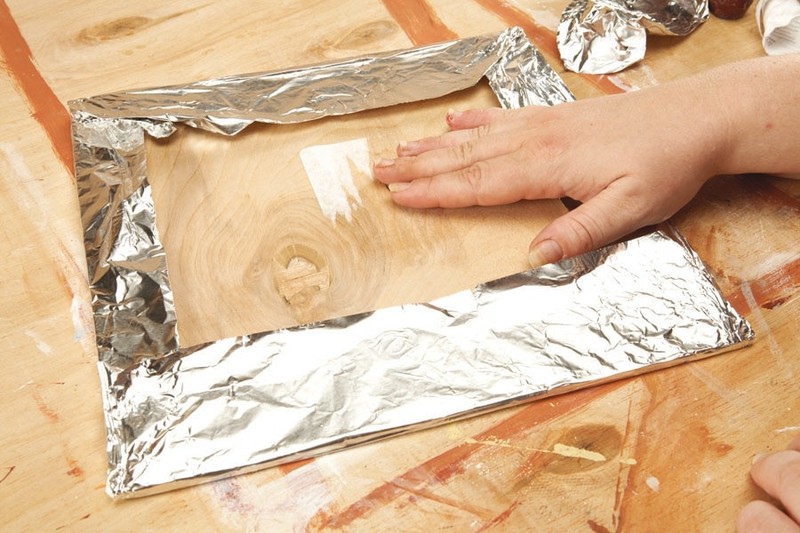
 Step 1
Cover surface with foil.
Cut a piece of foil larger than the size of your work surface to comfortably fold around the edges. Think of it as a present to yourself as you wrap the heavy-duty foil around the board and smooth the corners flat. -
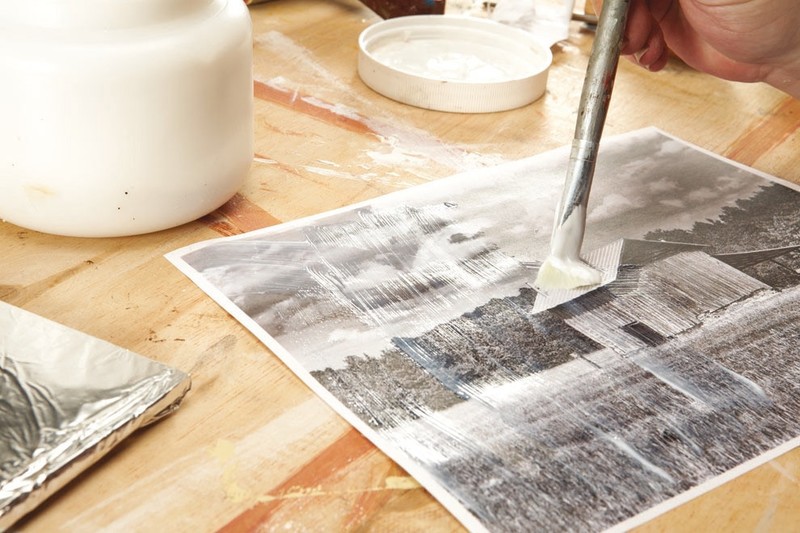
 Step 2
Add gel medium.
Generously brush a not-too-thick, not-too-thin coat of gel medium over the front of the printed image. Be sure to cover it entirely. -
 Step 3
Burnish the photo.
While the medium is still wet, place the photo facedown onto the foil and burnish it with an old credit card, bone folder or brayer. -
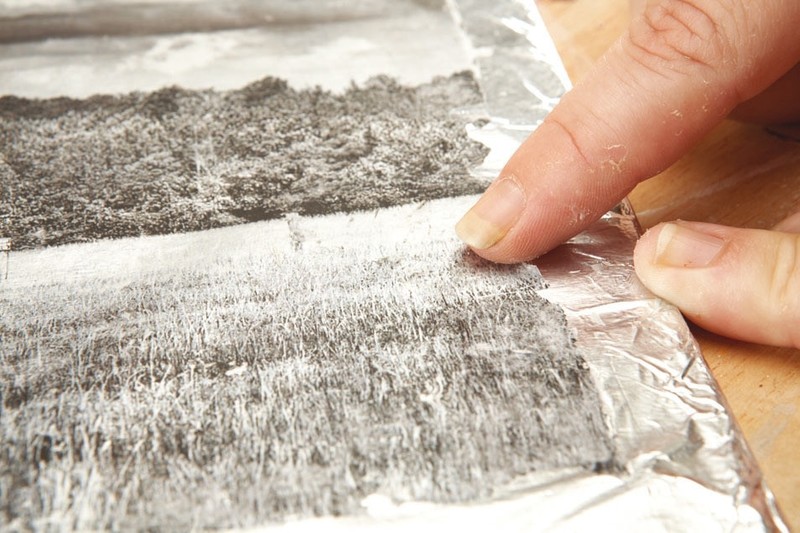
 Step 4
Test.
Wait three to five minutes and pull up a corner to see if it has transferred. If it hasn’t, burnish a bit more, then slowly peel up the paper again. Use your fingers or a sponge to rub off excess paper. -
 Step 5
Modify.
Scrape and rub the edges of the photo while it’s wet for a ragged look. You can also scrape away parts of the image with a sharp object and embed words, doodles or anything else your imagination can dream up. -
 Step 6
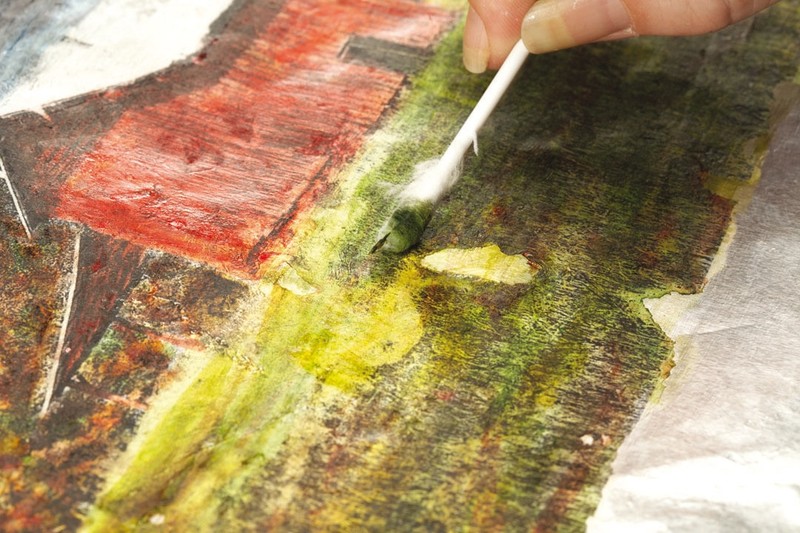
Begin painting.
Tear off a small piece of foil to use as a palette. Add a drop or two of your first colour and dip your cotton swab into it. The cotton swab will act as a paintbrush; use it to apply the alcohol ink. Use clean swabs for each colour. If you have an aversion to colouring outside the lines, use blending solution on a clean cotton swab to remove colour from an area.
Depending on the colour, it may take a few dabs -
 Step 7
Continue.
Blending your colours is easy with the cotton swabs. Vary your pressure to remove colour in one area and blend it with the surrounding colours. Experiment with dropping the ink directly onto the piece for a totally different look. Repeat the process with the remaining colours until you can’t help but to pat yourself on the back for a job well done. -
 Step 8
Prep for highlights.
Trace the areas you’d like to highlight with an awl or old pen. Keep in mind, these areas will be slightly raised upon the project’s completion. -
 Step 9
Finish.
Unwrap the foil. Flip it over and retrace the lines you etched. This will add an embossed, dimensional look to your piece. -
Step 10
Tips
∞ Crumple the foil before you attach it to the surface for an entirely different look.
Experiment with creases and the natural texture foil lends to the project.
∞ Mount the image to wood, canvas or even a book cover, or integrate it into a larger work of art.
∞ Black-and-white photography really pops on a metallic surface. Skip the painting or use the metallic alcohol inks for a modern urban feel.
∞ As with any transfer, remember to mirror your image before printing it if it has text or if you want the photo to appear exactly as it is. -
Step 11
Susan’s recipe for faux foil transfers
Here is an easy digital recipe to give faux tintype colouring to your images, minus the pretty frames that traditionally encapsulate them.Faux Tintype Recipe
1. Desaturate the colour of your photo:
Enhance>Adjust Colour>Remove Colour.
2. Alter the colour to give it a washed-out sepia tone (characteristic of some of the traditional tintypes):
Enhance>Adjust Colour> Colour Variations (Select Shadows, click twice on Decrease Blue and click once on Increase Red.)
3. Increase contrast:
Enhance>Adjust Lighting>Brightness/Contrast (I enhanced the Contrast to +20.)
4. Add a film grain:
Filter>Artistic>film grain with the following settings:
Grain: 1
Highlight Area: 9
Intensity: 0


 1
Home Accessories »
Diy Jewelry Box
1
Home Accessories »
Diy Jewelry Box
