Flower Motif Bracelet
Extract from A Beginner's Guide to Kumihimo • By Donna McKean-Smith • Published by Search Press


About
A Beginner's Guide to Kumihimo
This pretty eight-braid bracelet, with floral pattern, is made by threading the beads onto specific strands to create the daisy motif. You can easily change the types of bead you use to vary your own finished pieces.
-
 Luna D. favorited Flower Motif Bracelet
25 Apr 06:53
Luna D. favorited Flower Motif Bracelet
25 Apr 06:53
-
Tamara W. added Flower Motif Bracelet to Kumihimo
12 Jan 06:06
-
Amanda P. added Flower Motif Bracelet to Jewelry
17 Jun 22:33
-
 RareJewel favorited Flower Motif Bracelet
16 May 09:47
RareJewel favorited Flower Motif Bracelet
16 May 09:47
-
 Larry G. favorited Flower Motif Bracelet
09 May 11:27
Larry G. favorited Flower Motif Bracelet
09 May 11:27
-
 CraftyCat added Flower Motif Bracelet to Crafts
07 May 08:38
CraftyCat added Flower Motif Bracelet to Crafts
07 May 08:38
-
CraftyCat favorited Flower Motif Bracelet
07 May 08:38
-
 Carrie Q. favorited Flower Motif Bracelet
06 May 18:23
Carrie Q. favorited Flower Motif Bracelet
06 May 18:23
-
 Crafterella featured Flower Motif Bracelet
30 Apr 23:00
Crafterella featured Flower Motif Bracelet
30 Apr 23:00
-
Pamela J. favorited Flower Motif Bracelet
28 Apr 11:47
-
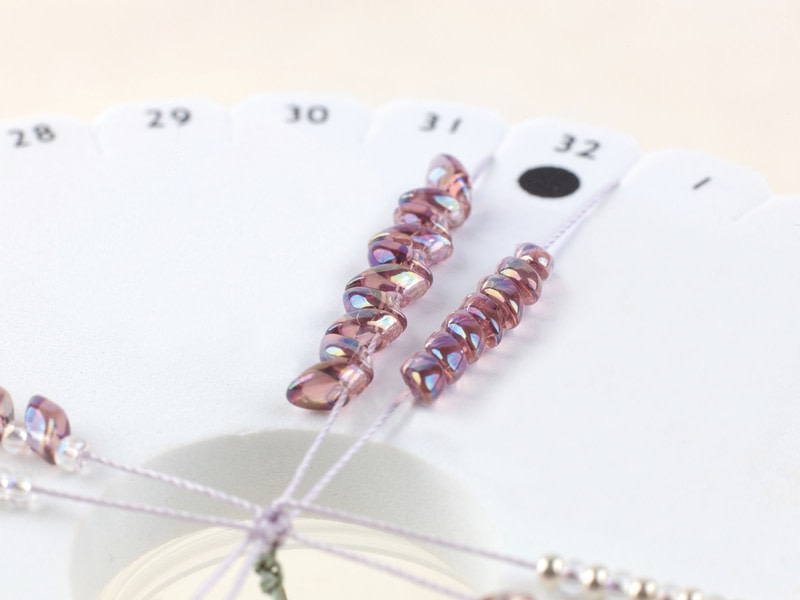
 Step 1
Measure and cut your cords into four 1m (39¼in) lengths, then lay them out on your disc at positions 31 and 32, 7 and 8, 15 and 16, and 23 and 24. Prepare the cords for beading, then braid 0.5cm (¼in) without beads – this is the end that you will glue into your end cap. Place the disc so that the next cord you are due to bring down is at the top-right of the disc. This is an important part of the flowers forming correctly when you braid.
Thread fifty white beads onto cords 31 and 32 – these beads will form part of the flower petals.
On cord 7, beginning with gold, thread alternating gold and purple seed beads – the gold beads will form the flower centres. Thread fifty beads altogether onto this cord.
On cord 8, beginning with a white bead, thread alternating white and purple seed beads until you have fifty beads altogether on the cord. Do the same on cord 24, but start with a purple bead and alternate with white until there are fifty beads altogether on the cord.
Thread fifty purple seed beads each onto cords 15, 16 and 23.Tip
You will find it useful to tie a knot in each strand and wind the excess cord and beads around bobbins (see page 29) to stop the cords and the beads tangling. -
 Step 2
Start to braid from the top-right cord (32) and bring over one bead per move, following the instructions for eight-braid beaded kumihimo:
-
 Step 3
Flower motif bracelets
To create a braid using magatama beads to form the flowers, the sequence of adding the beads onto the cord is the same as for the main flower motif bracelet itself.The result, however, with these uniquely shaped magatama beads, is a tactile, contemporary piece of jewellery that will doubtless attract a lot of attention.
magatama flower motif bracelet
The crucial consideration for creating the magatama variation is the direction in which the individual magatama beads are added onto the cord. It is not essential to position each bead specifically, but it will help you to sit the petals more openly on the braid.The magatamas on cord 31 are threaded long end up, long end down, alternately. On cords 32 and 8, the magatama beads are all threaded with the long end down.
-
 Step 4
On cord 24, the magatama bead is threaded on first, long end pointing up, followed by a small translucent seed bead.
Follow the eight-braid beaded instructions to braid this piece. You will need to ensure the magatama beads do not get caught within the braid. If they do get caught, however, this is easy to spot and correct, even if you are further along your braid.
-
 Step 5
After just one full repetition around the disc, your braid will begin to come through the bottom of the disc and the flower pattern will start to form. Continue until your braid is the desired length. If you need to add more beads, undo your knots and add more as required. Remember to do this when you still have at least three beads left on each strand to enable you to see which pattern of beads is on each strand.
Tip
You must be accurate with your braiding and add a bead every time you move over a cord; otherwise your pattern will become mixed up and the flower motif will not appear. -
Step 6
Including A Leaf Component
To include a leaf component within the flower motif, I have used a miyuki drop bead, but you can use a magatama or simply a seed bead. Once you have arranged your cords on the disc and braided 0.5cm (¼in) cord without beads, thread your leaf bead onto the bottom-left cord – in the photograph on the right, this is cord 16. Then alternate threading green leaf beads and beads for the colour of the main braid (here, purple), until you have fifty beads threaded on the cord.