


About
A tutorial on how to make fake cupcakes.
Whether you're taking these to the streets as part of a sweet art installation or just want to decorate a room, these cupcakes are not delicious, but they sure are sweet. Keep in mind that this is more of a field guide; feel free to make alterations to suit them to your fancy.
Here's how we made ours:
Tags
-
 Brittney S. added Fake Cupcakes to Misc Other
07 Jul 05:37
Brittney S. added Fake Cupcakes to Misc Other
07 Jul 05:37
-
 robyns323 favorited Fake Cupcakes
27 Jul 02:39
robyns323 favorited Fake Cupcakes
27 Jul 02:39
-
 Sabrina Dee Berry favorited Fake Cupcakes
11 Apr 07:46
Sabrina Dee Berry favorited Fake Cupcakes
11 Apr 07:46
-
 SugarNSpiceLily added Fake Cupcakes to kids toys
13 Feb 09:49
SugarNSpiceLily added Fake Cupcakes to kids toys
13 Feb 09:49
-
SugarNSpiceLily favorited Fake Cupcakes
13 Feb 09:49
-
 nigella l. favorited Fake Cupcakes
28 Jan 23:08
nigella l. favorited Fake Cupcakes
28 Jan 23:08
-
 Crafty Pirate favorited Fake Cupcakes
09 Nov 17:30
Crafty Pirate favorited Fake Cupcakes
09 Nov 17:30
-
 aryanityas added Fake Cupcakes to COOKINGGG
17 Aug 01:54
aryanityas added Fake Cupcakes to COOKINGGG
17 Aug 01:54
-
aryanityas added Fake Cupcakes to PAPERR
17 Aug 01:54
-
 Cuồng P. favorited Fake Cupcakes
14 Jul 17:31
Cuồng P. favorited Fake Cupcakes
14 Jul 17:31
-
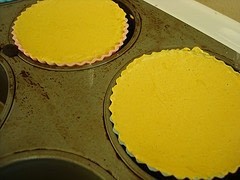
 Step 1
For the cake part: Mix plaster and water (usually 1 part each, but adjust to a pourable but thick consistency). You can mix up whatever quantity you'd like; generally we will do about 3-4 cups' worth at a time; with 4 ounce cupcake-cups, this will make about 8 or so cupcakes. Add a small bit of water-soluble paint (like a watery acrylic or gouache) in the color that you want the bottom part to be, and mix until the color is to the point you like it. Pour into the cups til they level off at the top.
-
 Step 2
Let these dry for an hour or so. It's ok to move on when they are hard, even if they are still slightly clammy to the touch.
-
 Step 3
For the frosting: Do the same plaster mix, but with whatever color you'd like for the frosting (we like pink best--so red paint). You can do slightly less, maybe 2/3 the amount that you used for the cake. Make this "batter" a little bit thicker though (by adding a little more plaster) so that it won't drip off of the sides when applied.
-
 Step 4
Using a spoon, gently put a spoonful on top of each cupcake, adding another spoonful to get a gentle "tiered" effect on the frosting, which will kind of melt into a pleasing cupcake frosting-y shape.
-
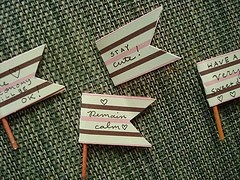
 Step 5
Optional for if you'd like to add messages: While still wet, insert toothpicks into center of frosting so that it will dry with the toothpick in. You can have the flags attached now or attach them later.
Let them set overnight or until they're hard and dry.
Now you're ready to place them on the street--or maybe just give them to friends--but whereever they end up, they're bound to make the world a little sweeter!


the cheap decorative way