

About
Craft Tutorial: Make Hair Bobbles with Fabric Decoupaged Beads
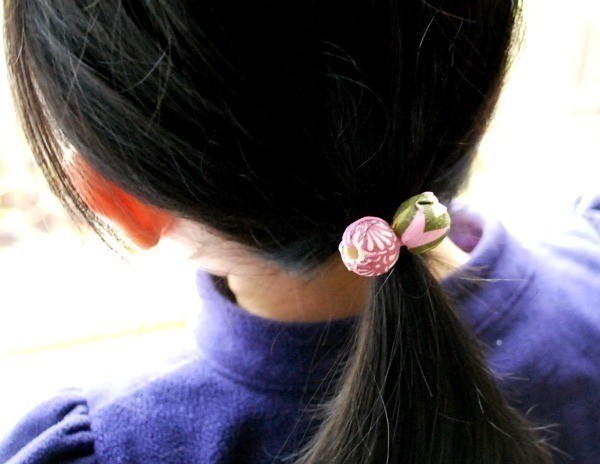
The forecast for St. Patrick’s Day this Thursday looks rather gloomy. Knowing my girls, they won’t take their jackets off at school, thus not revealing the green part of their St. Patrick’s Day Dresses, thus increasing their pinch vulnerability!
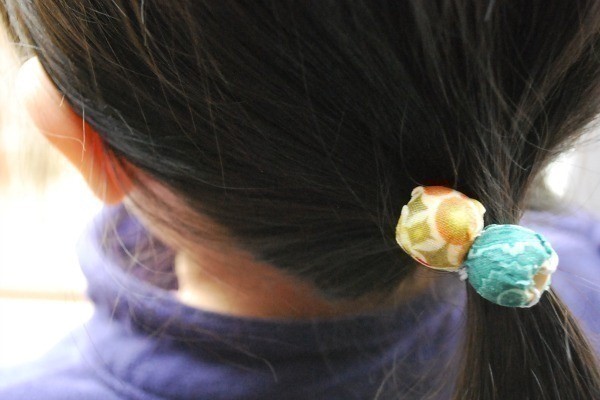
So I created green hair bobbles by decoupaging wood beads with green fabric scraps and hair elastics. I based this on my previous tutorial on how to make Decoupaged Kids Art Beads and Dress-Up Necklaces.
{Please note that around here, the technical term for any hair accessory with an elastic a “Hair Boingy”. Why? Because elastic goes “boing boing,” of course.}
How to Make Hair Bobbles, I mean Boingys, with Fabric Decoupaged Beads
-
 Rachel B. added Fabric Decoupaged Bead Hair Bobbles to DIY or Crochet Hair Accessories
12 May 02:12
Rachel B. added Fabric Decoupaged Bead Hair Bobbles to DIY or Crochet Hair Accessories
12 May 02:12
-
Rachel B. favorited Fabric Decoupaged Bead Hair Bobbles
12 May 02:12
-
 LaAlex added Fabric Decoupaged Bead Hair Bobbles to Hair Accessories
28 Feb 00:49
LaAlex added Fabric Decoupaged Bead Hair Bobbles to Hair Accessories
28 Feb 00:49
-
LaAlex favorited Fabric Decoupaged Bead Hair Bobbles
28 Feb 00:49
-
 Tiffany T. favorited Fabric Decoupaged Bead Hair Bobbles
10 Oct 05:53
Tiffany T. favorited Fabric Decoupaged Bead Hair Bobbles
10 Oct 05:53
-
 Nicky Frazier N. favorited Fabric Decoupaged Bead Hair Bobbles
22 Aug 20:44
Nicky Frazier N. favorited Fabric Decoupaged Bead Hair Bobbles
22 Aug 20:44
-
 sabra m. favorited Fabric Decoupaged Bead Hair Bobbles
20 Aug 12:43
sabra m. favorited Fabric Decoupaged Bead Hair Bobbles
20 Aug 12:43
-
 Ichigo M. favorited Fabric Decoupaged Bead Hair Bobbles
10 Aug 01:35
Ichigo M. favorited Fabric Decoupaged Bead Hair Bobbles
10 Aug 01:35
-
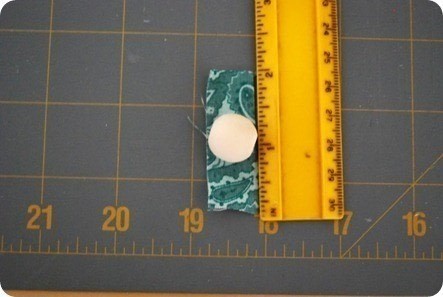
 Step 1
I cut the fabric scrap smaller than the measurements for paper. Fabric is a little bulkier, so if there’s any excess fabric it will stick up. So using the same sized beads as in my previous tutorial ,the dimensions for the fabric scrap are 2 inches long by 5/8 inches wide.
-
Step 2
I used Fabric Mod Podge to adhere the fabric to the wood beads. I had tried Matte Mod Podge first, but the fabric didn’t seem to stick as well.
-
Step 3
I tried cutting little slits along the edges as I did with paper, to help the edges lay down along the curvature of the bead. This didn’t work as well, again because of the bulk of the fabric. So I merely trimmed the fabric away with scissors if I couldn’t flatten it down.
-
 Step 4
I put a thicker coat of Fabric Mod Podge on the fabric scrap to adhere to the bead. After drying for two hours, I applied a much thinner coat on top to seal. I used a thinner coat because it gave the fabric a shiny look if I used too much, and I wanted to preserve the fabric look to it. I also tried using a thin layer Matte Mod Podge for the sealant, and that worked well too.
-
 Step 5
Then allow the seal to dry. I let it dry overnight as it was still quite sticky after a few hours.
-
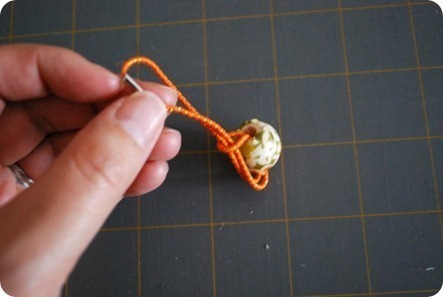
 Step 6
Now we’ll attach the beads to the hair elastics. This is a good time to use old ones that have been stretched out. Actually, the longer it is the better! It will give you more length to work with. Thread both of the beads onto the hair elastic by forming a little loop and shoving it through the hole. With these wood beads (from Michaels) the hole is large so it should fit. If you need help, use the crimp on the elastic as a “needle” and push that through the hole.
-
 Step 7
Take one bead and put it through the loop on the opposite side.
-
 Step 8
Repeat with the other bead.
-
 Step 9
...
-
 Step 10
If your elastics are too short, you can knot two together. Not sure what kind of knot this is called, but you just pull them in opposite directions.
-
 Step 11
The extra length can also accommodate bigger beads.
-
 Step 12
And you’re done.
-
 Step 13
And it’s easy to untie them, so if you don’t have a lot of hair elastics, you can interchange the beads.
The hardest part of this tutorial is waiting for the glue to dry! And hearing the question “Where’s my new hair boingy?” over and over and over again.
I am assuming that the majority of you know how to put these on (wrap both elastic strands around the ponytail and insert one bead through the other loop). I’ve had short hair since 1983 so this was all by memory! I’ve had fun living vicariously through my girls’ long hair!


 1
Books & Journals »
Locking Box And Journal
1
Books & Journals »
Locking Box And Journal
 2
Babies & Kids »
A Toy Kitchen For A Child
2
Babies & Kids »
A Toy Kitchen For A Child
 3
Origami Flowers »
Origami Orchid
3
Origami Flowers »
Origami Orchid
 4
Office »
Pretty Sketchbooks
4
Office »
Pretty Sketchbooks
 5
Charms & Keyrings »
Shugo Chara Inspired Pop It
5
Charms & Keyrings »
Shugo Chara Inspired Pop It
