


About
Stuffed Animals: From Concept to Construction
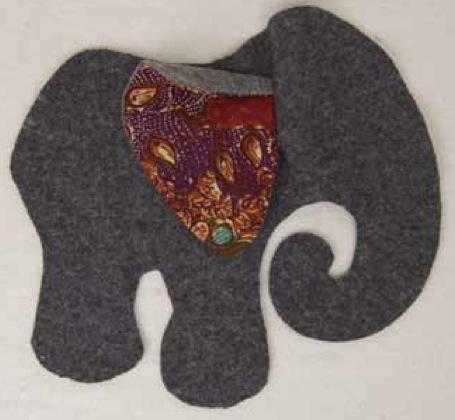
By creating this animal (which I made from a soft 100 percent wool sweater that I felted with hot water in the washing machine and then ran through the dryer), you are making a truly three-dimensional stuffed animal that stands on four feet. The key to the construction of this pattern is the underbody gusset, and once you get some practice with this crucial pattern piece, you can begin
to design any number of standing animals.
Tags
© 2024 Abigail Patner Glassenberg / Lark Crafts · Reproduced with permission.
-
 alp.zoey added Elephant to Sewing plushies
07 Aug 18:37
alp.zoey added Elephant to Sewing plushies
07 Aug 18:37
-
 Annie G. favorited Elephant
13 Aug 10:03
Annie G. favorited Elephant
13 Aug 10:03
-
 Sarah Sylvia S. favorited Elephant
20 Jul 16:24
Sarah Sylvia S. favorited Elephant
20 Jul 16:24
-
 Rebecca M. favorited Elephant
20 Jun 15:42
Rebecca M. favorited Elephant
20 Jun 15:42
-
 Kristy B. favorited Elephant
24 Mar 10:28
Kristy B. favorited Elephant
24 Mar 10:28
-
Alexander P. commented on Elephant
26 Dec 04:44
-
milly n. favorited Elephant
16 Oct 00:37
-
 ann w. favorited Elephant
07 Sep 21:34
ann w. favorited Elephant
07 Sep 21:34
-
Caitlin O. favorited Elephant
20 Aug 03:24
-
 Haley H. favorited Elephant
27 May 02:22
Haley H. favorited Elephant
27 May 02:22
You Will Need
-
Step 1
Trace the pattern pieces onto freezer paper with a pencil. Cut them out, transferring all of the markings.
-
Step 2
Adding a 1/4-inch (6 mm) seam allowance and remembering to reverse one of each piece, cut two Side Body pieces, two Underbody pieces, two Ear pieces, one Mouth piece, and one Tail piece from the felted wool sweater. For me, the easiest way to do this is to press the freezer paper pattern piece to the fabric, then cut out 1/4 inch (6 mm) away from the edges of the pattern piece. Transfer all the markings to the felted fabric.
-
Step 3
Adding a 1/4-inch (6 mm) seam allowance and remembering to reverse half of the pieces, cut two Ears from the patterned quilting cotton, four Tusks from the white quilting cotton, and one Mouth piece from the white quilting cotton. Without adding any seam allowance, cut two Eyelids and 12 Toes from gray felt. Cut two Whites of the Eyes from white felt, two Eyeballs from light brown felt, and two Pupils from black felt, all without additional seam allowances.
-
Step 4
Use a craft knife or a small pair of sharp scissors to cut the slit in each Side Body where indicated.
-
 Step 5
Place a quilting cotton ear piece and a felted wool sweater ear piece right sides together and stitch around, leaving an opening for turning and stuffing as marked. Repeat for the second ear. Clip the curves and turn the ears right side out and press. Fold the wool side of the ear over the cotton side along the fold line as marked and baste. Repeat for the second ear.
-
 Step 6
On the right side of one side body, slide the raw edges of one ear through the slit so that the cotton side of the ear is face up and the wool side is against the wool body. Fold the body over the ear along the slit and pin the ear in place. Sew across the slit about 1/8 inch
(3 mm) from the edge, closing it up entirely and trap- ping the raw edges of the ear in the seam. Repeat for the other ear and side body (figure 2 shows how the slit looks from the wrong side of the fabric once it is closed... -
 Step 7
and figure 3 shows how it looks from the right side).
-
 Step 8
Fold the tail along the marked fold line and press. Lay the tail against the right side of one side body with the pointed end aligned with the edge of the side body. Baste in place (figure 4).
-
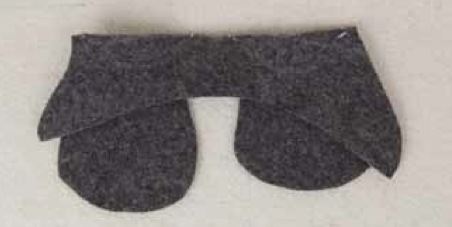
 Step 9
Fold the top of one underbody down toward the legs on the fold lines, right sides of the fabric together, as marked, and pin in place. Sew along the dotted dart line on each side (figure 5). Repeat for the other under- body piece.
-
 Step 10
Sew the underbodies together across the top, from point A to point B, leaving an opening as marked for turning and stuffing (figure 6).
-
 Step 11
Pin one underbody to one side body, right sides together, beginning at point A and extending downward along each leg and foot and back up to point B. Stitch. Repeat for the other underbody and side body (figure 7).
-
Step 12
Stitch the cotton mouth piece to the wool mouth piece, right sides together, along the curved edge from point C to point D, leaving the straight edge open. Clip the curves and turn the mouth right side out. Turn the raw edges under 1/8 inch (3 mm) and press. Stitch the mouth to the body as marked using a ladder stitch.
-
Step 13
Place two tusk pieces right sides together and stitch the tusk along the curved edge from point E to point F, leaving the straight edge open. Clip the curves and turn the tusks right side out. Turn the raw edges under and press. Stuff the tusk firmly. Place each tusk against the elephant’s body as marked and use a few pins to hold the tusks in place. Stitch the tusks to the body using small ladder stitches.


Comments


 1
Home Accessories »
Diy Jewelry Box
1
Home Accessories »
Diy Jewelry Box
