About
brand new snazzy coasters in a few simple steps
Sometimes a room just needs a splash or two of custom decor to liven it up. Even if you can't paint the walls or spring for expensive, elaborate curtains, you can make these personalized coasters cheaply and easily.
-
 witterings favorited Easy Peasy Redecorated Coasters
13 May 11:17
witterings favorited Easy Peasy Redecorated Coasters
13 May 11:17
-
 Rebecca M. favorited Easy Peasy Redecorated Coasters
18 Jun 00:40
Rebecca M. favorited Easy Peasy Redecorated Coasters
18 Jun 00:40
-
Lisa B. favorited Easy Peasy Redecorated Coasters
20 Jun 06:22
-
 Emma H. favorited Easy Peasy Redecorated Coasters
09 Mar 21:05
Emma H. favorited Easy Peasy Redecorated Coasters
09 Mar 21:05
-
 maja.suspiria favorited Easy Peasy Redecorated Coasters
10 Sep 16:19
maja.suspiria favorited Easy Peasy Redecorated Coasters
10 Sep 16:19
-
 Penny F. added Easy Peasy Redecorated Coasters to decorating ideas
13 May 19:21
Penny F. added Easy Peasy Redecorated Coasters to decorating ideas
13 May 19:21
-
 Hannah A. added Easy Peasy Redecorated Coasters to Apartment
23 Apr 15:57
Hannah A. added Easy Peasy Redecorated Coasters to Apartment
23 Apr 15:57
-
 Gypsie Moon favorited Easy Peasy Redecorated Coasters
09 Mar 23:09
Gypsie Moon favorited Easy Peasy Redecorated Coasters
09 Mar 23:09
-
 Syb' favorited Easy Peasy Redecorated Coasters
23 Feb 20:32
Syb' favorited Easy Peasy Redecorated Coasters
23 Feb 20:32
-
Jenny C. favorited Easy Peasy Redecorated Coasters
20 Feb 00:49
You Will Need
-
 Step 1
tart by peeling the original decal or graphic off of the coasters. In the case of the coasters I got from Michael’s, this was easy - I just got my fingernails under the first layer of cardboard, then pulled.
You could also skip this step entirely, in that case, and go straight to step #2, simply adding an extra coat or two of paint to completely hide the original graphic.
-
 Step 2
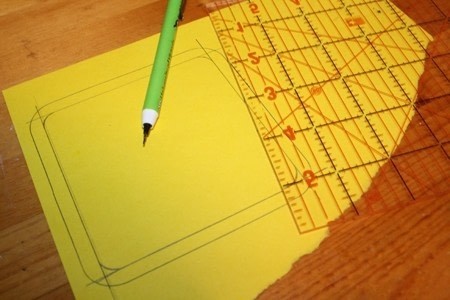
Trace the outline of one of the coasters onto your piece of card stock.
-
 Step 3
Paint the coasters whatever colour you wish.
I used white, and since my coasters already had white bottoms, I only needed to paint the tops and sides. You also don't need to paint the middle of the coasters, just the edges - the middles of the coasters won't be showing once you repaper them.
Let the paint dry and apply a second coat. Add a third coat if needed.
-
 Step 4
While the paint is drying, use that tracing of a coaster from step 2 to make a template for the paper you’ll be redecorating your coasters with.
You can make the paper decals the exact same size as the coaster, or make them smaller as I did, so you have a painted border around the edges. You can make the decals the same shape as the coaster, or make them different – cut a paper star out to place in the center of each coaster, or make paper stripes across them.
-
 Step 5
Trace the template onto your nice paper, once for each coaster. Cut these shapes out.
-
 Step 6
Once the paint on the coasters is dry, glue on the decals.
It depends on what kind of paper you’re applying, but I don’t recommend a gluestick for this, as it probably won’t be strong enough. I used white Elmers’ glue, and ran my thumbnail along the edges of each decal to make sure the glue went all the way to the edges and held them down.
-
 Step 7
Let it all dry, then apply a thin coat of varnish. Not too thick, or the paper will get too wet and will bubble up and you won’t have a nice smooth flat surface.
Once the first coat is dry, apply a second coat of varnish. Be sure to varnish the edges and the bottoms of the coasters as well, for greater durability.
-
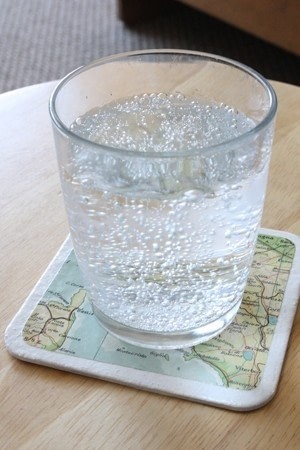
 Step 8
Serve delicious drinks comfortably in the living room, and enjoy this colourful new touch to your home!