About
Easy Hair Bow Tutorial
Countless hair bow makings have been given. Catering for your demands of easy hair bow tutorial, we specially designed this simple yet beautiful ribbon hair bows for you. You will find it much more particular than previous ribbon bows. See how to make a hair bow and enjoy its particularity.
This time the typical highlight of hair bow is the carefully selected ribbon pattern. Anchor printed grosgrain ribbons make the bow unique. The superb option matches your representative sailor suit well. Following we would like to share easy hair bow tutorial step by step. Take a few minutes with us and make a hair bow together.
Tags
-
 Rebecca M. favorited Easy Hair Bow Tutorial
20 Jun 01:41
Rebecca M. favorited Easy Hair Bow Tutorial
20 Jun 01:41
-
Barjaa B. added Easy Hair Bow Tutorial to DIYS
27 Jun 19:06
-
 tyler t. favorited Easy Hair Bow Tutorial
15 Mar 12:30
tyler t. favorited Easy Hair Bow Tutorial
15 Mar 12:30
-
 kittybadass5 c. favorited Easy Hair Bow Tutorial
02 Mar 11:01
kittybadass5 c. favorited Easy Hair Bow Tutorial
02 Mar 11:01
-
 Indigo Aana added Easy Hair Bow Tutorial to Projects To Try Out
15 Jun 10:30
Indigo Aana added Easy Hair Bow Tutorial to Projects To Try Out
15 Jun 10:30
-
 Jessica S. added Easy Hair Bow Tutorial to DIY Hair/Headband
31 May 09:06
Jessica S. added Easy Hair Bow Tutorial to DIY Hair/Headband
31 May 09:06
-
 marilyn.steckly favorited Easy Hair Bow Tutorial
24 Apr 03:48
marilyn.steckly favorited Easy Hair Bow Tutorial
24 Apr 03:48
-
 Linkin Logs added Easy Hair Bow Tutorial to J-fashion
14 Jan 08:47
Linkin Logs added Easy Hair Bow Tutorial to J-fashion
14 Jan 08:47
-
Polina B. favorited Easy Hair Bow Tutorial
05 Jan 16:01
-
 Chemical Kid favorited Easy Hair Bow Tutorial
19 Dec 18:17
Chemical Kid favorited Easy Hair Bow Tutorial
19 Dec 18:17
You Will Need
-
 Step 1
Fold the ribbons
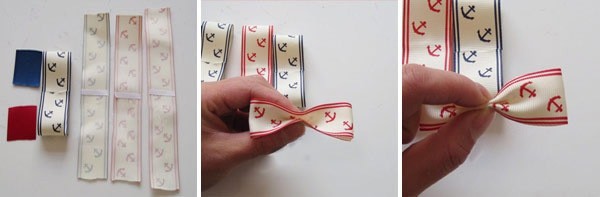
Prepare and cut out ribbons strips as the picture 1 shows: two 17cm anchor printed strips in red and blue, two 15cm anchor printed strips in red and blue and two 5cm plain red and blue strips; stick the double-sided tape in the middle of each anchor printed strip. Fold each end to the middle and stick. Make a fluted pattern in the middle as the following picture does. Press the two sides down. -
 Step 2
Make layers of ribbons
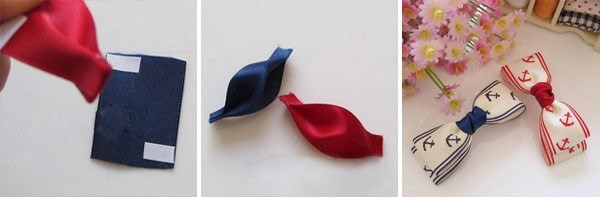
Bind the shape in the middle with several strands of sewing threads. Make the other shape; overlap two pieces in the same color; bind the two together. Stick the double-sided tape on the corners of the plain colored ribbons as below. -
 Step 3
Stick two glued ends to the following shape. Stick the two shapes to the middle of each same colored ribbon layer. Then two colored anchor printed ribbon bows are done.