


About
Step by step tutorial on how to draw a back-veiw for a lady!
I've been procrastinating doing a how-to on drawing a back-veiw so I'm finally doing it.
If you're doing a fashion drawing, usually there's some detail on the back of the outfit you want to include! Here's how.
Just a warning: Some basic information will be repeated from my other tutorial, so bear with me.
-
 Amanda P. added Draw A Back Veiw to Drawing Tutorials
17 Jun 22:03
Amanda P. added Draw A Back Veiw to Drawing Tutorials
17 Jun 22:03
-
Robyn A. favorited Draw A Back Veiw
23 Oct 12:30
-
Alex2:a L. favorited Draw A Back Veiw
22 Aug 20:15
-
 Conner W. added Draw A Back Veiw to helping stuff
16 Jul 15:52
Conner W. added Draw A Back Veiw to helping stuff
16 Jul 15:52
-
Conner W. added Draw A Back Veiw to gadgets stuff
16 Jul 15:52
-
 Dark Rose favorited Draw A Back Veiw
26 Jun 19:34
Dark Rose favorited Draw A Back Veiw
26 Jun 19:34
-
Dark Rose commented on Draw A Back Veiw
26 Jun 19:34
-
 LilacBlossoms favorited Draw A Back Veiw
09 Mar 14:41
LilacBlossoms favorited Draw A Back Veiw
09 Mar 14:41
-
 christie.sanderstruesdell favorited Draw A Back Veiw
19 Aug 22:41
christie.sanderstruesdell favorited Draw A Back Veiw
19 Aug 22:41
You Will Need
-
 Step 1
Let's start with some guidelines. Our drawing is going to be eight heads high, that means that you need to make eight equally spaced sections.
-
 Step 2
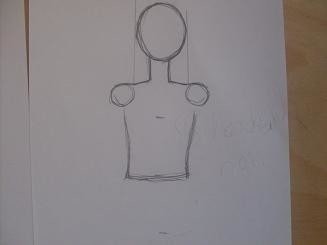
Okay, the head takes up the whole first section. Draw it slightly longer than it is wide, like an oval. Draw two lines that curve outward at the end, extending halfway through the next section.
-
 Step 3
Draw some small circles for shoulders. The top of the circle should align with the bottom of the neck, and the inner sides of the circles should align with the sides of the head. I drew some guidelines to help align the circles, but you dont have to if you don't want to. Connect the circles to the neck lines.
-
 Step 4
Now we get into the difference between the front and the back. Start the lines for the back roughly in the center of the shoulder circles. Extend the lines of the back down to the end of the third section. Curve them gently, starting by curving them slightly outward and then curving them inward. The width of the back depends on the build of the kind of girl you want to draw.
-
 Step 5
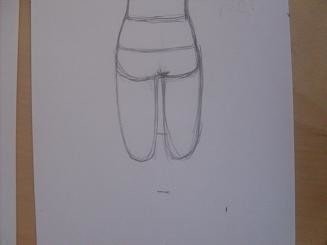
Allright, starting at the lines of the back, make two lines that curve outward. Again, how wide your stomache is is up to you (I wish that was true in real life ah ha ha)
Anywho, the lines should extend to half of the next section. You dont have to draw a horizontal line connecting the two lines like I did, but it may help you to get the two sides even.
Continue the two lines down to 3/4 of the section you're in and then start curving inward like so. -
 Step 6
Ok, lets start the legs. Draw two long oval shapes for the thighs that extend one and a half sections. Connect the sides of the legs to the lines formign the sides of the torso. Leave a little gap between the legs.
-
 Step 7
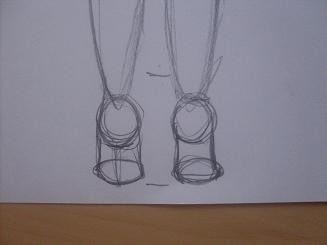
Draw some more ovals for the (calves?). The leg on the right in my drawing is kind of weirdly connected, but you'll want to connect them in a smooth inward curve.
The peaks of the curves of the lower leg ovals should come be somewhere around the third marking from the bottom. The legs should extend a bit into the last section.
(The circles i drew in the knee area are unneccessary. They're just weird guidelines I use sometimes for no apparent reason) -
 Step 8
Okay so, the feet will look differently depending on the shoe's you're drawing. If you're drawing high heels, like I am, draw circles for the heel of the foot. Draw two flat ovals underneith (their bottoms should reach the end of the last section)for the (ball?) of the foot. Connect the two shapes with lines. Connect the legs with the feet with lines as well. Remember: in back view shoes will look a little weird.
If you're doing some sort of flat shoe, you dont have to draw the (ball?) of the foot because its hidden by the heel. -
 Step 9
Awrighty, done with the legs and on to the arms!
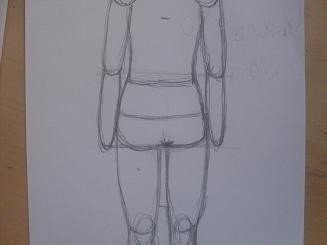
You want to make your arms extend from the shoulder circles and go to a bit above the end of the third section -
 Step 10
If you want, you can cheat a little bit and have the arms folded in front of her, so that the forearms and hands are blocked.
If not, make the forearms extend to the end of the next section. They should curve softly outward on the insides. -
 Step 11
Ok here's the hard part: hands
Draw a circle at the end of the arms. Draw a small oval shape on the inside halves of each circle for the meat of the thumb. Add some long, slightly pointed ovals for the fingers. Since its a fashion drawing, your fingers dont have to be perfect. -
 Step 12
Done! Add some hair and an outfit. Go over the lines you want to keep with ink and then erase the sketch. Have fun!!
Hope you enjoyed and comment with any concerns/questions


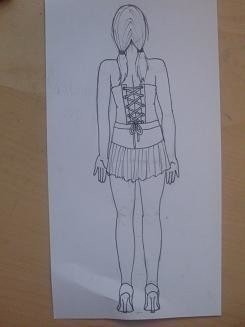

=] thanks