About
The ensuing tutorial will show you a functional and amusing jewelry making technique that allows you to make all sorts of handmade items easily. Today’s techniques are about how to make a DIY hair accessory by tying a knot.
When learning how to make DIY hair accessories, it is important that the items you make meet all your requirements for a jewelry ornament, such as functional, fashionable, decorative, etc. Handmade hair accessories can help hold your hair out of your face all the while adding a pop of color to your outfit. We introduce here a distinctive way of making such an accessory out of common jewelry making techniques. For instance, in this tutorial, we use a versatile knot tying technique.
-
 Katt C. favorited Diy Hair Accessories By Tying A Knot
23 Aug 21:22
Katt C. favorited Diy Hair Accessories By Tying A Knot
23 Aug 21:22
-
 Jessica S. added Diy Hair Accessories By Tying A Knot to Craft Ideas
31 May 09:10
Jessica S. added Diy Hair Accessories By Tying A Knot to Craft Ideas
31 May 09:10
-
Jessica S. added Diy Hair Accessories By Tying A Knot to Jewelry - Upcycle
31 May 09:10
-
Jessica S. added Diy Hair Accessories By Tying A Knot to DIY Hair/Headband
31 May 09:10
-
Jessica S. added Diy Hair Accessories By Tying A Knot to Top Favorites- Try first
31 May 09:09
-
Jessica S. favorited Diy Hair Accessories By Tying A Knot
31 May 09:09
-
 darawalee.manoon favorited Diy Hair Accessories By Tying A Knot
22 Dec 05:46
darawalee.manoon favorited Diy Hair Accessories By Tying A Knot
22 Dec 05:46
-
 TheeCookieMonsterr favorited Diy Hair Accessories By Tying A Knot
20 Oct 01:17
TheeCookieMonsterr favorited Diy Hair Accessories By Tying A Knot
20 Oct 01:17
-
 Chloe L. favorited Diy Hair Accessories By Tying A Knot
22 Sep 01:50
Chloe L. favorited Diy Hair Accessories By Tying A Knot
22 Sep 01:50
-
 Penny F. added Diy Hair Accessories By Tying A Knot to Accessories
16 Sep 14:13
Penny F. added Diy Hair Accessories By Tying A Knot to Accessories
16 Sep 14:13
-
 Step 1
Step 1: Preparation of rope ends
1. Cut a small piece of wire and fold in half;
2. Take the rope end cap and insert the wire through the hole. Leave a loop on the outside. Twist the two ends of the wire and fix them firmly inside the rope cap;
3. Repeat the above 2 procedures with the three other rope caps. Set aside.
-
 Step 2
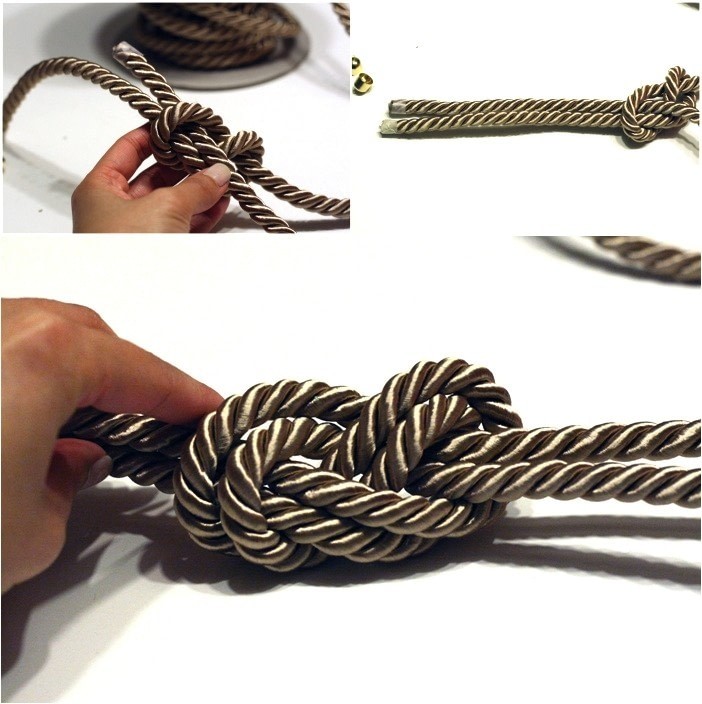
Step 2: Create the knot pattern
1. Take the rope, tape the two ends of rope;
2. Start to tie your knot leaving 8-10 inches on one end, in a figure “8” shape;
3. Once the knot is finished, measure another 8-10 inches and tape the location, next cut the rope;
-
 Step 3
4. Pick up the rest of the rope and repeat the figure “8” knot again;
5. Insert the second rope into the knot. Follow the first cord through the knot with the second cord that you just inserted. Make sure that both the beginnings and the ends of the ropes are equal.
-
 Step 4
Step 3: Add on the end caps
Heat up a glue gun and squeeze glue into the end cap, next insert the rope ends in the caps. Press them in firmly to make sure that they are well attached.
Repeat this step for the 3 other rope ends.
-
 Step 5
Step 4: Add on the adjustable elastic band
1. Attach one jumpring to every end cap;
2. Add on the elastic band as below.
-
 Step 6
And here you have it!