


About
Evil Never Smelled So Good
I designed these for sale on my alternative fashion website, Gaia Noir, but thought the good crafty people of Cut Out + Keep would also like a tutorial!
These are a gothy twist on traditional Victorian lavender bags, and are useful for hanging in your wardrobe, putting in your clothes drawers etc to create a lovely old-fashioned scent (without resembling the lacy floral nightmares your Grannie used to use..!). You can also use different scents if you know your herbs and spices - cloves, cinnamon oil + broken cinnamon sticks is a good Christmassy variation.
Tags
-
 liza.minelli.564 favorited Cute Skull Lavender Sachets
05 Feb 03:27
liza.minelli.564 favorited Cute Skull Lavender Sachets
05 Feb 03:27
-
 Kaitlynn L. favorited Cute Skull Lavender Sachets
01 Sep 14:55
Kaitlynn L. favorited Cute Skull Lavender Sachets
01 Sep 14:55
-
 Emma H. favorited Cute Skull Lavender Sachets
31 Oct 23:08
Emma H. favorited Cute Skull Lavender Sachets
31 Oct 23:08
-
 pandanomz favorited Cute Skull Lavender Sachets
08 Sep 18:51
pandanomz favorited Cute Skull Lavender Sachets
08 Sep 18:51
-
 ADRIRI favorited Cute Skull Lavender Sachets
17 Aug 02:21
ADRIRI favorited Cute Skull Lavender Sachets
17 Aug 02:21
-
 Nancy! added Cute Skull Lavender Sachets to horreur/halloween
21 Mar 23:02
Nancy! added Cute Skull Lavender Sachets to horreur/halloween
21 Mar 23:02
-
 Mai added Cute Skull Lavender Sachets to House Stuffs
21 Jan 01:15
Mai added Cute Skull Lavender Sachets to House Stuffs
21 Jan 01:15
-
Mai added Cute Skull Lavender Sachets to House Stuffs
21 Jan 01:15
-
 cristinakilljoyway favorited Cute Skull Lavender Sachets
03 Jan 23:36
cristinakilljoyway favorited Cute Skull Lavender Sachets
03 Jan 23:36
-
 Mari F. favorited Cute Skull Lavender Sachets
21 Nov 22:57
Mari F. favorited Cute Skull Lavender Sachets
21 Nov 22:57
You Will Need
-
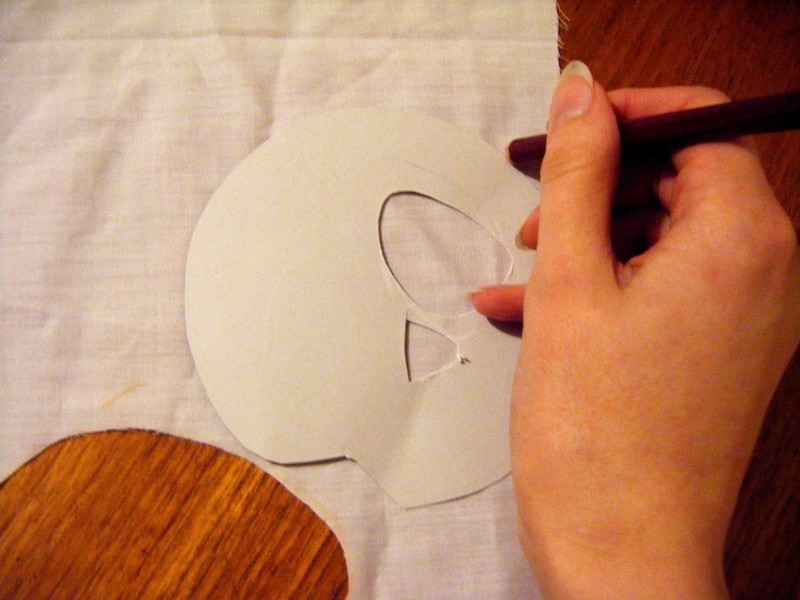
 Step 1
If you want a matching set of these, want to keep the back and front really even or don't want pencil mark mistakes on your cotton, making a cardboard template helps. When making the template you could just cut out one eyesocket shape and flip the template over to do the second one.
So either draw two identical skull shapes directly onto the cotton, or make a template and draw round it.
-
 Step 2
Now use the cut-out eyesocket to draw an eye socket shape onto the black felt with chalk. Flip it over to make a nice even mirror image for the second eye socket.
Also draw a small triangle of black felt for the nose.
-
 Step 3
Cut out! (and quickly iron if you want it looking really professional)
Now you have a back and front of a the cotton skull pouch, two felt eyes and one felt nose.
-
 Step 4
Stitch the 'facial features' (erm...if that's the right word? :D ) onto the front piece with black thread, keeping the stitches small and invisible.
Put the two right sides facing each other and stitch them together around the edge, starting at a bottom corner of the jaw. When you come to the centre top, add an loop of ribbon (optional; if you'd like a pouch you can hang over a clotheshanger etc) and carry on to the other bottom corner of the jaw.
DO NOT FORGET TO LEAVE THE BOTTOM OF THE JAW OPEN (or you'll have no way of getting the lavender in!). Flip inside-out so the sewn-up seam is on the inside and the eyes are now looking at you (creepy, huh? :) ).
-
 Step 5
Now for the lavender filling (this step isn't vital but putting the lavender in a separate bag makes it easier to change if it gets old, and prevents the oils from staining the outer skull pouch layer).
Draw two circles slightly smaller than the skull pouch, onto the muslin (again, you can use a template for uniformity). Cut out and stitch together round the edges, leave a small gap, turn inside-out and pour the lavender into it.
-
 Step 6
Then sew up the remaining gap! Now you have a sealed circular muslin pouch of lavender.
Put it inside the cotton skull pouch.
-
 Step 7
Fold the flat bottom of the jaw in on itself so there's no rough edges, pin in place and sew up the gap (that's the best part to finish with because the flat shape is easier to sew than the curved top).
(Optional) Hand-stitch a tiny ribbon hair bow onto the skull's top, at an angle. No real reason except that it's dead cute :)
And now you have your own creepy little lavender skulls!


 1
Books & Journals »
Locking Box And Journal
1
Books & Journals »
Locking Box And Journal
 2
Babies & Kids »
A Toy Kitchen For A Child
2
Babies & Kids »
A Toy Kitchen For A Child
 3
Origami Flowers »
Origami Orchid
3
Origami Flowers »
Origami Orchid
 4
Office »
Pretty Sketchbooks
4
Office »
Pretty Sketchbooks
 5
Charms & Keyrings »
Shugo Chara Inspired Pop It
5
Charms & Keyrings »
Shugo Chara Inspired Pop It


thank you for the great tute and the sharing of this great cool project;-D