


About
Cut out the summer heat!
Follow my blog for new upcoming tutorials!
http://fairytaleriot.blogspot.com
Made this shirt out of a thrift-ed blouse I got for only $2, I felt inspired by a lot of hipster photographs! Feel free to comment on my blogspot if you have any questions, I'm aware that I'm not the best at written instructions.
Tags
-
 Alma added Cut Out Shoulder Blouse to Recycling T-shirts
10 Jul 09:31
Alma added Cut Out Shoulder Blouse to Recycling T-shirts
10 Jul 09:31
-
 autumnrose.lee favorited Cut Out Shoulder Blouse
31 Oct 11:13
autumnrose.lee favorited Cut Out Shoulder Blouse
31 Oct 11:13
-
 spychohead added Cut Out Shoulder Blouse to refashion
11 Oct 02:03
spychohead added Cut Out Shoulder Blouse to refashion
11 Oct 02:03
-
Aaliyah D. added Cut Out Shoulder Blouse to Favorite
23 May 01:11
-
Aaliyah D. favorited Cut Out Shoulder Blouse
23 May 01:11
-
 Zeynep A. favorited Cut Out Shoulder Blouse
17 Apr 18:06
Zeynep A. favorited Cut Out Shoulder Blouse
17 Apr 18:06
-
Calah L. added Cut Out Shoulder Blouse to CLOTHES
06 Jan 20:56
-
Calah L. favorited Cut Out Shoulder Blouse
04 Jan 01:02
-
 Shelly S. added Cut Out Shoulder Blouse to refashion
05 Aug 03:32
Shelly S. added Cut Out Shoulder Blouse to refashion
05 Aug 03:32
-
Shelly S. favorited Cut Out Shoulder Blouse
05 Aug 03:32
-
 Step 1
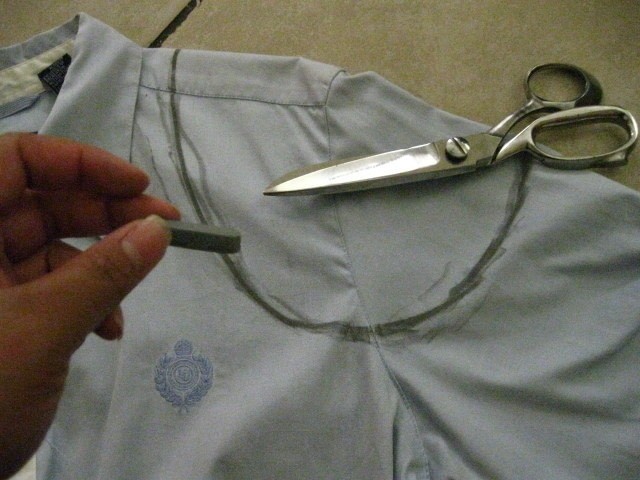
1)Put on your shirt and mark where you want the cut-out to be using the chalk.
-It doesn't have to be perfect, just a rough guideline on where you want it to fall. -
 Step 2
2) Take the blouse off, and redefine the line, making it a clear cut.
-
 Step 3
3) Cut out the shape leaving about 1/2 inch of a seam allowance.
-
 Step 4
4) Now taking the shape you just cut-out, flip it over, and lay it over the opposite shoulder. You can also fold the shirt in half, to ensure an accurate match up.
TIP: The front side of the shape should be touching the front side of the shirt, so that the back is facing up.
-
 Step 5
Note: No need to leave seam allowance on this shoulder.
5) Trace the shape, and cut it out.
-
 Step 6
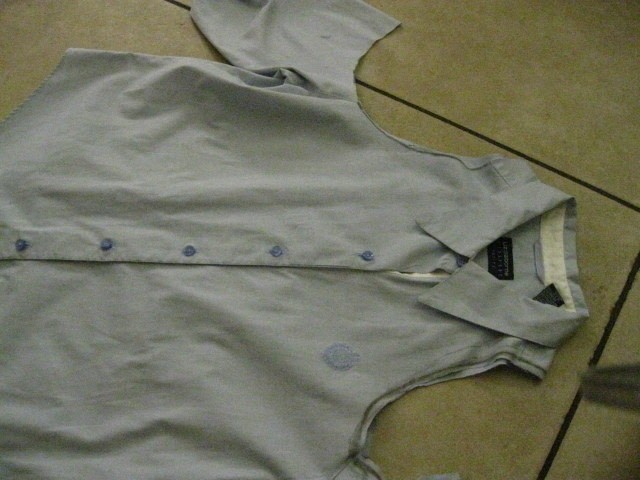
6) So now you should have something that looks like this. Try it on to make sure that the cut-outs are what you wanted.
-
 Step 7
7) Alright, here's where it gets tricky...which is why I've given you two options (Bias tape or hemming).
BIAS METHOD
1a)Using bias tape (or in my case a 2 inch wide fabric, folded in half) pin around both holes. (If you already know a bias tape method go ahead and use it, and skip my horrible explanation)2a)What I did was fold a 2 inch wide piece of fabric in half, then pinned the side with raw edges to the edge of the blouse. The blouse should be inside out when doing this step.
3a)Next sew along the edge of the hole.
4a)Turn the shirt right-side out and pull the bias tape to the front of the shirt (this should fold over the raw edges of both the bias tape and hole).
5a)Press the edge with an iron, if you want, then sew the tape down. Repeat with other cut-out.
OR
HEMMING METHOD
2a) You can simply fold in the 1/2 inch seam allowance, pin, then sew. :)
-
 Step 8


Comments

