


About
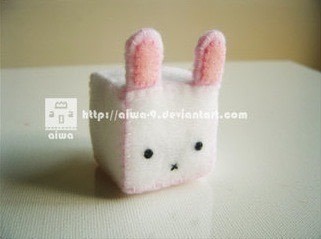
CUBED bunny plush tutorial
The CUBED Bunny Plush TUTORIAL is finally done XD
This is the bunny from my 2nd CUBED series [link]
You can also try making other cubed plush using this tutorial.
Enjoy~
If you still have questions, you can ask here~
EDIT: oops~ for step 4, i forgot to mention that you need to sew the other 2 pieces of white semi-ovals to the back of the ears XD
Tags
-
 Barbara M. favorited Cubed Bunny Plush
09 Apr 23:07
Barbara M. favorited Cubed Bunny Plush
09 Apr 23:07
-
Tamlyn H. favorited Cubed Bunny Plush
26 Jan 10:55
-
Tamlyn H. added Cubed Bunny Plush to Plushies
26 Jan 10:54
-
 mar *ૢ✧ ཻུ۪۪⸙͎ ೫ favorited Cubed Bunny Plush
21 Sep 04:38
mar *ૢ✧ ཻུ۪۪⸙͎ ೫ favorited Cubed Bunny Plush
21 Sep 04:38
-
 Crystal added Cubed Bunny Plush to Fabric & Sewing Crafts
18 May 16:47
Crystal added Cubed Bunny Plush to Fabric & Sewing Crafts
18 May 16:47
-
Alex Z. added Cubed Bunny Plush to Интересное
12 May 15:48
-
Therese W. added Cubed Bunny Plush to Cubes
05 Jun 20:45
-
Angela A. favorited Cubed Bunny Plush
11 Jan 21:32
-
 Kaitoleen favorited Cubed Bunny Plush
08 Dec 20:26
Kaitoleen favorited Cubed Bunny Plush
08 Dec 20:26
-
Liza W. added Cubed Bunny Plush to new plushie
17 Jul 17:02
-
 Step 1
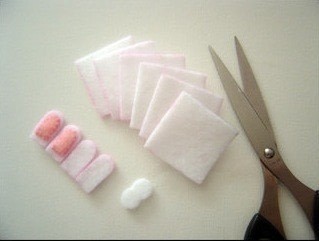
Trace the felt with the square pattern using a washable colored marker. (Choose colors that are complementary to the felt color, so it won't be as visible and distracting.)
-
 Step 2
Cut out all the traced pieces, including the ears and tail. Cut 4 white pieces of semi-ovals for the ears and 2 smaller pink pieces of semi ovals for the inner ears. Cut out 2 small white circles for the tail. Use a sharp scissors when cutting, so the edges and slides of the felt pieces will be more clean.
-
 Step 3
To make the ears, sew the smaller pink semi-oval onto the bigger white semi-oval. Then, do the same for the other ear.
-
 Step 4
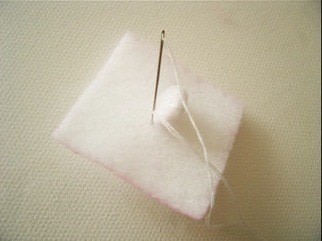
To make the tail, sew the two small white circles half way, add in a tiny bit of cotton stuffing, then sew up the other half on to a piece of white square felt by going in and cut over the square felt and tail (hold the tail piece tightly against the square piece as you sew).
-
 Step 5
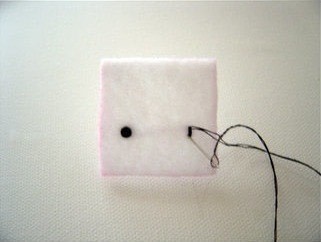
To sew on the eyes, first find a spot where you want the eyes to go on a square piece of felt. Then, sew a straight line vertically (this is your center point for the eye). Continue to sew vertical lines on the left side of the center point, as you sew farther away from the centre point, sew shorter lines, so you get a semi-circle. Now, sew on the right side of the center point, sewing shorter lines as you go farther from the center point. Then, do the same for the other eye (make sure it's parallel and even with the other eye on the square piece).
-
 Step 6
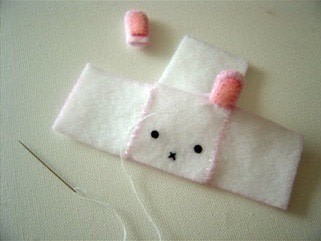
After sewing on the eyes, you can sew on the mouth by making an X or any other shape you want (but X is the easiest to do for beginners).
Then, sew another square piece of felt besides the face piece on the left or right.
-
 Step 7
Don't sew another piece on the top yet, because the ears need to be added for that part (which is coming up next!)
-
 Step 8
To sew on the ears, hold one piece of ear tightly between the face piece and another square piece at the top.
-
 Step 9
When sewing the ears on top, go in and out of the 3 pieces of felt with the ear piece in the middle. Make sure the ear piece is tightly sewn onto the other pieces. Then, do the same for the other ear.
-
 Step 10
Now, sew on other square pieces around the face piece until you get a + shape.
-
 Step 11
Then, start sewing the square pieces together along the sides, and leave either the top left or right side unsewn because the keychain holder will be added on one of those sides.
-
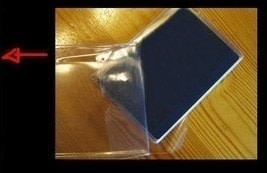
 Step 12
Cut out a small piece of flexible clear plastic around 3cm x 6 mm. Sew the sides of the twi pieces of square felt on the top right or left side of the "head" together HALF-WAY and STOP! Fold the plastic piece in half vertically and hold onto it tightly in the center between the two pieces of square felt and sew them together. Make sure you sew at least 2-3 stitches on the plastic piece so it will be securely attached to the plush (so the stitching on the plastic will be closer and more dense than your usual sewing around the entire plush).
-
 Step 13
You can find these plastic material on packaging of stuff you buy. Make sure the plastic material is thick enough so it won't break easily when you sew it onto the felt, yet it's flexible enough for you to sew through with a needle.
You don't have to use clear plastic for the keychain holder of course, as you can use other materials such as thick ribbons, synthetic PU leather. But, I find clear plastic less distracting to the plush itself, so it won't stand out as much.
-
 Step 14
Now, sew on the square piece with tail onto the rest of the CUBE. Sew on the other sides of the CUBE together EXCEPT for 3 sides of square...
-
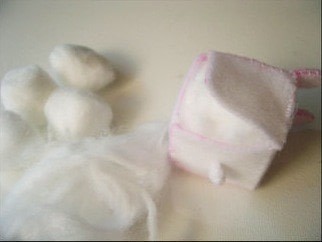
 Step 15
It's time to put in the stuffing! If you bought cotton stuffing, you can directly put them in. But if you are using cotton balls, first unroll them and pull them into thin and small strands before stuffing them into the plush (so that the stuffing will be even inside and won't make the plush look bumpy on the outside).
-
 Step 16
After you put in stuffing, continue to sew around the remaining 3 sides, adding more cotton stuffing as you need to.
-
 Step 17
Add in the keychain on the keychain holder and you're DONE!


Thanks for sharing this
Just a little imagination and u can do whatever u want