


About
Make It Your Own
A geode may not be the first thing that springs to mind when you see these cube bookends but, honestly, that’s where my design process started! I love the way geodes have a seemingly glowing, coloured interior encased in solid, neutral rock, and I wanted to make something to achieve the same effect. I’ve lost count of the number of colour combinations I tried until I found the right one: mushroom grey with the brightest pink.
There are lots of places you can get wood or MDF cut to size – just search online for somewhere close to you.
MAKE IT YOUR OWN
• You can pick up gorgeous, vintage wooden bookends (on eBay or in secondhand or
charity shops) which look great as they are, or you can spruce them up with a couple of coats of bright acrylic paint (like the red pair in the photo opposite).
• Once you’ve made the cubes, they are something of a blank canvas that you could decorate in any number of ways. You could mask and paint them with stripes, or coat the inside with glue and cover it in glitter
– the possibilities are endless.
-
 Sam C. favorited Cube Bookends
13 Jan 00:40
Sam C. favorited Cube Bookends
13 Jan 00:40
-
 Bek S. favorited Cube Bookends
03 Aug 02:14
Bek S. favorited Cube Bookends
03 Aug 02:14
-
 Katelyn T. favorited Cube Bookends
22 Aug 23:58
Katelyn T. favorited Cube Bookends
22 Aug 23:58
-
 Ginger D. favorited Cube Bookends
26 Jun 09:23
Ginger D. favorited Cube Bookends
26 Jun 09:23
-
Katie T. favorited Cube Bookends
01 May 20:13
-
 Dimitra D. added Cube Bookends to DIY the room
23 Apr 08:49
Dimitra D. added Cube Bookends to DIY the room
23 Apr 08:49
-
Katrina P. favorited Cube Bookends
15 Feb 20:38
-
 isis.nallely favorited Cube Bookends
31 Jan 03:51
isis.nallely favorited Cube Bookends
31 Jan 03:51
-
T€€ja¡ favorited Cube Bookends
27 Jan 04:46
-
Mariah E. favorited Cube Bookends
14 Nov 22:23
You Will Need
-
Step 1
Set out one of your 10 cm x 10 cm (4 inches x 4 inches) wooden blocks flat on a piece of newspaper.
-
 Step 2
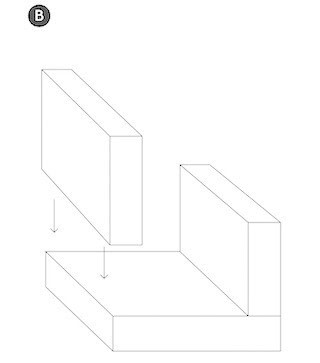
Now take one of your 6.4 cm x 10 cm (2. inch x 4 inch) blocks and apply wood glue along one of the long edges. Place the glue edge on one side of your square block and line it up exactly with the edges.
-
 Step 3
Do the same with another 6.4 cm x 10 cm (2. inch x 4 inch) block on the opposite side of the square block.
-
 Step 4
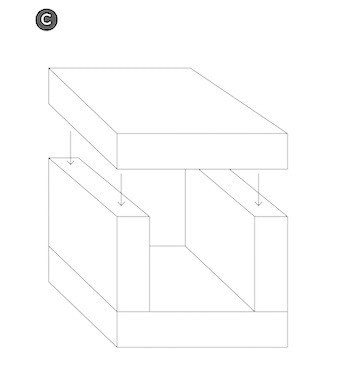
Next, apply glue to the top edges of your two glued-down blocks (being careful not to move them) and place a second 10 cm x 10 cm (4 inch x 4 inch) block on top. Press the top block down firmly (don’t worry if some glue spills out!).
-
Step 5
Check that all your edges line up neatly and make any adjustments while the glue is still wet. Clean off any excess glue gently with a tissue (on the inside and outside).
-
Step 6
Repeat this with your remaining four blocks for your second bookend and leave both cubes to dry (ideally overnight).
-
Step 7
Once the glue is completely dry, sand any rough edges or slight overlaps.
-
Step 8
With your grey acrylic, paint the sides and edges of your cubes. You can do this in stages, letting parts dry and then turning the cubes over (so they are never sat on a wet side!). Build up coats of paint in this way, until you have a smooth, opaque finish. Leave to dry completely.
-
Step 9
To paint the inside of the cube, first mask the outside edges on either side with masking tape. Using your second colour, paint the inside of each cube, again, building up several coats to create a strong, solid colour.
-
Step 10
Once the inside colour is dry, carefully remove the masking tape. To get a really neat edge between the two colours you may have to use a fine brush to go over any specks of paint that have found their way under the masking tape.
-
Step 11
Once all the paint is dry, your bookends are ready to use.

 1
Home Accessories »
Diy Jewelry Box
1
Home Accessories »
Diy Jewelry Box
