About
How to make a book clutch
I wanted to make one of my own, to upcycled an old book (or, perhaps I should say recycle, since an old book is already quite a lovely and useful thing). But, when I scoured the internet for a good tutorial, I couldn't find a method that pleased me. There were suggestions to place a zipper where the pages would be, or to fasten the whole thing with a big button and an elastic loop. These are all convenient ideas for a DIY version, but I wanted my finished product to look almost exactly like a book from the outside with no visible zipper or other closure. So, I created my own method.
There are quite a number of supplies, but nothing you can't find on one trip to Hobby Lobby and one to Half Price Books.
I hope you like the technique for making book clutches that I've shown here and that you find the tutorial helpful. When you make your own, please do send me a link.
-
 Kinhime Dragon added Book Clutch to alter
12 Jul 13:24
Kinhime Dragon added Book Clutch to alter
12 Jul 13:24
-
 Jacqulene C. favorited Book Clutch
22 Nov 14:23
Jacqulene C. favorited Book Clutch
22 Nov 14:23
-
 Laura added Book Clutch to Wardrobe + Accessories
22 Oct 07:30
Laura added Book Clutch to Wardrobe + Accessories
22 Oct 07:30
-
 laura_southpaw added Book Clutch to Wednesday Addams
06 Oct 20:42
laura_southpaw added Book Clutch to Wednesday Addams
06 Oct 20:42
-
 Cheryl added Book Clutch to Hermione look
16 Sep 21:54
Cheryl added Book Clutch to Hermione look
16 Sep 21:54
-
 Jordyn N. favorited Book Clutch
20 Jun 20:44
Jordyn N. favorited Book Clutch
20 Jun 20:44
-
 Drea B. favorited Book Clutch
25 Mar 09:45
Drea B. favorited Book Clutch
25 Mar 09:45
-
BookOwl2 favorited Book Clutch
07 Mar 01:11
-
 Nakia favorited Book Clutch
11 Jan 09:45
Nakia favorited Book Clutch
11 Jan 09:45
-
 Taylor B. favorited Book Clutch
25 Aug 19:12
Taylor B. favorited Book Clutch
25 Aug 19:12
You Will Need
-
 Step 1
Measure the length and width of the book's pages (not its cover). You will want to cut one strip of wood the length of a page and two strips of the the width of a page minus the thickness of the wood -- i.e., if a pages is 4 1/2 inches wide and the wood is 1/4 inch thick, the two strips should be 4 1/4 inches long. If this is confusing, have no fear; it will all make sense soon when you see the wood lined up.
-
 Step 2
Cut the wood to desired length. You may also need to cut it to the desired width if it is too wide. It should be about the thickness of all the pages stacked together, but it doesn't have to be exact.
-
 Step 3
Check that the wood is the right length by lining it up on top of the pages to form three sides of a box.
-
 Step 4
Laying down newspaper first, spray paint the strips of wood taking care to get the thin edges painted as well as the surface. Don't worry about the bottom side, as it will be hidden by fabric.
-
 Step 5
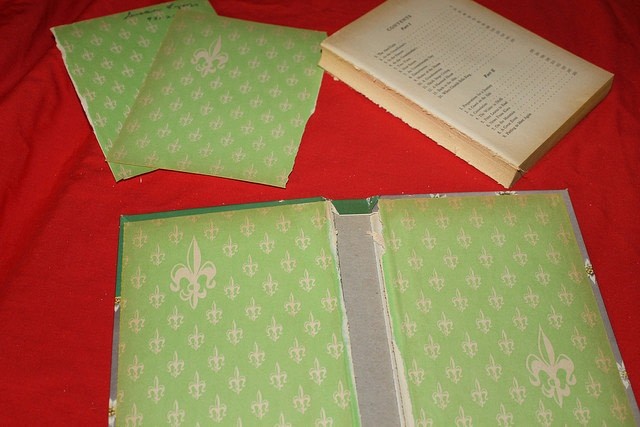
Using your craft knife, carefully cut the pages free from the cover.
-
 Step 6
You will be left with the cover (the only part we'll be using), some lining pages (if decorative, these could make cute stationary), and the majority of the book (which can be salvaged with a new cover made from a cereal box, brown paper, etc. if you wish). But those are projects for another day.
-
 Step 7
To make the pattern for the lining, trace around the open book cover on a pice of newspaper, leaving enough room for a seam allowance.
-
 Step 8
Set the cover upright on another piece of newspaper, as shown, opened as far as you'd like the clutch to open. Trace the shape it makes, leaving a half inch to an inch of space to the edge of the cover.
-
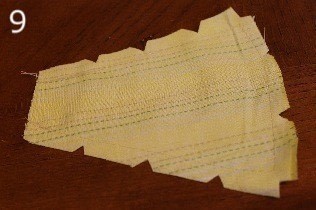
 Step 9
Using the triangular pattern, cut a quadruple layer of fabric. Cut a single layer of fabric with the rectangular pattern. Also, cut a strip of fabric the width of the gold-painted wood strips (plus a seam allowance) and the length of the three of them together.
-
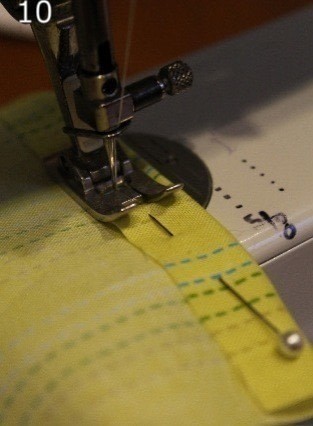
 Step 10
Sew two of the triangular pieces of fabric together (rights sides facing each other). Cut a few notches in the seam allowance, turn the piece right-side-out, and iron it smooth. Do the same with the remaining two triangular pieces.
-
 Step 11
Sew a hem around all four edges of the rectangular piece of fabric. You needn't bother turning the hem under twice, as the raw edges will be hidden by fabric glue later.
-
 Step 12
Sew the short edges of the triangular pieces to the long sides of the rectangular piece, centering them as shown.
-
 Step 13
Sew each long edge of the triangular pieces along the sides of the rectangular pice as shown.
-
 Step 14
Hem the long strip of fabric all the way around making sure that, once hemmed, it's exactly the width of the wood strips.
-
 Step 15
Using the wood glue, attach the wood strips to the back cover (and to each other at the corners) with the gold sides facing out. Let dry before proceeding to step 15.
-
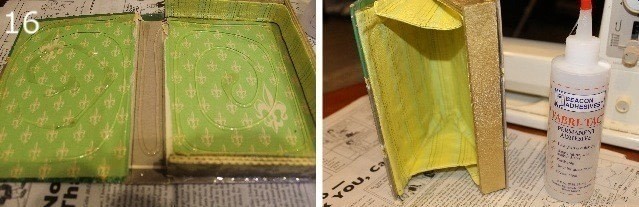
 Step 16
Using the fabric glue, attach the thin strip of fabric all the way around the inside of the frame made by the wood stripes.
-
 Step 17
Still using the fabric glue, attach the lining to the inside of the book cover as shown.
-
 Step 18
Using the wood glue, attach the remaining edges of the wood frame to the book cover as shown.
-
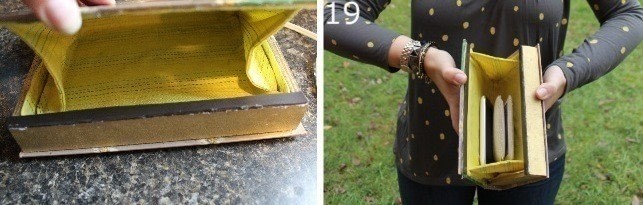
 Step 19
Cut the craft magnet to desired length (and width if needed) and glue a strip to each edge of the clutch as shown. I used hot glue here, but wood glue would work as well. My craft magnet strips came with a peel-away adhesive side, but it wasn't strong enough.
-
 Step 20
Enjoy your new book clutch!


Comments